
Are you looking to improve your vehicle’s stance, handling, or simply want a wider, more aggressive look? Installing wheel spacers could be the perfect upgrade for you.
But if you’ve never done it before, the process might seem a bit intimidating. Don’t worry—this step-by-step guide breaks everything down into simple, easy-to-follow instructions. By the end, you’ll have the confidence and know-how to install wheel spacers safely and correctly.
Ready to transform your ride? Let’s dive in!
Choosing The Right Wheel Spacers
Wheel spacers help improve your vehicle’s stance and fit larger wheels. Picking the right one is important for safety and performance.
Consider the type, material, thickness, and your vehicle’s compatibility before buying wheel spacers.
Types Of Wheel Spacers
There are several types of wheel spacers. Each type fits different needs and vehicles.
- Hub-Centric Spacers:These fit tightly around the hub for better balance.
- Lug-Centric Spacers:These rely on the lug nuts to hold the wheel in place.
- Extended Stud Spacers:These add extra length to the wheel studs.
Material And Thickness Options
Wheel spacers come in different materials and thicknesses. Choose based on strength and your wheel setup.
| Material | Advantages | Common Thickness |
| Aluminum | Lightweight, rust-resistant | 5mm to 25mm |
| Steel | Very strong, heavier | 5mm to 30mm |
| Polyurethane | Flexible, less common | 5mm to 15mm |
Compatibility With Your Vehicle
Check your car’s bolt pattern, hub size, and clearance before buying spacers.
- Match the bolt pattern exactly to your wheels and vehicle.
- Confirm the spacer hub bore fits your car’s hub.
- Ensure the spacer thickness does not cause rubbing on suspension parts.
- Consult your vehicle manual or a professional if unsure.
Gathering Necessary Tools
Installing wheel spacers is a task that needs the right tools. Preparing your tools beforehand saves time and avoids frustration.
This guide covers the basic tools, safety equipment, and optional tools to make the job easier.
Basic Tools Checklist
These tools are essential for removing and installing wheel spacers properly.
- Socket wrench set
- Torque wrench
- Breaker bar
- Jack and jack stands
- Lug nut remover
- Wire brush
Safety Equipment
Safety is important during any car repair. Use these items to protect yourself.
| Safety Item | Purpose |
| Safety glasses | Protect eyes from dust and debris |
| Gloves | Keep hands safe from cuts and dirt |
| Steel-toe boots | Protect feet from heavy tools or parts |
| Wheel chocks | Prevent the car from rolling |
Optional Tools For Ease
These tools are not required but can make the process smoother and faster.
- Impact wrench for faster lug nut removal
- Anti-seize lubricant to prevent rust
- Magnetic tray to hold small nuts and bolts
- Rubber mallet for gentle tapping
Preparing Your Vehicle
Installing wheel spacers needs careful preparation of your vehicle. This helps keep you safe and makes the process easier.
Before you start, make sure your car is stable and ready for work. Follow these steps closely.
Parking And Securing The Car
Park your car on a flat, hard surface. Avoid soft or sloped areas to stop the car from moving.
Apply the parking brake firmly. Use wheel chocks on wheels that stay on the ground to prevent rolling.
- Choose a flat and stable spot to park
- Engage the parking brake fully
- Place wheel chocks behind or in front of wheels
Loosening Lug Nuts
Before lifting the car, loosen the lug nuts slightly. This stops the wheels from spinning when you lift the vehicle.
Use a proper lug wrench to turn the nuts counterclockwise. Do not remove them yet; just break their tightness.
- Use the correct size lug wrench
- Turn lug nuts counterclockwise to loosen
- Loosen nuts but keep them on the wheel
Lifting The Vehicle Safely
Use a jack to lift the car at the recommended lifting points. Check your vehicle’s manual if unsure.
Lift the car high enough to remove the wheel easily. Always place jack stands under the car to support it safely.
- Find the correct lifting points on the car frame
- Use a reliable jack to raise the vehicle
- Place jack stands for extra support
- Never work under a car supported only by a jack

Credit: www.youtube.com
Removing The Wheels
To install wheel spacers, you must first remove the wheels. This process requires basic tools and careful handling of your vehicle.
Ensure your car is on a flat surface and safely lifted using a jack. Follow these steps to remove the wheels properly.
Step-by-step Wheel Removal
Removing the wheels is simple if you follow these steps carefully. Keep your tools handy and work steadily.
- Loosen the lug nuts slightly while the car is on the ground.
- Use a jack to lift the car off the ground safely.
- Remove the lug nuts completely and keep them in a safe place.
- Gently pull the wheel off the hub and set it aside.
Inspecting The Hub And Components
With the wheel removed, check the hub and surrounding parts. This ensures everything is in good condition before installing spacers.
| Component | Check For |
| Hub | Rust or damage |
| Brake Disc | Wear and tear |
| Studs | Loose or missing |
Inspecting these components helps prevent issues later. Make any necessary repairs before proceeding.
Installing The Wheel Spacers
Installing wheel spacers can improve the look and handling of your vehicle. It is important to do it carefully for safety and performance.
Follow these instructions to install your wheel spacers correctly and securely.
Aligning The Spacer Correctly
Start by cleaning the wheel hub surface to remove dirt and rust. Place the spacer on the hub, matching the bolt pattern exactly. Make sure the spacer sits flush against the hub without gaps.
Securing The Spacer With Lug Nuts
Use the correct lug nuts for your spacer and wheel type. Hand-tighten the lug nuts in a star pattern to hold the spacer firmly. This pattern helps distribute pressure evenly.
- Place the spacer on the hub, aligning bolt holes.
- Hand-tighten the first lug nut at the top.
- Move to the lug nut opposite and tighten by hand.
- Continue in a star pattern until all nuts are hand-tight.
- Use a wrench to tighten each nut partially in the same pattern.
Torque Specifications
Proper torque is crucial to keep the spacer and wheel safe. Use a torque wrench and follow the vehicle or spacer manufacturer’s torque settings.
| Component | Torque Value (ft-lbs) |
| Spacer Lug Nuts | 80 – 100 |
| Wheel Lug Nuts | 90 – 110 |
| Recheck Torque | After 50 miles |

Credit: www.youtube.com
Reattaching The Wheels
Once you have installed wheel spacers, it’s time to put the wheels back on. This step is crucial to ensure your vehicle is safe and runs smoothly.
Follow these steps carefully to avoid any issues with your wheels. Proper installation ensures a secure and stable ride.
Mounting The Wheel Over Spacer
Align the wheel with the wheel spacer. Ensure the holes on the wheel line up with the bolts on the spacer.
Push the wheel gently onto the spacer until it sits flush. Make sure there are no gaps between the wheel and spacer.
Tightening Lug Nuts Properly
Start by hand-tightening each lug nut onto the bolts. This helps prevent cross-threading and ensures a snug fit.
Use a wrench to tighten the lug nuts in a star pattern. This keeps the wheel balanced and evenly secured.
- Tighten one nut, then move to the opposite nut
- Continue this pattern until all nuts are secure
- Check each nut for a consistent tightness
Final Torque Check
Use a torque wrench to ensure each lug nut is tightened to the manufacturer’s specifications. This prevents any loosening while driving.
Recheck each nut with the torque wrench after a short drive. This confirms that everything remains tight and secure.
- Set the torque wrench to the recommended setting
- Check each nut in the same star pattern
- Adjust if needed to reach the correct torque
Post-installation Checks
After installing wheel spacers, checking your work is important. These checks keep your vehicle safe and running well.
Follow these steps to make sure everything is secure and working properly after installation.
Lowering The Vehicle
Lower the vehicle slowly using the jack. Make sure the car sits evenly on the ground. This helps the wheel spacers fit correctly.
Check that the wheels touch the ground fully and the spacers do not move or shift.
Test Drive Tips
Drive your vehicle gently at first. Listen for strange noises or vibrations. Pay attention to how the car handles turns and stops.
If you notice any wobbling or unusual sounds, stop and inspect the spacers and wheel nuts immediately.
- Start with slow speeds
- Avoid sharp turns initially
- Check for vibrations or noise
- Stop if you feel anything unusual
Rechecking Torque After Driving
After driving for about 25 to 50 miles, recheck the torque on your wheel nuts. This ensures they stay tight and safe.
Use a torque wrench set to the vehicle’s recommended settings. Tighten any loose nuts to the correct level.
- Drive 25-50 miles first
- Use a torque wrench
- Set torque to vehicle specs
- Tighten any loose nuts
Safety Tips And Common Mistakes
Installing wheel spacers can improve your vehicle’s stance and handling. Safety is very important during installation.
Common mistakes can cause damage or accidents. Follow these tips to avoid problems.
Avoiding Over-tightening
Do not over-tighten the lug nuts when installing wheel spacers. Too much force can damage the threads or warp the brake rotors.
- Use a torque wrench to apply the correct torque.
- Check your vehicle’s manual for the recommended torque value.
- Tighten lug nuts in a star pattern to ensure even pressure.
- Retorque the lug nuts after driving 50-100 miles.
Ensuring Spacer Compatibility
Choose spacers that match your vehicle’s bolt pattern and hub size. Incorrect spacers can cause vibration and unsafe driving.
| Compatibility Factor | Check Point |
| Bolt Pattern | Match your wheel bolts (e.g., 5×114.3 mm) |
| Hub Diameter | Spacer center hole must fit your hub tightly |
| Spacer Thickness | Choose thickness that suits your clearance needs |
| Material Quality | Use aluminum or high-grade steel for strength |
Regular Maintenance Advice
Check your wheel spacers regularly to keep them safe. Loose or damaged spacers can cause accidents.
- Inspect lug nuts and bolts for tightness every 1,000 miles.
- Look for signs of rust or cracks on the spacers.
- Clean the spacer and hub surfaces before reinstalling.
- Replace spacers if they show wear or damage.
Credit: www.ebay.com
Frequently Asked Questions
What Are Wheel Spacers And Why Use Them?
Wheel spacers create extra space between the wheel and hub. They improve vehicle stability, enhance aesthetics, and allow larger brake calipers installation. Spacers also help achieve a wider stance for better handling and traction.
How Do I Install Wheel Spacers Step By Step?
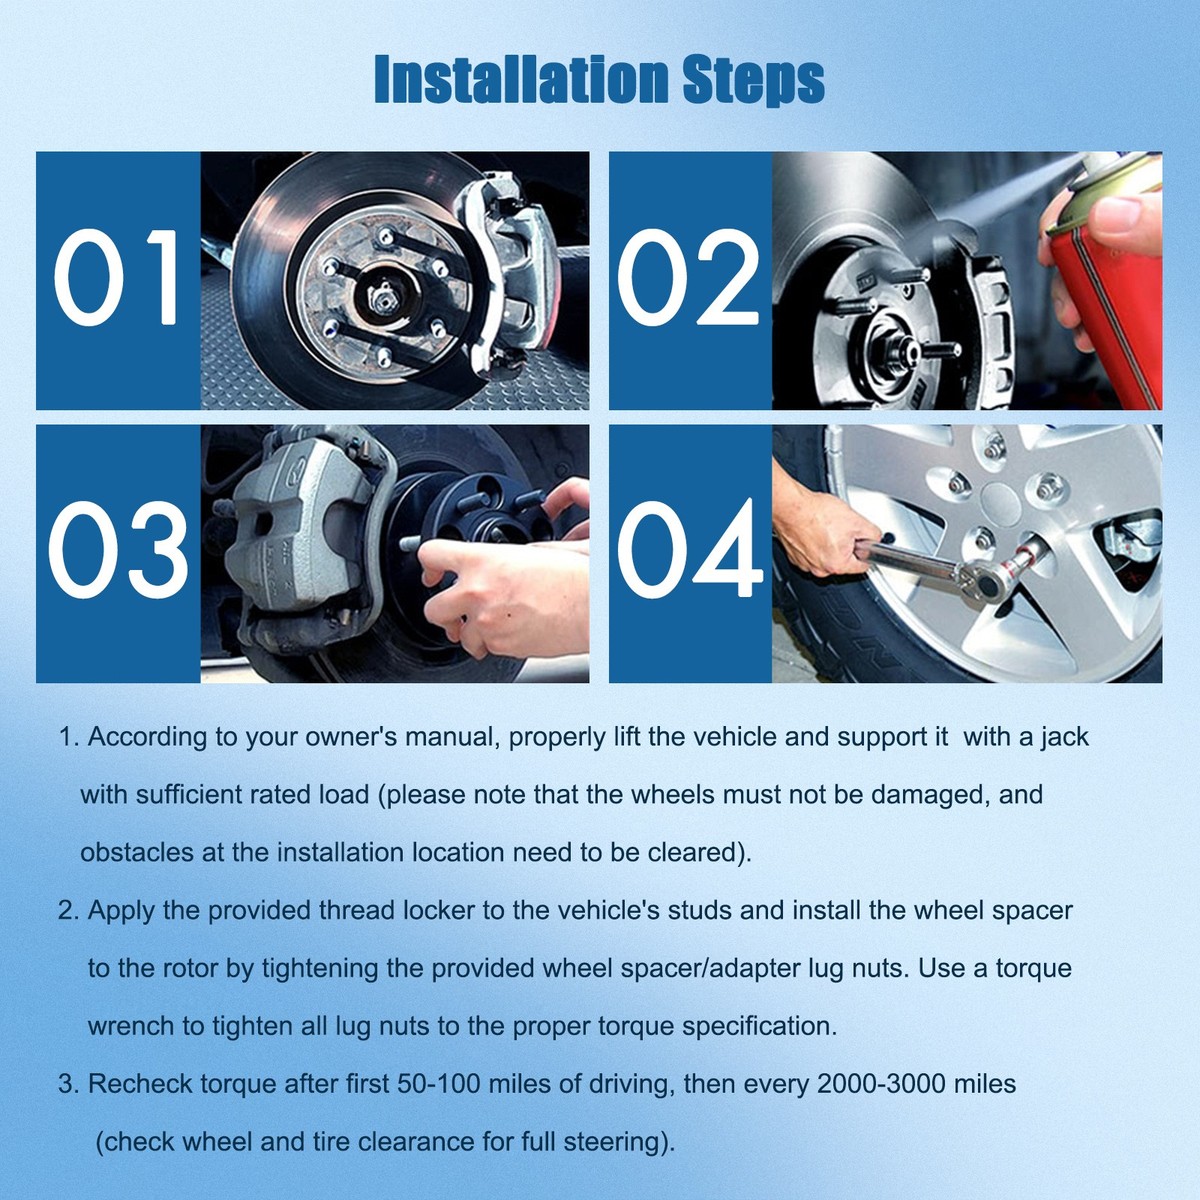
First, loosen lug nuts and remove wheels. Clean hub surface, align spacer, and secure it with bolts. Reinstall wheels, torque lug nuts properly, and lower the vehicle. Always follow manufacturer instructions for safety and accuracy.
Are Wheel Spacers Safe For My Vehicle?
Yes, when installed correctly using quality spacers and proper torque. Ensure spacers match bolt pattern and thickness. Incorrect installation may cause vibrations or damage. Always consult a professional if unsure about the process.
Can Wheel Spacers Affect Vehicle Performance?
Wheel spacers can improve handling by widening the track. However, improper use may cause suspension stress or alignment issues. Use appropriate spacer size to maintain balance and avoid negative impacts on ride quality.
Conclusion
Installing wheel spacers can improve your vehicle’s look and performance. Follow each step carefully for safe installation. Double-check all bolts and torque settings before driving. Take your time and use the right tools. Proper installation helps avoid problems on the road.
Enjoy the wider stance and better handling. Stay safe, and drive confidently with your new wheel spacers.


