
Are you tired of that annoying tire pressure warning light flashing on your dashboard? Installing a TPMS sensor can solve this problem and keep your tires safe and efficient.
But if you’re unsure how to do it yourself, don’t worry. This step-by-step guide will walk you through the entire process in a simple and clear way. By the end, you’ll have the confidence to install your TPMS sensor quickly and correctly, saving you time and money.
Keep reading, and let’s get your vehicle running smoothly again!

Credit: www.bh-sens.com
Preparing For Installation
Installing a TPMS sensor ensures your tires are monitored for safety. Preparing well makes the process easier and safer.
This guide covers the tools needed, how to select the right sensor, and safety tips before you start.
Gathering Necessary Tools
Collect all tools before you begin. This saves time and avoids interruptions during installation.
- Tire pressure gauge
- Valve core tool
- Torque wrench
- Socket set
- Jack and jack stands
- Flathead screwdriver
- TPMS programming tool (if needed)
Choosing The Right Tpms Sensor
Select a TPMS sensor that fits your vehicle model and tire size. Using the wrong sensor can cause errors or damage.
| Sensor Type | Compatibility | Notes |
| Direct TPMS | Most vehicles | Measures actual tire pressure |
| Indirect TPMS | Some cars | Uses ABS sensors to estimate pressure |
| Aftermarket TPMS | Universal fit | May need extra programming |
Safety Precautions
Follow safety rules to prevent injury and damage. Always work in a secure and clean area.
- Wear safety goggles and gloves.
- Use jack stands to support the vehicle.
- Do not work on hot tires or brakes.
- Keep tools organized to avoid slips.
- Disconnect the car battery if needed.
Removing The Old Tpms Sensor
Removing the old TPMS sensor is a careful process. It helps prepare your tire for a new sensor. Follow each part to avoid damage.
This guide covers deflating the tire, taking off the tire from the rim, and finding the sensor to remove it.
Deflating The Tire
Start by letting the air out of the tire. This step is important to safely remove the tire from the rim.
- Remove the valve cap from the tire.
- Press the valve core to release the air.
- Wait until the tire is fully deflated before moving on.
Removing The Tire From The Rim
Once the tire is deflated, you can remove it from the rim. Use proper tools to avoid damage.
- Place the tire on a flat surface.
- Use a tire lever to break the bead seal.
- Lift the tire edge over the rim carefully.
- Work around the rim until the tire comes off completely.
Locating And Detaching The Sensor
The sensor is attached inside the rim. You need to find it and remove it carefully.
| Tool | Purpose |
| Socket wrench | Unscrew the sensor nut |
| Flathead screwdriver | Help pry sensor if stuck |
| Gloves | Protect your hands |
After locating the sensor, use a socket wrench to remove the nut holding it. Gently pull the sensor out. Use a screwdriver if needed.
Installing The New Tpms Sensor
Installing a new TPMS sensor helps keep your tires safe and properly monitored. This guide shows you how to install the sensor step by step.
Follow the instructions carefully to attach and secure the sensor before remounting the tire.
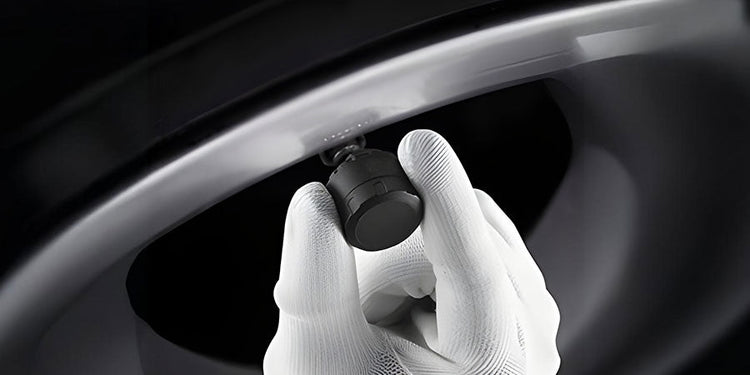
Attaching The Sensor To The Valve Stem
First, place the new TPMS sensor onto the valve stem. Make sure it fits snugly and aligns correctly with the stem hole.
- Remove the old sensor carefully from the valve stem.
- Clean the valve stem area to remove dirt and debris.
- Place the new sensor on the valve stem without forcing it.
- Check that the sensor sits flush and does not tilt.
Securing The Sensor Properly
After attaching the sensor, secure it tightly to avoid air leaks or sensor damage. Use the correct tools and follow torque specifications.
| Task | Details | Tool Needed | Torque |
| Fasten sensor nut | Thread the nut onto the valve stem carefully | Torque wrench | 4-7 Nm |
| Check sensor position | Make sure sensor is not loose or misaligned | Hand check | N/A |
| Inspect for leaks | Apply soapy water and look for bubbles | Spray bottle | N/A |
Re-mounting The Tire
Once the sensor is secured, put the tire back on the wheel rim. Make sure the tire bead seats properly and the sensor is safe inside.
- Lubricate the tire bead for easier mounting.
- Use a tire mounting machine or hand tools carefully.
- Avoid pinching or damaging the sensor during mounting.
- Inflate the tire to the recommended pressure slowly.
- Check the sensor function with a TPMS tool after mounting.
Reprogramming The Tpms System
Reprogramming the TPMS system is important after installing new sensors. It helps the vehicle recognize each sensor correctly.
This guide explains how to use a TPMS tool, sync sensors, and verify their function.
Using A Tpms Tool
A TPMS tool reads and programs the tire pressure sensors. It connects to the sensor and the vehicle system.
Follow these steps to use the TPMS tool properly:
- Turn on the tool and select the correct vehicle model.
- Activate the sensor by placing the tool near the valve stem.
- Read sensor data and check for errors.
- Program the new sensor ID into the vehicle system.
Syncing Sensors With The Vehicle
Syncing links each sensor to the vehicle’s computer. This step ensures the system can track tire pressure accurately.
To sync sensors, you need to:
- Turn the vehicle ignition on without starting the engine.
- Use the TPMS tool to enter the programming mode.
- Trigger each sensor one by one by pressing the tool near the sensor.
- Wait for the tool to confirm each sensor is registered.
- Exit programming mode and turn off the ignition.
Verifying Sensor Functionality
After syncing, verify that sensors work well. This step prevents driving with faulty sensors.
Check sensor function by:
- Starting the vehicle and checking the dashboard for TPMS warnings.
- Using the TPMS tool to read sensor data from each tire.
- Confirming the pressure readings match the actual tire pressure.
- Driving the vehicle for a short time and watching for alerts.
Troubleshooting Common Issues
Installing a TPMS sensor can sometimes lead to common issues. Understanding these problems helps in resolving them quickly. Here, we look at some frequent concerns and offer solutions.
Sensor Not Detected
Sometimes the sensor is not detected by the system. This can occur due to various reasons. Ensuring the sensor is properly installed is crucial.
- Check if the sensor is correctly positioned
- Ensure the sensor’s frequency matches the vehicle’s system
- Verify if the sensor ID is registered with the vehicle’s ECU
Inaccurate Pressure Readings
Inaccurate pressure readings may lead to improper tire maintenance. Proper calibration of the TPMS sensor can fix this issue.
| Possible Cause | Solution |
| Sensor Calibration Error | Re-calibrate the sensor |
| Interference from Electronics | Check for nearby electronic devices |
| Damaged Sensor | Replace the sensor |
Battery Life And Maintenance
Battery life affects the sensor’s performance. Regular maintenance is necessary to ensure efficient operation. Knowing the lifespan of the battery helps plan timely replacements.
Credit: gutatpms.com
Tips For Long-term Tpms Care
Taking care of your TPMS sensors helps keep your tires safe. Good care extends sensor life and saves money.
Follow simple steps to check and maintain your sensors. This guide shows easy ways to protect your TPMS.
Regular Sensor Checks
Check your sensors often to catch problems early. Look for warning signs on your dashboard.
- Inspect sensor batteries yearly
- Use a TPMS tool to test sensor signals
- Look for sensor damage during tire changes
- Reset sensors after tire rotation
Proper Tire Maintenance
Keeping tires in good shape protects your TPMS sensors. Poor tire care can damage sensors or reduce accuracy.
| Tire Maintenance Task | Effect on TPMS |
| Keep tires inflated to correct pressure | Prevents false sensor alerts |
| Balance tires every 5,000 miles | Reduces sensor wear |
| Rotate tires regularly | Helps sensors read all tires evenly |
| Avoid hitting curbs or potholes | Prevents sensor damage |
When To Replace Sensors
Replace sensors when they stop working or show signs of wear. Sensors usually last 5 to 10 years.
- Replace if battery life ends
- Change after sensor damage from tire work
- Swap if sensor fails to send signals
- Follow vehicle manual for sensor lifespan

Credit: www.dollarfix.com
Frequently Asked Questions
What Tools Are Needed To Install A Tpms Sensor?
You need a TPMS sensor, valve core tool, tire iron, and torque wrench. A jack and lug wrench are also essential for removing tires safely.
How Do I Reset The Tpms Sensor After Installation?
After installing, turn on your car and drive for 10 minutes. Some vehicles require a manual reset via the dashboard or an OBD2 scanner.
Can I Install Tpms Sensors Myself Safely?
Yes, with the right tools and careful steps, self-installation is possible. Follow the guide closely to avoid damage and ensure proper sensor function.
How Long Does Tpms Sensor Installation Take?
Typically, installing a TPMS sensor takes about 30 to 45 minutes per tire. Time varies with experience and vehicle type.
Conclusion
Installing a TPMS sensor is easier than it seems. Follow each step carefully and take your time. Double-check your work to avoid mistakes. Proper installation keeps your tires safe and your ride smooth. Trust the process, and you will succeed.
Regularly check your sensors to ensure they work well. Your car will thank you with better tire health. Enjoy safer drives with confidence and peace of mind.


