
Have you ever wished you had proof during a tricky moment on the road? Installing a dash cam can be your best move to protect yourself and your car.
It’s easier than you might think, and once set up, it works silently, capturing everything that happens while you drive. In this guide, you’ll learn simple steps to install your dash cam quickly and get the most out of it.
Ready to add a smart eye to your car? Keep reading, and you’ll be driving safer in no time.

Credit: medium.com
Choosing The Right Dash Cam
Installing a dash cam is a smart way to protect yourself on the road. It records your trips and helps with insurance claims.
Picking the right dash cam can be tricky. You need to find one that fits your needs and budget.
Key Features To Consider
Look for a dash cam with good video quality. Clear footage helps in case of accidents.
Check for features like night vision, wide-angle lens, and loop recording. These improve recording in different conditions.
- High resolution (1080p or higher)
- Wide viewing angle (120° or more)
- Night vision or low-light recording
- Loop recording to save space
- G-sensor to detect impacts
- Easy installation and controls
Top Brands And Models
Some brands are known for making reliable dash cams. They offer good support and regular updates.
Popular models have a balance of features and price. They are tested by many users and get good reviews.
- Thinkware F800 Pro
- Nextbase 522GW
- Garmin Dash Cam Mini 2
- Vantrue N2 Pro
- Viofo A129 Pro Duo
Budget Vs Quality
Cheap dash cams can save money but may lack features. They might have lower video quality.
Higher quality dash cams cost more but offer better video and durability. They last longer and record clearer footage.
- Low budget: basic recording, fewer features
- Mid budget: good video, some extras
- High budget: best video, advanced features

Credit: www.youtube.com
Preparing For Installation
Installing a dash cam needs proper preparation. It helps ensure a smooth setup process.
Before starting, gather tools, pick a mounting spot, and check your vehicle’s compatibility.
Gathering Necessary Tools
Having the right tools saves time and avoids frustration during installation.
- Dash cam device with mounting kit
- Power cable and adapter
- Trim removal tool or flathead screwdriver
- MicroSD card for recording
- Cleaning cloth
- Optional: cable clips or zip ties
Selecting The Best Mounting Location
Choose a location that offers a clear view of the road and does not block your sight.
| Location | Advantages | Disadvantages |
| Behind rearview mirror | Hidden, clear front view | May block some vision |
| Lower windshield corner | Out of the way, easy access | Less central view |
| Dashboard mount | Easy to reach | Can obstruct view, less stable |
Checking Vehicle Compatibility
Make sure your vehicle supports the dash cam’s power and mounting needs.
- Check if your car has a 12V power outlet near the windshield.
- Confirm the dash cam’s power cable length fits your vehicle.
- Look for flat surfaces or suitable spots for mounting the camera securely.
- Consult your vehicle manual for any restrictions on device mounting.
Step-by-step Installation Process
Installing a dash cam in your vehicle helps capture important moments while driving. The process involves mounting the camera, routing the power cable, and connecting it to a power source.
Follow these steps to install your dash cam safely and securely.
Mounting The Dash Cam
Choose a spot on your windshield that gives a clear view of the road. Usually, this is behind the rearview mirror. Make sure the camera does not block your vision.
- Clean the area where you will attach the mount.
- Use the adhesive or suction cup to fix the mount to the windshield.
- Attach the dash cam to the mount firmly.
- Adjust the angle to capture the front view properly.
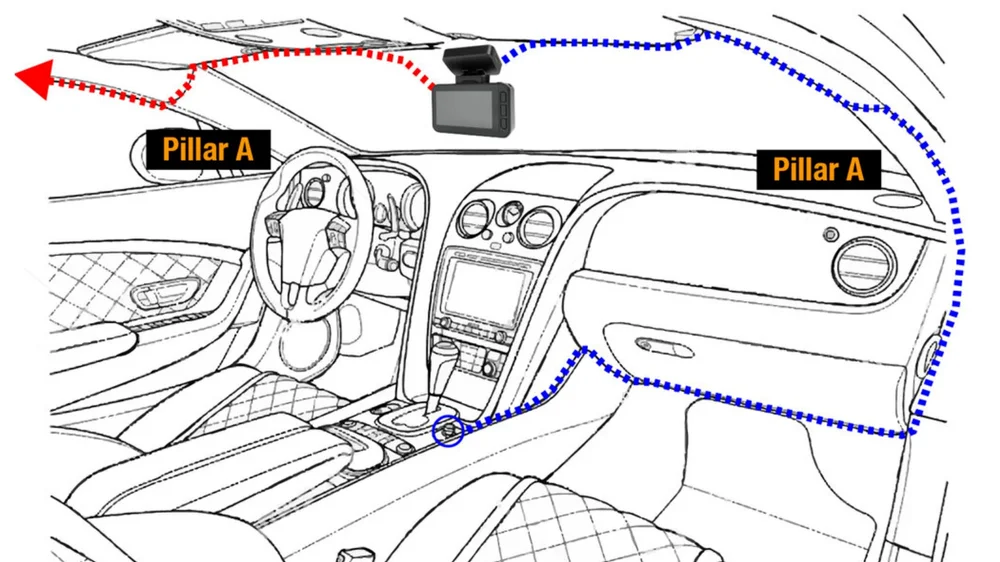
Routing The Power Cable
Keep the power cable neat and out of the way. This avoids distractions and prevents damage to the cable.
- Start from the dash cam and run the cable along the edge of the windshield.
- Tuck the cable into the headliner and down the A-pillar.
- Use a trim tool to hide the cable behind panels if possible.
- Lead the cable to the car’s power source location.
Connecting To Power Sources
The dash cam needs constant power from your vehicle. You can connect it to a 12V socket or hardwire it for a cleaner look.
| Power Source | Pros | Cons |
| 12V Socket (Cigarette Lighter) | Easy to connect, no tools needed | Visible cable, socket may be used for other devices |
| Hardwired to Fuse Box | Clean installation, powers with ignition | Requires tools and knowledge, may need professional help |
Configuring Dash Cam Settings
After installing your dash cam, you need to set it up correctly. Proper settings help capture clear videos and keep your data safe.
Configuring settings like video quality, loop recording, and safety features makes your dash cam work best for you.
Adjusting Video Quality
Video quality affects how clear your recordings are. Higher quality uses more storage but shows more details.
Choose a balance between video clarity and storage space. Many dash cams let you pick from options like 720p, 1080p, or 4K.
- 720p saves storage but has lower detail
- 1080p is good for most drivers
- 4K offers the best clarity but uses more space
Setting Loop Recording
Loop recording saves video in short clips. When the memory is full, it overwrites the oldest files.
This feature helps your dash cam record continuously without stopping. You can set clip lengths like 1, 3, or 5 minutes.
- Short clips make it easy to find important events
- Longer clips use more storage per file
- Loop recording keeps your dash cam ready all the time
Enabling Safety Features
Many dash cams have safety features to protect you and your videos. Turn them on for better security.
Common features include motion detection, G-sensor, and parking mode. These help record incidents even when you are away.
- Motion detection records when movement is sensed
- G-sensor saves video on impact or sudden stops
- Parking mode monitors your car while parked
Testing And Troubleshooting
After installing your dash cam, it is important to test it. Testing ensures the camera works as expected. Troubleshooting helps fix any problems found during testing.
This guide covers how to check the camera angle, power, recording status, and common issues. Follow these steps to get the best use from your dash cam.
Verifying Camera Angle And View
Check the camera angle to make sure it captures the road clearly. Adjust the camera to avoid glare or obstructions.
Look at the live view or recorded video to confirm the field of view covers the windshield and road ahead.
- Ensure the lens is clean and free of dust
- Position the camera behind the rearview mirror if possible
- Adjust tilt and rotation for a straight horizon line
- Check for reflections or shadows in the video
Checking Power And Recording Status
Make sure the dash cam turns on with your car. Check the power connection and battery if the camera does not start.
Confirm that the camera is recording by looking for a red light or a recording icon on the screen.
- Verify the power cable is firmly connected
- Check the fuse if the camera does not power on
- Look for a blinking or steady recording indicator
- Test by driving and reviewing the recorded footage
Common Installation Issues
Some problems may occur during or after installation. These include poor video quality, power loss, or no recording.
Knowing common issues helps you fix them quickly and keep your dash cam working well.
- Loose connections causing power interruptions
- Memory card errors or full storage
- Incorrect camera placement blocking view
- Software glitches needing a reset or update
- Interference from other electronic devices
Credit: www.grdian.com
Maintenance Tips For Longevity
Installing a dash cam is smart for car safety and security. Keeping it in good shape is important. Regular maintenance can help it last longer.
Follow these tips to keep your dash cam working well. These simple steps ensure your device records clearly and reliably.
Regular Cleaning
Dust and dirt can block your dash cam’s view. Clean the lens often to keep the video clear. Use a soft cloth to wipe the lens gently.
Avoid using harsh chemicals on the lens. They can cause damage. A clean lens means better video quality.
Firmware Updates
Firmware updates fix bugs and improve performance. Check for updates regularly. Install them to keep your dash cam running smoothly.
Follow the manufacturer’s instructions for updates. This ensures your dash cam has the latest features and security fixes.
Storage Management
Manage your storage to avoid losing important video. Use a high-capacity memory card. Check it often to ensure it’s not full.
Transfer important videos to your computer. This frees up space and keeps your recordings safe.
- Use a reliable memory card
- Delete unwanted footage regularly
- Back up critical videos
Frequently Asked Questions
How Do I Install A Dash Cam In My Car?
To install a dash cam, mount it on the windshield near the rearview mirror. Connect the power cable to the car’s cigarette lighter or hardwire it to the fuse box. Adjust the camera angle for clear road visibility before securing the wires neatly.
What Tools Are Needed For Dash Cam Installation?
You typically need a dash cam, power cable, fuse tap (for hardwiring), trim removal tool, and adhesive mounts. Some installations may require a multimeter and wire strippers. Most dash cams come with basic mounting accessories to simplify the setup process.
Can I Install A Dash Cam Without Professional Help?
Yes, many dash cams are designed for easy self-installation. Follow the user manual for mounting and wiring instructions. Ensure the camera has a clear, unobstructed view. If unsure, watch online tutorials or seek professional help for complex wiring.
Where Is The Best Place To Mount A Dash Cam?
Mount the dash cam behind the rearview mirror to avoid obstructing your view. Ensure it captures the road ahead clearly. This position keeps the device discreet and stable, minimizing glare and vibrations for better video quality.
Conclusion
Installing a dash cam brings safety and peace of mind. It records important moments on the road. You can protect yourself from false claims. The process is simple and saves time later. Choose the right spot for clear views. Secure the wires neatly to avoid distractions.
Test the camera before driving. A dash cam is a smart tool for all drivers. It helps keep you safe every time you drive. Take the step today and feel more secure.


