
Imagine you’re driving and suddenly hear that dreaded hissing sound—your tire is flat. Panic sets in, right?
But what if you could fix it quickly, without waiting for help or expensive towing? You can, with a tire repair kit. Knowing how to use one can save you time, money, and stress when every second counts. You’ll discover simple, step-by-step instructions to get your tire back on track fast.
Keep reading, because being prepared could turn a roadside nightmare into just a small bump in your day.
Credit: www.rhinousainc.com
Choosing The Right Tire Repair Kit
A tire repair kit can help you fix a flat tire quickly. Picking the right kit is important. It saves time and keeps you safe during emergencies.
There are many kinds of repair kits. Each has different tools and uses. Learn what fits your needs before buying one.
Types Of Repair Kits
Tire repair kits come in several types. The most common are plug kits, patch kits, and plug-and-patch kits. Each works differently to fix a tire.
- Plug Kits:Use rubber plugs to fill small holes from the outside.
- Patch Kits:Apply patches inside the tire to cover the hole.
- Plug-and-Patch Kits:Combine plugs and patches for a stronger fix.
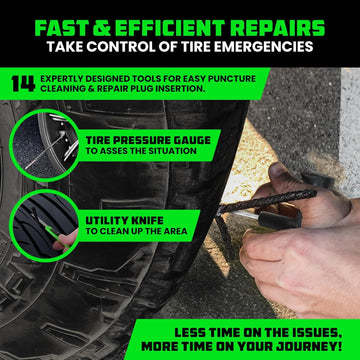
Essential Tools Included
Good tire repair kits have basic tools. These tools help you find and fix the tire damage quickly.
- Reamer tool to clean and widen the hole
- Insertion tool to push the plug into the hole
- Rubber plugs or patches to seal the tire
- Rubber cement or adhesive for better sealing
- Gloves to protect your hands
Some kits also include a small air pump or pressure gauge. These help you refill the tire air after repair.
Selecting Based On Tire Type
Not all repair kits work for every tire. Choose a kit that fits your tire type and size. This ensures a safe and effective repair.
- For car tires, simple plug kits often work well.
- For larger tires, like trucks, plug-and-patch kits are better.
- Run-flat tires need special kits or professional help.
- Bicycle tires require smaller kits made for thin rubber.
Check your vehicle manual or tire label to know the exact tire type before choosing a kit.
Preparing For Tire Repair
Having a tire repair kit ready can save you during a flat tire emergency. Knowing how to prepare helps you fix the tire safely and quickly.
This guide shows how to get ready before using a tire repair kit on the road.
Finding A Safe Location
Stop your vehicle in a place away from traffic. Look for a flat, stable surface to work on the tire.
Avoid hills or soft ground. These spots can cause your car to roll or sink during repair.
- Pull over to the shoulder or parking lot
- Turn on hazard lights
- Use wheel chocks if available
Gathering Necessary Equipment
Before starting, collect all tools and supplies needed for the repair. Check your tire repair kit and car tools.
You will usually need a tire plug, reamer tool, insertion tool, and air pump or inflator.
- Tire repair kit (plugs, tools)
- Car jack and lug wrench
- Air compressor or pump
- Gloves and flashlight
- Owner’s manual for guidance
Inspecting The Tire Damage
Look closely at the tire to find the damage spot. Check for nails, cuts, or holes.
Do not try to fix sidewall damage or large tears. These need professional help.
- Locate the puncture or leak
- Mark the damaged area
- Check if the tire is repairable
- Look inside tire for objects
Step-by-step Repair Process
Using a tire repair kit in an emergency can save you time and trouble. Follow these simple steps to fix a puncture safely and quickly.
Make sure you have the right tools ready. Work carefully to avoid making the damage worse.
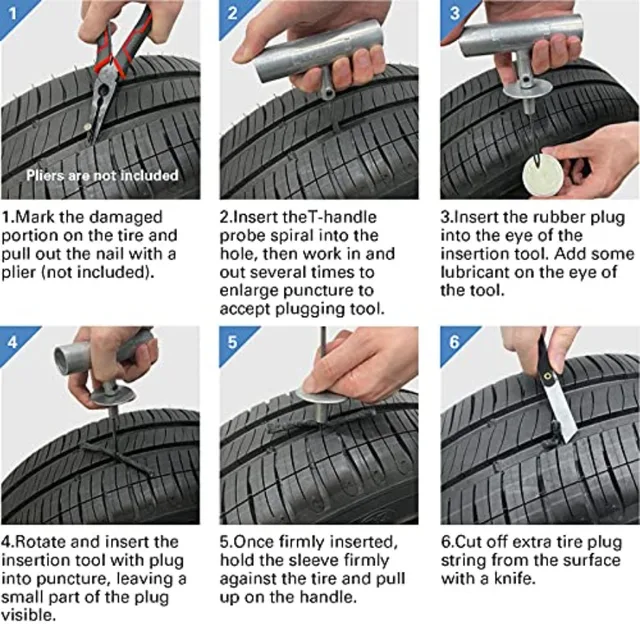
Removing The Object
First, find the object that caused the puncture. Use pliers or your fingers to pull it out straight. Do this slowly to avoid enlarging the hole.
Cleaning The Puncture Area
Clean the hole and the area around it. Remove dirt and debris using a cloth or a brush. This helps the plug or patch stick better.
- Remove loose dirt from the tire surface.
- Use the reaming tool from the kit to widen the hole slightly.
- Insert and remove the tool several times to clean the inside of the puncture.
Applying The Repair Plug Or Patch
Choose between a plug or a patch based on your kit. For plugs, insert the sticky strip into the hole with the tool. For patches, apply glue and press the patch firmly.
| Repair Type | How to Apply |
|---|---|
| Plug | Insert plug with tool, pull to seal hole |
| Patch | Spread glue, place patch, press firmly |
Sealing And Inflating The Tire
After applying the repair, seal the tire by pressing the plug or patch tight. Inflate the tire to the correct pressure with a pump or compressor. Check for leaks by listening or using soapy water.
Credit: www.aliexpress.com
Safety Tips During Repair
Using a tire repair kit can be a lifesaver in emergencies. It’s important to stay safe while fixing your tire. Here are some tips to ensure safety during the repair process.
Using Protective Gear
Wear protective gear to keep yourself safe during tire repairs. Safety goggles and gloves are essential. They protect your eyes and hands from sharp objects.
- Gloves prevent cuts and bruises
- Goggles protect from dirt and debris
- Closed-toe shoes shield your feet
Avoiding Common Mistakes
Many people make mistakes when using tire repair kits. Avoiding these mistakes ensures a successful repair. Read instructions carefully to prevent errors.
- Don’t rush the process
- Ensure the car is on a flat surface
- Check for multiple punctures
When To Call For Professional Help
Sometimes, a tire repair kit is not enough. Knowing when to call for help is important. If the damage is severe, seek professional assistance.
Professionals have tools and skills to handle tough situations. It’s better to be safe than sorry.
Maintaining Your Tire Post-repair
After using a tire repair kit, it is important to take care of your tire. Proper maintenance helps keep your tire safe and working well.
Checking your tire often can stop small problems from becoming big ones. Follow these tips to keep your tire in good shape after repair.
Checking Tire Pressure Regularly
Check your tire pressure every few days after repair. Proper pressure helps your tire last longer and drives safely.
Use a tire pressure gauge to measure the air inside. Fill air if the pressure is low, based on the car’s recommended level.
- Check pressure when tires are cold
- Keep pressure within the car’s manual range
- Check before long trips or heavy loads
Monitoring For Leaks
Watch your tire for slow leaks after repair. Leaks can cause the tire to lose air and become unsafe.
Look for signs like a soft tire or hissing sounds. If you see bubbles with soapy water on the repair area, it may still leak.
- Inspect the repaired spot every week
- Listen for unusual air sounds
- Use soap water to find small leaks
Scheduling Professional Inspection
After a repair, have a professional check your tire soon. Experts can find hidden damage that repair kits miss.
A professional inspection ensures your tire is safe to use. They may suggest a full tire replacement if needed.
- Visit a tire shop within a few days
- Ask for a full tire and wheel check
- Follow advice on tire safety and repair
Preventive Measures To Avoid Flats
Flat tires can cause delays and unsafe driving situations. Taking simple steps helps keep your tires in good shape. This guide shares easy ways to prevent flats using tire repair kits in emergencies.
Regular care for your tires improves safety and saves money. Learn how to check tires, keep the right pressure, and avoid road dangers.
Routine Tire Inspections
Check your tires often for cuts, cracks, or worn tread. Look for objects like nails or glass stuck in the tire. These can cause slow leaks or sudden flats.
Inspect tires before long trips and once a month. Catching problems early helps you fix them before they get worse.
- Look for uneven wear on the tread
- Check sidewalls for cracks or bulges
- Remove stones or debris from the tread
- Replace tires that show severe damage
Proper Tire Inflation
Keeping tires at the correct pressure stops flats and improves fuel efficiency. Underinflated tires wear out faster and can overheat.
Use a tire gauge to check pressure once a month. Adjust the air to the number listed in your car’s manual or on the door sticker.
- Check pressure when tires are cold for accuracy
- Do not overinflate tires beyond recommended limits
- Keep a portable air pump in your car for emergencies
Avoiding Road Hazards
Watch the road to avoid sharp objects like nails, glass, or metal. Potholes and rough roads can also damage tires or cause flats.
Drive carefully in construction zones and avoid debris on the road. Slow down on uneven surfaces to reduce tire stress.
- Stay clear of piles of gravel and sharp debris
- Do not drive over curbs or sharp edges
- Keep a safe distance from trucks that might drop objects

Credit: www.amazon.com
Frequently Asked Questions
What Tools Are Included In A Tire Repair Kit?
A tire repair kit typically includes rubber plugs, a reamer, an insertion tool, and sealant. Some kits also have gloves and instructions.
How Long Does A Tire Repair Kit Fix Last?
Repairs from a tire repair kit are usually temporary, lasting until professional help is available. They can last from days to weeks.
Can Tire Repair Kits Fix All Types Of Punctures?
Tire repair kits work best on small, puncture-type damages. They are not suitable for sidewall or large tire damage.
How Do I Properly Use A Tire Repair Kit?
First, locate and clean the puncture. Then, use the reamer to widen the hole, insert the plug with the tool, and apply sealant if included.
Conclusion
Tire repair kits help you fix flats quickly and safely. Keep the kit in your car for emergencies. Follow the steps carefully to avoid mistakes. Practice using the kit before you really need it. A little preparation can save time and stress.
Always check your tire pressure after the repair. Stay calm and confident during the process. This simple tool can keep you moving until help arrives. Remember, safety comes first on the road.


