
Changing your oil filter might seem tricky at first, but it doesn’t have to be. If you’ve ever struggled to remove a stubborn oil filter, you know how frustrating it can be.
That’s where an oil filter wrench comes in—it makes the job easier and saves you time. You’ll learn exactly how to use an oil filter wrench the right way, so you can tackle your oil change with confidence. Keep reading, and soon you’ll be handling your car maintenance like a pro.
Types Of Oil Filter Wrenches
Oil filter wrenches help remove and install oil filters. They come in different types for various filters and spaces. Choosing the right wrench makes the job easier and safer.
Each type works best under certain conditions. Knowing the types helps you pick the best tool for your car or machine.
Band Wrenches
Band wrenches use a metal strap that wraps around the filter. Tightening the handle grips the filter firmly. This type is good for round filters of many sizes.
It works well in tight spaces because the strap is thin. You turn the handle to loosen or tighten the filter. It fits different filter sizes by adjusting the band.
- Fits many filter sizes
- Good for tight spaces
- Simple to use
Socket-style Wrenches
Socket-style wrenches look like a cup that fits over the end of the filter. You attach a ratchet or breaker bar to turn the wrench. This type gives strong grip and good control.
It is best for filters with flat ends and enough space around them. The socket fits snugly, so it reduces slipping. It is easy to use with power tools too.
- Fits specific filter sizes
- Works with ratchets
- Provides strong grip
Cap Wrenches
Cap wrenches cover the end of the oil filter like a cap. They have ridges or teeth that match the filter’s shape. You turn the wrench with a ratchet or a handle.
Cap wrenches are good for tight spaces and filters with specific shapes. They prevent damage by gripping evenly around the filter. This type is common in many repair shops.
- Fits specific filter shapes
- Uses ratchet or handle
- Protects filter from damage
Pliers-type Wrenches
Pliers-type wrenches look like regular pliers with wide jaws. The jaws adjust to grip the filter tightly. You squeeze the handles and twist the filter loose or tight.
This type works well for filters with smooth or knurled surfaces. It is good for filters that are stuck or hard to reach. The jaws may have rubber or metal teeth for better grip.
- Adjustable jaws
- Good for stuck filters
- Easy to use

Credit: www.youtube.com
Choosing The Right Wrench
Using the correct oil filter wrench makes removing and installing filters easier. It saves time and prevents damage to the filter or your vehicle.
Choosing the right wrench depends on several factors. Consider size, accessibility, and material to pick the best tool for your needs.
Matching Size And Fit
Oil filters come in different sizes. Using a wrench that fits perfectly prevents slipping and damage. Check your vehicle’s manual for the filter size before buying a wrench.
- Measure the diameter of the oil filter
- Choose a wrench that matches the size exactly
- Adjustable wrenches can fit multiple sizes
- A snug fit reduces the risk of stripping the filter
Considering Accessibility
Some oil filters are hard to reach in tight engine spaces. Choose a wrench that works well in these conditions. A slim or flexible handle can help you reach difficult spots.
| Wrench Type | Best For | Accessibility |
| Belt Wrench | Various sizes | Good for tight spaces |
| Cap Wrench | Exact filter sizes | Needs more clearance |
| Pliers Wrench | Small filters | Limited space |
| Strap Wrench | Any size | Very tight spots |
Material And Durability
Strong materials last longer and handle tough filters better. Look for wrenches made from steel or aluminum. Avoid plastic tools that may break under pressure.
- Steel wrenches resist wear and tear
- Aluminum wrenches are lightweight and durable
- Plastic wrenches are cheap but less reliable
- Check for rust-resistant coatings on metal tools
Preparing For Removal
Removing an oil filter requires some preparation. This helps you work safely and efficiently.
Before using an oil filter wrench, you must gather tools, cool the engine, and find the filter.
Gathering Tools And Supplies
Have all necessary tools ready before starting. This saves time and avoids frustration.
You will need an oil filter wrench, a drain pan, gloves, and rags for spills.
- Oil filter wrench (correct size)
- Oil drain pan
- Protective gloves
- Clean rags or paper towels
Ensuring Engine Is Cool
Never try to remove the oil filter when the engine is hot. Hot parts can burn you.
Wait at least 30 minutes after turning off the engine. This lets the engine cool down safely.
Locating The Oil Filter
Find the oil filter under the hood or beneath the vehicle. It looks like a small canister.
Check your vehicle manual if you cannot find it. Knowing the filter location helps you work faster.
- Look near the engine block
- Check around the oil pan area
- Use a flashlight for better visibility
- Consult the vehicle manual if needed

Credit: www.craftsman.com
Step-by-step Removal Process
Removing an oil filter is a key part of car maintenance. Using an oil filter wrench makes this task easier. This guide shows the steps to remove the filter safely.
Follow these steps carefully to avoid damage and spills. Each part explains what to do and how to handle common problems.
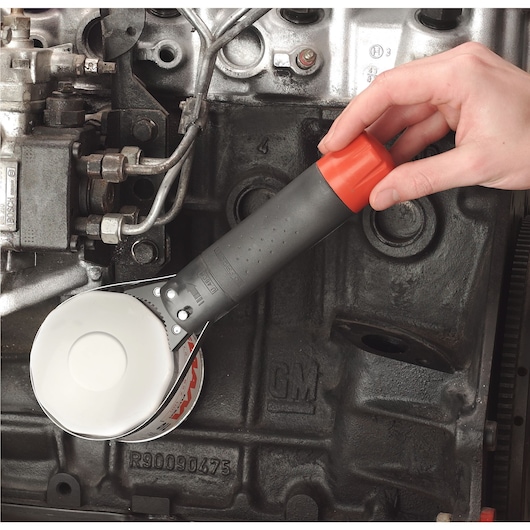
Positioning The Wrench
Place the oil filter wrench around the filter carefully. Make sure the wrench fits snugly. It should grip the filter tightly without slipping.
- Check the wrench size matches the filter.
- Fit the wrench evenly around the filter.
- Align it to allow easy turning.
- Avoid forcing the wrench on the wrong spot.
Applying Proper Force
Use steady force to turn the wrench. Twist it slowly to loosen the filter. Too much force can break the wrench or damage the filter.
- Hold the wrench firmly with one hand.
- Use your other hand to steady the filter.
- Turn the wrench counterclockwise gently.
- Increase force only if the filter is tight.
- Stop if the wrench slips or the filter moves wrongly.
Handling Stubborn Filters
Some filters stick due to oil buildup or rust. Use these tips to remove them safely without damage.
| Problem | Solution |
| Filter stuck tightly | Apply penetrating oil and wait 10 minutes |
| Wrench slips | Use a strap wrench for better grip |
| Filter hard to reach | Use an extension on the wrench handle |
| Filter damaged | Wear gloves and try loosening carefully by hand |
Removing The Filter By Hand
After loosening with the wrench, you can remove the filter by hand. This reduces spills and helps control the filter.
- Grip the filter firmly with your hand.
- Turn it counterclockwise to unscrew.
- Use a cloth to keep your hands clean.
- Keep the filter upright to avoid oil spills.
- Dispose of the old filter properly.
Post-removal Tips
After removing the oil filter, there are important steps to follow. These steps ensure your engine stays clean and functions well.
Follow these simple tips to get the best performance from your vehicle. Taking care of these details helps avoid potential issues.
Cleaning The Mounting Surface
Ensure the mounting surface is clean and free of debris. Dirt on this surface can cause leaks and engine problems.
Use a clean cloth to wipe the area carefully. Check for any old oil or dirt that might be left behind.
- Wipe with a lint-free cloth
- Remove old oil residue
- Ensure no debris is left
Checking The Old Filter Seal
Look at the old filter seal to ensure it is intact. Sometimes, the seal can stick to the engine and cause issues.
If the seal is still on the engine, remove it carefully. Leaving it can prevent the new filter from sealing properly.
- Inspect the old filter seal
- Remove if still attached to the engine
- Ensure new filter can seal correctly
Preparing For New Filter Installation
Prepare the new filter by lubricating its rubber seal. This helps it fit snugly and prevents leaks.
Apply a thin layer of new oil to the seal before installing. This step is crucial for a good fit and function.
- Lubricate the new filter seal
- Use fresh oil for lubrication
- Ensure a snug fit to prevent leaks
Common Mistakes To Avoid
Using an oil filter wrench can be easy if you avoid common mistakes. These errors can make your car maintenance harder and less safe.
Understanding what to avoid will help you work with confidence and keep your vehicle in top shape.
Over-tightening Or Under-tightening
Getting the right tightness on your oil filter is crucial. Over-tightening can damage the filter or make it hard to remove next time.
- Use the wrench to tighten the filter until snug.
- Avoid using excessive force or tools for leverage.
- Check for leaks after installation.
Using Incorrect Tools
Using the wrong tool can cause damage and make the job frustrating. Always use a wrench that fits your oil filter size.
| Tool | Best Use |
| Strap Wrench | For tight spaces |
| Socket Wrench | For more torque |
| Cap Wrench | For exact fit |
Ignoring Safety Precautions
Safety should always come first when working on your vehicle. Failing to follow safety rules can lead to injury.
Always wear gloves to protect your hands from oil and sharp edges. Ensure the car is stable and never crawl under a car that is only supported by a jack.
Maintenance And Care Of Your Wrench
Taking care of your oil filter wrench helps it last longer. Proper maintenance keeps it working well.
Regular cleaning and storage protect the tool from damage. Knowing when to replace it avoids problems.
Cleaning After Use
Clean your oil filter wrench after each use to remove oil and dirt. Use a rag and mild soap with water.
- Wipe off all grease and grime
- Dry the wrench completely to prevent rust
- Check for any stuck debris in moving parts
- Use a small brush for hard-to-reach spots
Proper Storage
Store your wrench in a dry, clean place to avoid rust and damage. Keep it away from moisture.
| Storage Tip | Reason |
|---|---|
| Use a toolbox or drawer | Protects from dust and impacts |
| Keep away from damp areas | Prevents rust and corrosion |
| Organize with other tools | Easy to find and reduces loss |
| Apply light oil before storage | Keeps metal parts lubricated |
When To Replace Your Wrench
Replace your wrench if it shows signs of wear or damage. Using a broken wrench can cause injury or damage.
- Check for cracks or bends in the metal
- Look for worn or stripped gripping surfaces
- Replace if the wrench slips or won’t hold
- Consider replacement if moving parts are loose
- Buy a new wrench if it no longer fits filters properly
Credit: www.facom.com
Frequently Asked Questions
What Is An Oil Filter Wrench Used For?
An oil filter wrench helps remove or tighten oil filters easily. It grips the filter firmly, making the job quicker and safer. This tool prevents damage to the filter and surrounding parts during oil changes.
How Do I Choose The Right Oil Filter Wrench?
Select a wrench that fits your oil filter size and type. Common types include strap, cap, and claw wrenches. Consider durability, grip strength, and ease of use for effective performance.
Can I Use An Oil Filter Wrench Without Damage?
Yes, if used correctly. Ensure the wrench fits tightly but not overly tight. Apply steady pressure to avoid crushing or slipping, which can damage the filter or engine parts.
How Often Should I Replace My Oil Filter Wrench?
Replace your wrench if it shows wear, rust, or poor grip. A well-maintained wrench lasts years but inspect regularly to ensure safety and efficiency during oil changes.
Conclusion
Using an oil filter wrench makes oil changes easier and faster. It helps you grip and turn the filter without much effort. Choose the right wrench size for your car’s filter. Always apply steady pressure to avoid damage. Clean the wrench after each use to keep it working well.
With these simple steps, you can handle oil filters safely and confidently. Regular oil changes keep your engine running smoothly. Practice a few times, and you will get better at it. Simple tools, clear steps—easy car care.


