
Is your car having trouble starting, or does it make a clicking sound when you turn the key? The starter motor might be the problem.
But how do you know for sure? Testing your starter motor with the right tools can save you time and money by pinpointing the issue quickly. You’ll learn simple, step-by-step methods to check your starter motor using tools you probably already have.
By the end, you’ll feel confident diagnosing the problem yourself and knowing exactly what to do next. Keep reading to take control of your car’s health and avoid costly repairs!
Starter Motor Basics
The starter motor helps start a car engine. It turns the engine to begin running.
This motor works with the car battery and ignition system. It is important for vehicle operation.
Function And Importance
The starter motor spins the engine’s flywheel to start combustion. It uses electrical power from the battery.
Without a working starter motor, the engine will not start. This part is essential for driving the car.
- Converts electrical energy to mechanical energy
- Engages the engine to start combustion
- Works only when the ignition key is turned
- Critical for vehicle use and safety
Common Problems
Starter motors can fail due to wear or electrical issues. Problems often cause the engine not to start.
Common faults include dead battery, bad wiring, or worn brushes inside the motor.
- Clicking sound but engine won’t turn over
- Starter motor runs but does not engage
- Engine turns slowly or not at all
- Electrical shorts or blown fuses

Credit: www.searshomeservices.com
Tools Needed
Testing a starter motor needs some basic tools. These tools help check if the motor works well or has issues.
Having the right tools makes testing faster and safer. Below are the main tools you will need.
Multimeter
A multimeter measures electrical values like voltage, current, and resistance. It helps check the starter motor’s electrical parts.
Use the multimeter to test battery voltage and continuity in the motor’s wiring. This finds any breaks or short circuits.
Battery Charger
A battery charger keeps the car battery full during testing. A weak battery can give wrong test results.
Charging the battery ensures the starter motor gets enough power to work properly during the test.
Test Light
A test light shows if electricity flows through the starter motor circuit. It is easy to use and very helpful.
Connect the test light to different points. If it lights up, that part has power. If not, there may be a fault.
Wrenches And Screwdrivers
Wrenches and screwdrivers help remove and install the starter motor. They also open covers for better access.
Use the right size tools to avoid damage. Keep them handy for quick adjustments during testing.
Preparation Steps
Testing a starter motor requires some preparation. You need to get your tools ready and set up the vehicle properly. This helps ensure a smooth and safe test process.
Follow these steps to prepare before testing the starter motor. Preparation helps avoid damage and keeps you safe.
Safety Precautions
Safety is very important when testing a starter motor. The motor uses electricity and moving parts that can hurt you.
Always wear safety gloves and eye protection. Disconnect the battery before working on the starter motor to avoid electric shocks.
- Wear insulated gloves
- Use safety goggles
- Disconnect the negative battery cable
- Keep loose clothing and hair away
- Work in a well-ventilated area
Vehicle Positioning
Position the vehicle on a flat, stable surface. This prevents the car from rolling or moving during the test.
Apply the parking brake and place wheel chocks behind the tires. This keeps the vehicle secure while you work.
- Park on a level surface
- Engage the parking brake
- Place wheel chocks behind wheels
- Turn off the ignition
Accessing The Starter Motor
Locate the starter motor under the hood or near the engine block. It usually connects to the transmission housing.
Remove any covers or parts blocking access. You may need a wrench or socket set to reach the starter motor bolts.
- Open the vehicle hood
- Find the starter motor near the engine
- Remove covers or shields if needed
- Use tools to loosen bolts carefully
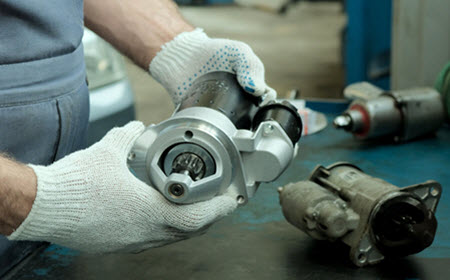
Credit: www.adairandsons.com
Testing Voltage Supply
Testing the voltage supply is important to check if the starter motor works well. It helps find electrical problems in the starting system.
You need simple tools like a multimeter to measure voltage. This guide explains how to test voltage supply in three parts.
Checking Battery Voltage
Start by checking the battery voltage. A healthy battery should have about 12.6 volts when the engine is off.
Use a multimeter set to DC voltage. Connect the red lead to the positive terminal and the black lead to the negative.
- Turn off the engine and all accessories
- Set multimeter to 20V DC range
- Touch red lead to battery positive terminal
- Touch black lead to battery negative terminal
- Read the voltage on the display
Testing Starter Relay
The starter relay sends power to the starter motor. Check if it works by testing voltage at the relay terminals.
Turn the ignition key to the start position. Use a multimeter to see if voltage appears on the relay output terminal.
- Locate the starter relay in the fuse box
- Set multimeter to 20V DC
- Probe the input terminal for constant battery voltage
- Turn the ignition key to start
- Check for voltage at the output terminal
- No voltage means the relay may be faulty
Measuring Voltage At Starter
Check voltage directly at the starter motor. This shows if the starter receives power to crank the engine.
With the ignition key in the start position, measure voltage at the large terminal on the starter motor.
- Find the starter motor under the engine
- Set multimeter to 20V DC
- Touch red lead to the main terminal on the starter
- Touch black lead to a good ground
- Turn the key to start
- Voltage close to battery voltage means good supply
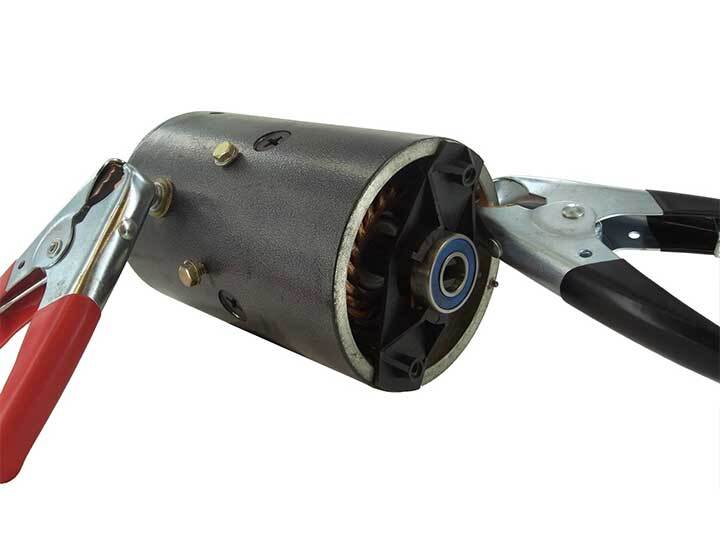
Bench Testing The Starter Motor
Testing a starter motor on a bench helps find problems. It shows if the motor works outside the car.
You need some basic tools and a power source. This test saves time before installing or replacing the motor.
Removing The Starter Motor
First, disconnect the car battery to avoid shocks. Locate the starter motor near the engine.
Use the right tools to remove bolts and wires. Carefully take out the starter motor without damage.
- Disconnect the negative battery cable
- Locate the starter motor under the hood
- Remove electrical connections from the motor
- Unscrew mounting bolts holding the motor
- Gently pull the starter motor out
Connecting To A Power Source
Place the starter motor on a secure surface. Use jumper cables to connect it to a 12-volt battery.
Attach the positive cable to the motor’s terminal. Connect the negative cable to the motor body or ground.
- Secure the starter motor on a bench
- Connect positive cable to the motor terminal
- Attach negative cable to motor casing
- Ensure all connections are tight and safe
Observing Motor Response
Once connected, the motor should spin quickly. Listen for smooth running and check if the gear moves.
If the motor is slow, noisy, or does not spin, it may be faulty. Repeat the test to confirm results.
- Motor spins fast and smoothly: good condition
- Motor sounds noisy or rough: possible issue
- Motor does not spin: likely faulty starter
- Gear should extend and retract properly
Using A Multimeter For Resistance Tests
Testing a starter motor is important to ensure your vehicle starts properly. A multimeter helps by measuring resistance in the starter motor’s components. This guide focuses on how to use a multimeter for resistance tests.
Understanding how to test the coil resistance, check continuity, and identify shorts or opens will improve your troubleshooting skills. Let’s explore each of these tests in detail.
Testing Coil Resistance
Coil resistance is a key factor in starter motor performance. Use a multimeter to measure it.
First, set your multimeter to the ohms setting. Then, connect the multimeter probes to the coil terminals. Read the resistance value displayed.
- Ensure the multimeter is on the correct setting.
- Touch probes to coil terminals.
- Check the reading on the multimeter.
Checking Continuity
Continuity ensures the circuit is complete. A multimeter can check this in a starter motor.
Set the multimeter to the continuity setting. Place the probes on the motor’s connectors. A beep sound indicates a continuous circuit.
- Switch to continuity mode.
- Position probes on connectors.
- Listen for a beep sound.
Identifying Shorts Or Opens
Shorts or opens can cause starter motor problems. Use a multimeter to find them.
Set your multimeter to the resistance mode. Connect probes to different points on the motor. A low reading indicates a short. A high or infinite reading shows an open.
- Select resistance mode on multimeter.
- Test different motor points.
- Look for low or high readings.
Interpreting Test Results
Testing a starter motor helps find out if it works well. Understanding the results is key to fixing any problems.
Read results carefully to know if the starter needs repair or replacement. Look for signs of wear or electrical issues.
Signs Of A Faulty Starter
A faulty starter shows clear signs that you should not ignore. Recognizing these signs can prevent bigger issues.
- Car does not start, even with a charged battery.
- Clicking or grinding noise when turning the key.
- Starter motor runs but engine does not turn over.
When To Replace Or Repair
Deciding between replacing or repairing depends on the starter’s condition. Evaluate carefully to make the right choice.
If the starter shows severe damage, replacement is often best. Minor issues might only need a repair.
| Condition | Action |
| Severe wear or damage | Replace |
| Minor electrical issues | Repair |
Credit: discountstarterandalternator.com
Tips For Accurate Testing
Testing a starter motor requires care and the right tools. Accurate testing helps find issues fast.
Use simple steps to check the motor’s condition. Follow tips to avoid errors and get clear results.
Ensuring Good Connections
Check all wires and terminals before testing. Loose or dirty connections can give wrong readings.
Clean terminals with a wire brush. Tighten any loose bolts or nuts on the starter motor.
- Use a multimeter to test wire continuity.
- Make sure battery cables are secure.
- Remove corrosion with sandpaper or a brush.
- Connect test leads firmly to terminals.
Avoiding Common Mistakes
Do not test the starter motor with the engine running. This can damage the tools and motor.
Always disconnect the battery before connecting or removing test equipment. This prevents sparks.
- Do not use damaged or worn test leads.
- Avoid guessing voltage; always measure it.
- Do not ignore unusual noises during testing.
- Test in a dry, well-lit area for safety.
Frequently Asked Questions
How Do I Test A Starter Motor With A Multimeter?
To test a starter motor with a multimeter, check voltage at the battery terminals. Measure resistance across the starter solenoid terminals. Look for continuity to ensure the motor’s electrical path is intact. Low voltage or no continuity indicates a faulty starter motor.
What Tools Are Needed To Test A Starter Motor?
You need a multimeter, jumper cables, and a wrench to test a starter motor. A screwdriver and a battery charger can also be helpful. These tools help check electrical connections, measure voltage, and perform a basic operational test on the starter motor.
Can A Starter Motor Be Tested Without Removing It?
Yes, you can test a starter motor without removal by checking voltage at the battery and starter terminals. Use a multimeter to ensure power reaches the motor. Listen for clicking sounds when turning the ignition, which indicates the solenoid is working.
How Do I Know If My Starter Motor Is Faulty?
A faulty starter motor causes the engine to crank slowly or not at all. Listen for clicking noises or no sound when turning the key. Test voltage and continuity with a multimeter to confirm electrical issues before replacement.
Conclusion
Testing a starter motor with tools is simple and useful. You can find problems early and save money on repairs. Use a multimeter and other basic tools to check the motor’s condition. Follow the steps carefully, and take safety measures.
Regular checks keep your vehicle running smoothly. Practice these tests to feel more confident about your car’s health. Small efforts bring big benefits in the long run. Keep your tools ready and test whenever you notice starting issues. This helps avoid unexpected breakdowns and costly fixes.


