
Your car rims say a lot about your style. If they look dull or scratched, your whole car’s appearance can suffer.
But what if you could give them a fresh, eye-catching look without spending a fortune? Painting your car rims yourself is easier than you think. In this guide, you’ll discover simple steps to transform your rims and make your car stand out.
Ready to learn how to paint car rims like a pro? Keep reading, and let’s get started!
Choosing The Right Paint
Painting car rims can change the look of your vehicle. Choosing the right paint is very important for good results.
The paint must stick well and resist weather and road wear. This guide helps you pick the best paint for rims.
Types Of Rim Paint
There are different paints made for car rims. Some are easier to use, and some last longer.
Pick paint based on the finish you want and how strong it should be.
- Spray Paint:Easy to apply with good coverage.
- Epoxy Paint:Very strong and resists chips and rust.
- Urethane Paint:Durable with a shiny finish.
- Powder Coating:Professional finish but needs special equipment.
Color Selection Tips
Choose rim colors that match your car and style. Dark colors hide dirt well.
Bright colors stand out but need more cleaning. Matte finishes give a modern look.
- Match rim color with car paint or contrast for style
- Consider how often you will clean the rims
- Use primer and clear coat for better color and protection
- Test paint on a small area first
Tools And Materials Needed
To paint rims, gather all tools and materials before starting. This helps the job go smoothly.
Good preparation improves paint adhesion and finish quality.
- Sandpaper (various grits for smoothing)
- Rim cleaner or degreaser
- Masking tape and paper to cover tires
- Spray paint or rim paint
- Primer suitable for metal
- Clear coat for protection
- Safety gloves and mask
- Clean cloths and brushes
Preparing The Rims
Painting car rims starts with good preparation. Proper steps make sure the paint sticks well. You also get a smooth and lasting finish.
This guide covers removing the rims, cleaning and sanding, and masking areas before painting.
Removing The Rims
Take off the rims carefully to avoid damage. Use a car jack and a wrench to loosen the lug nuts. Make sure the car is on a flat surface before lifting it.
- Loosen the lug nuts slightly while the car is on the ground.
- Use a jack to lift the car safely.
- Remove the lug nuts completely once the car is raised.
- Pull the rim off the wheel hub carefully.
- Place rims on a soft surface to avoid scratches.
Cleaning And Sanding
Clean the rims to remove dirt, grease, and brake dust. Use soap and water or a special wheel cleaner. Let the rims dry fully before sanding.
| Material | Purpose | Notes |
|---|---|---|
| Soap and water | Basic cleaning | Removes surface dirt |
| Wheel cleaner | Deep cleaning | Breaks down brake dust and grease |
| Sandpaper (320-400 grit) | Surface smoothing | Prepares for primer and paint |
Sand the rims gently to remove old paint and smooth rough spots. Use circular motions for even sanding.
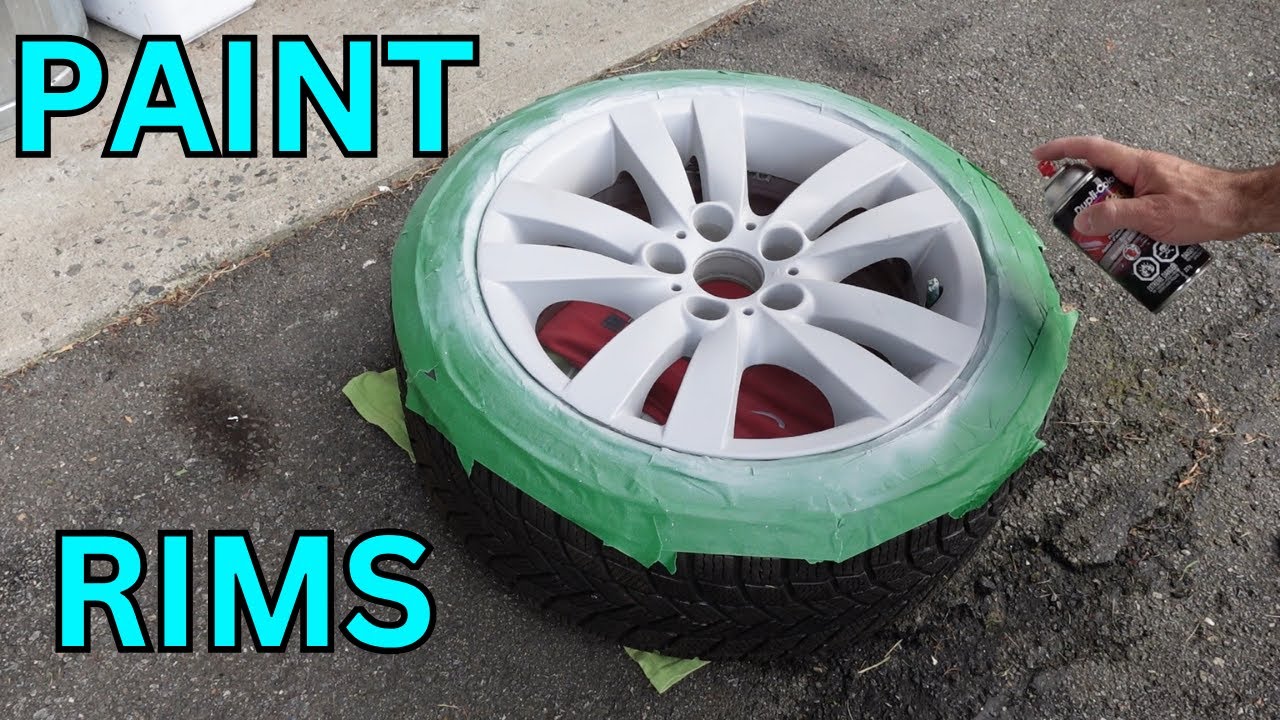
Masking Areas
Cover parts that should not be painted. Use masking tape and paper to protect tires and valve stems. This keeps paint off unwanted areas.
- Apply tape around the edge of the rim.
- Cover the tire with paper or plastic sheets.
- Seal edges well to avoid paint leaks.
Applying Primer
Applying primer to car rims is an important step before painting. It helps the paint stick better and last longer. Proper primer application protects your rims from rust and damage.
Follow the right steps to select and apply primer for a smooth and durable finish.
Selecting Primer
Choose a primer made for metal surfaces and car rims. Look for primers that prevent rust and work well with your paint type. Using the correct primer improves the final look and durability.
- Use an etching primer for bare metal rims
- Choose a filler primer to cover small scratches
- Select a primer compatible with your topcoat paint
- Opt for rust-resistant primers for older rims
Spray Techniques
Spraying primer evenly is key to a good finish. Hold the spray can or gun 6 to 8 inches from the rim surface. Use steady, even strokes to avoid drips and runs.
| Spray Method | Description |
| Light Coats | Apply several thin layers to build coverage |
| Crosshatch Pattern | Spray horizontally then vertically for even coverage |
| Overlap Passes | Overlap each spray pass by 50% to avoid gaps |
| Dry Between Coats | Let each coat dry before applying the next |
Drying Times
Allow primer to dry fully before sanding or painting. Drying times depend on primer type, temperature, and humidity. Follow the instructions on the primer label for best results.
- Wait at least 30 minutes for tack-free drying
- Allow 1 to 2 hours for full cure before sanding
- Longer drying may be needed in cold or humid conditions
- Use a heat lamp or warm space to speed up drying if needed

Credit: www.youtube.com
Painting The Rims
Painting car rims changes their look and protects them. It is a simple process with the right tools.
Clean rims well before painting. This helps the paint stick better and last longer.
Spray Painting Tips
Use smooth and even strokes when spray painting. Hold the can about 6 to 8 inches from the rim.
Keep the spray moving to avoid putting too much paint in one spot. This prevents runs and drips.
- Shake the spray can well before use
- Spray in a well-ventilated area
- Wear a mask and gloves for safety
Multiple Coats
Apply several light coats instead of one thick coat. This helps the paint dry evenly and look smooth.
Wait about 10 to 15 minutes between coats. This lets each layer dry before adding the next one.
- Start with a thin base coat
- Apply 2 to 3 more coats for full coverage
- Allow final coat to dry completely
Avoiding Drips And Runs
Hold the spray can at the right distance and keep it moving. Stop spraying before you reach the edge.
If you see drips, wait for the paint to dry. Then lightly sand the area before adding more paint.
- Spray thin layers to prevent paint build-up
- Move the can side to side smoothly
- Fix drips by sanding and repainting
Adding Clear Coat
Adding a clear coat to car rims enhances their appearance. It protects the paint from damage and environmental factors.
The clear coat provides a glossy finish. It makes the rims look new and shiny for a long time.
Purpose Of Clear Coat
Clear coat acts as a shield for the paint on car rims. It prevents scratches, chips, and fading caused by UV rays.
This coating helps maintain the color and gloss of the rims. It also makes cleaning easier by providing a smooth surface.
- Protects against weather elements
- Enhances the shine of the rims
- Extends the lifespan of the paint
Application Process
Before applying the clear coat, ensure the rims are clean and dry. Use a clean cloth to wipe away dust and dirt.
Spray the clear coat evenly over the rims. Hold the spray can about six inches away for the best coverage.
- Apply in light, even coats
- Allow each coat to dry before adding another
- Use a mask to avoid inhaling fumes
Curing Time
After applying the clear coat, allow it to cure properly. This ensures the coat hardens and bonds with the paint.
Typically, curing can take about 24 to 48 hours. Avoid driving the car during this period to prevent dust and debris from sticking.

Credit: www.reddit.com
Finishing Touches
Painting car rims is almost done, but the final steps are very important. These steps help the paint last longer and look better.
Pay close attention to removing tape, putting rims back, and caring for them afterward. This will keep your rims looking fresh.
Removing Masking Tape
Wait until the paint feels dry but not fully hard before removing the tape. This stops paint from peeling off.
Peel the tape slowly and at a 45-degree angle. This helps keep clean edges on your paint job.
Reinstalling The Rims
Before putting rims back on, clean the wheel hub area to remove dirt and rust. This helps rims fit well.
Tighten lug nuts in a star pattern. This makes sure the rims fit evenly and safely on your car.
- Place rim on hub carefully
- Hand-tighten lug nuts first
- Use a wrench to tighten nuts in star order
- Check all nuts for proper tightness
Maintenance And Care Tips
Keep your painted rims clean by washing them often with mild soap and water. Avoid harsh cleaners.
Check rims for chips or scratches. Touch up paint quickly to stop rust from forming.
- Wash rims weekly to remove dirt
- Use soft cloth or sponge to avoid scratches
- Dry rims after washing to prevent water spots
- Apply wax for extra paint protection
- Inspect rims regularly for damage
Credit: www.youtube.com
Frequently Asked Questions
How Do I Prepare Car Rims Before Painting?
Clean rims thoroughly with soap and water. Remove dirt, grease, and old paint using sandpaper. Dry completely before applying primer.
What Type Of Paint Is Best For Car Rims?
Use high-quality enamel or acrylic paint designed for metal surfaces. These paints offer durability and resist chipping and fading.
How Many Coats Of Paint Should I Apply On Rims?
Apply two to three thin coats. Allow each coat to dry completely before applying the next for a smooth, even finish.
Can I Paint Car Rims Without Removing Them?
Yes, but removing rims ensures better access and cleaner results. Painting on mounted rims risks uneven coverage and overspray.
Conclusion
Painting car rims can give your vehicle a fresh, stylish look. Take time to clean and sand the rims well. Use the right paint and apply it evenly for best results. Allow each coat to dry fully before adding another.
Protect your rims with a clear finish to last longer. With care and patience, you can achieve a smooth, attractive finish. Enjoy the satisfaction of customizing your car yourself. Your rims will stand out and reflect your personal style.


