
Looking to give your car a sleek, modern look while boosting its visibility at night? Installing exterior LED lights is one of the best ways to do just that.
You might think it’s complicated or expensive, but with the right steps, you can easily upgrade your ride yourself. Imagine turning heads wherever you go and feeling safer on the road—all by adding a simple lighting upgrade. Ready to learn how to install exterior LED lights on your car quickly and effectively?
Keep reading, and you’ll discover everything you need to know.
Credit: www.promoteproject.com
Choosing The Right Led Lights
Installing exterior LED lights on your car can improve visibility and style. Choosing the right type is important for safety and appearance.
Different LED lights serve various purposes. You should pick lights that fit your needs and match your car.
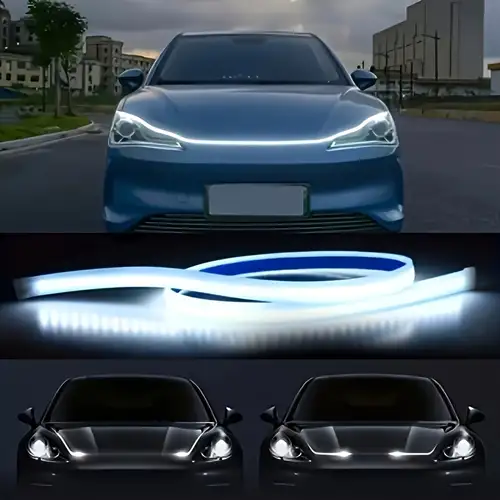
Types Of Exterior Led Lights
There are many types of exterior LED lights for cars. Each type has a special use and look.
- Headlights:Main lights for night driving.
- Fog Lights:Used in fog or rain for better road view.
- Daytime Running Lights (DRL):Lights that stay on during the day to increase visibility.
- Turn Signal Lights:Show your turning direction to others.
- Brake Lights:Indicate when you are stopping.
Brightness And Color Options
LED lights come in many brightness levels and colors. Choose options that match your driving needs and legal rules.
| Brightness (Lumens) | Common Colors | Recommended Use |
| 800-1200 | Cool White (6000K) | Headlights, Fog Lights |
| 500-800 | Warm White (3000K) | Turn Signals, Brake Lights |
| 400-700 | Amber | Turn Signals, Side Markers |
| 300-600 | Red | Brake Lights, Rear Fog Lights |
Compatibility With Your Car Model
Not all LED lights fit every car. Check your car’s make and model before buying.
Use this checklist to ensure compatibility:
- Find your car’s model and year.
- Look for LED lights made for your car model.
- Check the bulb size and type in your car manual.
- Confirm the voltage matches your car’s system.
- Check if you need adapters or extra parts.
Gathering Necessary Tools
Installing exterior LED lights on your car needs the right tools. Getting these ready saves time and effort. You can work safely and efficiently with the proper equipment.
This guide covers the basic tools, safety gear, and extra materials you might need. Prepare well before you start the installation process.
Basic Installation Tools
These tools help you fit and connect the LED lights to your car. Most are common and easy to find.
- Screwdrivers (flathead and Phillips)
- Wire strippers and cutters
- Electrical tape
- Socket wrench set
- Multimeter to test connections
- Heat shrink tubing
- Crimping tool
Safety Equipment
Protect yourself during installation with the right safety gear. This reduces the risk of injury and accidents.
| Item | Purpose |
| Safety glasses | Protect eyes from debris and sparks |
| Gloves | Shield hands from cuts and electrical shocks |
| Mask | Prevent inhaling dust or fumes |
| Long sleeves | Protect skin from scratches and burns |
Additional Materials You Might Need
Sometimes, extra supplies are needed to complete your LED light installation. These depend on your car and the LED kit.
Consider these materials:
- Zip ties for securing wires
- Silicone sealant to waterproof connections
- Extra fuses matching your car’s fuse box
- Mounting brackets if not included
- Extension wires for longer runs
Preparing Your Car
Installing exterior LED lights on your car needs good preparation. This helps the lights work well and last longer.
Before you start, make sure your car is ready. Clean the area, disconnect the battery, and check the wiring.
Cleaning The Installation Area
Clean the area where you will put the LED lights. Dirt and dust can stop the lights from sticking well.
Use a soft cloth and mild soap to clean the surface. Dry it completely before you continue.
Disconnecting The Battery
Always disconnect the car battery before starting any electrical work. This stops shocks and short circuits.
Use a wrench to remove the negative terminal first. Then remove the positive terminal. Keep the cables apart.
- Wear safety gloves and glasses
- Use the right size wrench
- Do not touch both terminals together
Inspecting Existing Wiring
Check the wiring near the installation area. Look for broken or loose wires before you connect the LED lights.
Fix or replace damaged wires. Make sure all connections are tight and clean to avoid problems later.
- Look for frayed insulation
- Check for corrosion on connectors
- Test wires with a multimeter if possible

Credit: www.novsights.com
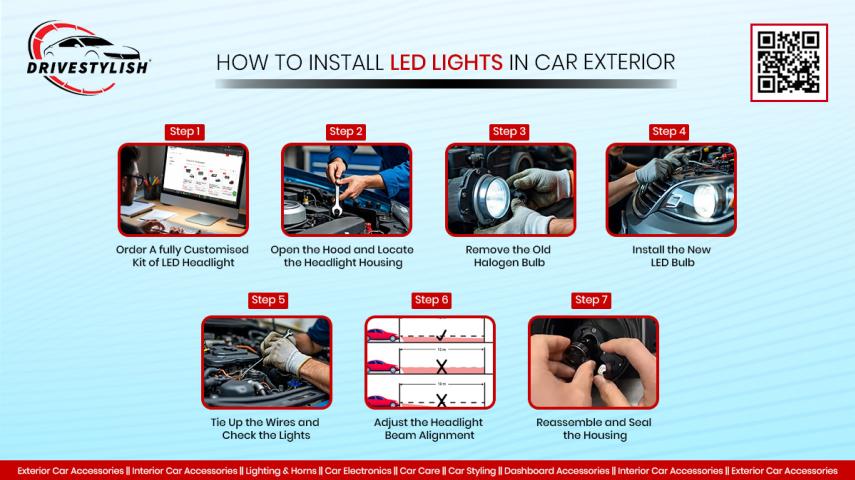
Installing The Led Lights
Installing exterior LED lights on your car can improve visibility and style. It is important to install them carefully to ensure safety and durability.
Follow simple steps to mount the lights, route the wires, and connect to power properly. This guide helps you do it right.
Mounting The Lights Securely
Choose a flat and clean surface to mount your LED lights. This helps the lights stick well and stay in place during driving.
Use screws, brackets, or strong adhesive tape depending on the type of lights. Make sure the lights do not move or shake.
- Clean the mounting area with rubbing alcohol
- Mark the positions before drilling or sticking
- Use waterproof materials to avoid damage
- Tighten screws securely without cracking the lights
Routing The Wires
Plan a path for the wires that avoids heat and moving parts. This prevents wire damage and shorts.
Use clips or zip ties to keep wires neat and close to the car body. Check that wires are not stretched or pinched.
- Run wires along existing wire channels if possible
- Avoid sharp edges and hot engine parts
- Leave some slack near connectors for flexibility
- Protect wires with tubing or tape if needed
Connecting To Power Source
Identify a suitable power source, like the car battery or fuse box. Make sure the power matches the LED lights’ requirements.
Use proper connectors and fuses to avoid electrical problems. Connect the positive and negative wires correctly to prevent shorts.
- Turn off the car before making electrical connections
- Use a fuse rated for the LED light’s power
- Connect the positive wire to the power source
- Connect the negative wire to a good ground point
- Test the lights before closing all covers
Testing And Adjustments
After installing exterior LED lights on your car, testing and adjusting them is important. This step ensures the lights work well and are safe to use on the road.
You will check if the lights turn on, adjust their angles, and fix common problems that may occur.
Checking Light Functionality
Start by turning on the car’s power and activating the LED lights. Look closely to see if all lights illuminate properly. Test different modes if your lights have them, such as brake, turn signal, or running lights.
If any light does not turn on, check the wiring connections and the fuse. Also, inspect the bulbs for damage or poor contact.
Adjusting Light Angles
Proper light angle helps improve visibility and avoids blinding other drivers. Use the following steps to adjust the angles:
- Park your car on a level surface facing a wall about 25 feet away.
- Turn on the LED lights you want to adjust.
- Mark the light beams’ current position on the wall with tape.
- Loosen the mounting screws slightly to move the lights.
- Adjust the lights so the beams align with your marks or slightly below.
- Tighten the screws to secure the lights in place.
Troubleshooting Common Issues
| Issue | Possible Cause | Fix |
|---|---|---|
| Light does not turn on | Loose wiring or blown fuse | Check connections, replace fuse |
| Light flickers | Poor connection or damaged bulb | Secure wiring, replace bulb |
| Light beam too high or low | Incorrect angle | Adjust mounting screws |
| Lights dim or uneven | Power supply issue | Check battery and wiring |
Maintaining Your Led Lights
Keeping your car’s exterior LED lights in good shape helps them last longer. Regular maintenance ensures they work properly.
Following a few simple steps will make sure your lights stay bright and clear.
Cleaning Tips
Dirt and grime can make your LED lights dimmer. Cleaning them regularly keeps them bright.
- Use a soft cloth to wipe the lights.
- Apply mild soap and water for stubborn dirt.
- Avoid harsh chemicals that might damage the lights.
Regular Inspection
Checking your LED lights often helps you spot problems early. This prevents bigger issues later on.
| Inspection Task | Frequency |
| Check for cracks | Monthly |
| Inspect brightness | Weekly |
| Look for moisture inside | Monthly |
Replacing Damaged Components
Sometimes parts of your LED lights can get damaged. Replacing them keeps your lights functioning well.
Credit: www.temu.com
Frequently Asked Questions
How Do I Choose The Right Exterior Led Lights For My Car?
Select LED lights based on brightness, color temperature, and compatibility with your vehicle. Check voltage and size to ensure a proper fit. Opt for durable, weather-resistant models for long-lasting performance and safety.
What Tools Are Needed To Install Car Exterior Led Lights?
Common tools include a screwdriver, wire stripper, electrical tape, and a multimeter. You may also need a drill and connectors. Having these tools ensures a smooth, safe installation process.
Can I Install Exterior Led Lights Without Professional Help?
Yes, with basic electrical knowledge and proper tools, you can install LED lights yourself. Follow the manufacturer’s instructions carefully and disconnect the car battery before starting for safety.
How To Connect Led Lights To My Car’s Electrical System?
Identify the positive and negative wires on both the LED light and car. Use connectors or solder wires securely. Test the connection before finalizing to avoid electrical issues.
Conclusion
Installing exterior LED lights on your car is simple and rewarding. Follow each step carefully for the best results. Use the right tools to avoid mistakes or damage. Test the lights before finalizing the setup. Bright, efficient lighting improves safety and style.
Enjoy your car’s new look and better visibility. Keep your installation clean and secure for long-lasting use. Trust your skills and take your time. Ready to drive with confidence and shine on the road!


