
Is your car’s battery acting up, or are you hearing strange noises under the hood? Your alternator might be the culprit.
But how can you be sure without spending money on a mechanic? You can check your alternator quickly and easily using a multimeter. You’ll learn simple steps to test your alternator at home, saving you time and avoiding costly repairs.
Keep reading, because understanding this one skill could keep your car running smoothly and prevent unexpected breakdowns.
Credit: discountstarterandalternator.com
Tools Needed
Checking an alternator with a multimeter requires only a few tools. These tools help you test the alternator’s voltage and performance.
Make sure you have everything ready before starting the test. It will save time and keep you safe.
Digital Multimeter
A digital multimeter is the main tool for this test. It measures voltage, current, and resistance easily.
Choose a multimeter with a voltage setting that covers at least 20 volts DC for car batteries.
Safety Gloves
Wear safety gloves to protect your hands from electrical shocks and sharp edges. Gloves also keep your hands clean.
Use gloves made of rubber or other non-conductive materials for better protection.
Safety Glasses
Safety glasses protect your eyes from sparks or debris when working near the engine. Always wear them during testing.
Choose glasses that fit well and offer clear vision without fogging.
Car Battery
The car battery powers the alternator test. Make sure the battery is fully charged for accurate readings.
If the battery is weak, the test results may be incorrect or unclear.
Wiring Diagram Or Manual
A wiring diagram or vehicle manual helps you locate alternator terminals and connections. It guides proper testing points.
Check the manual for your car model to avoid mistakes and damage.
Safety Precautions
Checking an alternator with a multimeter involves working with electrical parts. It is important to take safety steps to avoid injury or damage.
Follow these safety precautions before and during your test. This helps keep you and your vehicle safe.
Wear Protective Gear
Always wear safety glasses to protect your eyes from sparks or debris. Use gloves to avoid electric shock and keep your hands clean.
Choose gloves made for electrical work. This adds a layer of protection when handling wires and terminals.
Work In A Well-ventilated Area
Run the engine only in a space with good airflow. Exhaust fumes can be harmful if you stay in a closed area.
Open doors or windows to ensure fresh air flows around you while testing the alternator.
Turn Off The Engine Before Connecting
Before attaching the multimeter leads, switch off the engine. This prevents sparks or short circuits when connecting the meter.
Only start the engine after the multimeter is safely connected to the correct points.
Set The Multimeter To The Correct Setting
Choose the right voltage or resistance setting on the multimeter before use. Using the wrong setting can damage the meter or the alternator.
Check the multimeter manual if you are unsure about the correct setting for alternator testing.
Avoid Loose Clothing And Jewelry
Remove any loose clothes or jewelry before starting. These items can get caught in moving parts or cause electrical shorts.
Keep your work area tidy to prevent accidents during the test.
Setting Up The Multimeter
Checking an alternator with a multimeter starts with setting up the tool correctly. Proper setup ensures you get accurate readings. This guide helps you prepare your multimeter for the test.
Follow the steps carefully to avoid mistakes. Setting the multimeter right is key to finding out if your alternator works well.
Selecting The Right Mode
Turn on your multimeter and pick the correct mode for testing. The alternator produces voltage, so use the voltage setting.
Set the multimeter to measure DC voltage (V with a straight line). Alternators produce direct current when the engine runs.
- Look for the DC voltage symbol (V⎓ or V–)
- Set the range above 20 volts for car batteries
- Avoid AC voltage mode (V~) as it gives wrong results
Preparing The Probes
Check the multimeter probes for any damage before use. Clean probe tips help get a clear reading.
Attach the black probe to the multimeter’s COM port. Connect the red probe to the port labeled VΩ or similar.
- Use the black probe for ground or negative points
- Use the red probe for positive points
- Hold probes steady during the test to avoid errors
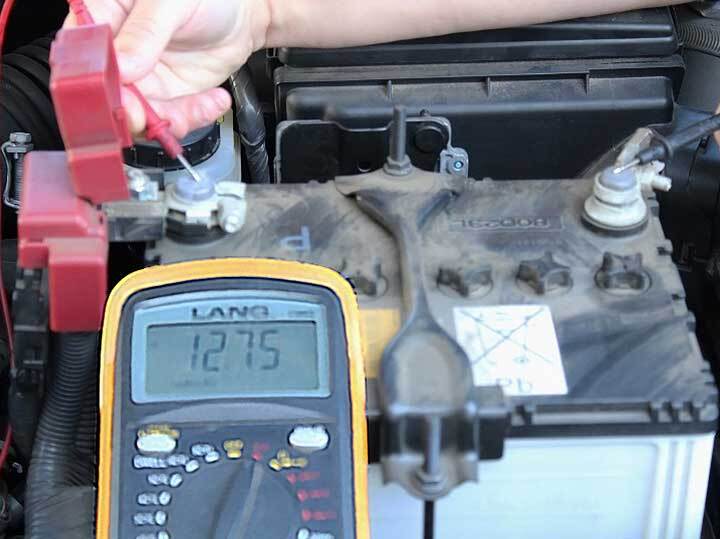
Testing Battery Voltage
Checking your car battery voltage helps find electrical problems. A multimeter is a simple tool for this test.
Testing battery voltage shows if the battery holds a good charge. It also helps check the alternator’s function.
Prepare Your Multimeter
Set your multimeter to measure DC voltage. Choose a range over 12 volts for an accurate reading.
Test Battery Voltage When Engine Is Off
Turn off the car and all electrical devices. Connect the multimeter probes to the battery terminals.
- Red probe on positive (+) battery terminal
- Black probe on negative (–) battery terminal
- Read the voltage on the multimeter screen
A healthy battery should read about 12.6 volts or more when the engine is off.
Check Voltage With Engine Running
Start the engine and keep the multimeter probes connected. The voltage should rise as the alternator charges the battery.
| Condition | Voltage Reading | Meaning |
| Engine Off | 12.6 V or higher | Battery is fully charged |
| Engine Running | 13.7 to 14.7 V | Alternator is charging correctly |
| Engine Running | Below 13.7 V | Alternator may not charge properly |
| Engine Off | Below 12.4 V | Battery may be weak or discharged |
Checking Alternator Output
An alternator is vital for keeping your car’s battery charged. Checking its output with a multimeter is simple. This guide explains how to do it safely.
Use a multimeter to ensure your alternator works well. Follow these steps to check the voltage.
Measuring Voltage At Idle
Start your car and let it idle. Set your multimeter to read voltage. Connect the red probe to the positive battery terminal. Connect the black probe to the negative terminal.
The voltage reading should be between 13.8 and 14.4 volts. This range means your alternator is charging the battery properly.
Measuring Voltage At High Rpm
With the multimeter still connected, increase the engine speed to about 2000 RPM. Watch the voltage reading on the multimeter.
The voltage should remain stable between 13.8 and 14.4 volts. If it drops or rises too much, there may be an issue with the alternator.
- Ensure safety by keeping hands away from moving parts.
- Repeat the test if the voltage seems incorrect.
- Consider professional help if issues persist.

Credit: www.youtube.com
Inspecting Alternator Diode
The alternator diode helps convert AC to DC power in your car’s charging system. A bad diode can cause battery drain or flickering lights.
You can check the alternator diode using a multimeter. This test shows if the diode is working properly or if it is faulty.
Set Your Multimeter To Diode Test Mode
Turn the multimeter dial to the diode test setting. This mode measures voltage drop across the diode and shows if current flows correctly.
If your multimeter does not have a diode mode, use the resistance (ohms) setting instead.
Remove Alternator And Access Diodes
Disconnect the battery to avoid shocks. Remove the alternator from the vehicle to access the diode pack.
Locate the diode pack inside or attached to the alternator housing. This is where you will test each diode.
Test Each Diode For Forward And Reverse Bias
Touch the multimeter probes to each diode’s terminals. Record the readings in both directions to check if the diode allows current one way only.
- Place the red probe on the anode and black on the cathode to test forward bias.
- Place the black probe on the anode and red on the cathode to test reverse bias.
- A good diode shows low voltage in forward bias and high or no reading in reverse bias.
- A bad diode shows low or no reading in both directions.
Interpret Multimeter Readings
If the multimeter shows a reading between 0.5 and 0.8 volts in one direction, the diode is likely good. This means it passes current one way.
If the reading is close to zero or shows no change in both directions, the diode is damaged and must be replaced.
Interpreting Multimeter Readings
Understanding multimeter readings is crucial for checking an alternator. This guide explains how to interpret these readings easily.
A multimeter helps you measure voltage, current, and resistance in your alternator. Correct interpretation ensures your car’s electrical system works properly.
Measuring Voltage
Set the multimeter to DC voltage. Connect the red probe to the battery’s positive terminal and the black probe to the negative terminal.
A healthy alternator should show a reading between 13.8 to 14.4 volts. This indicates the alternator is charging the battery properly.
Checking Current
Switch the multimeter to the current setting. Attach the probes to the battery terminals as before.
Readings should match the alternator’s rated output. If not, there might be an issue with the alternator.
Testing Resistance
Turn the multimeter to the resistance setting. Connect the probes to the alternator’s terminals.
Low resistance indicates a good connection. High resistance suggests potential issues like corrosion or faulty wiring.
| Reading | Expected Value | Indicator |
|---|---|---|
| Voltage | 13.8-14.4V | Normal charging |
| Current | Match alternator’s rating | Proper function |
| Resistance | Low | Good connection |
Common Alternator Issues
An alternator helps charge your car battery and power the electrical system. It works while the engine runs.
If the alternator fails, your car may not start or could lose power quickly. Knowing common problems helps you check it.
Dead Battery Despite Driving
Your battery can die if the alternator does not charge it. The battery light may appear on the dashboard.
This issue causes dim headlights and slow electrical accessories. It means the alternator may not work well.
Strange Noises From Alternator
Alternators can make grinding or whining sounds if the bearings wear out. This noise means parts are failing.
Ignoring these sounds can cause more damage. The alternator may stop working completely soon after.
Electrical Failures In The Vehicle
Flickering or dimming lights, slow power windows, or radio cutting out can point to alternator issues.
The alternator may not supply enough electricity to the car’s systems. This makes electronics work poorly.
Burning Smell Near The Engine
A burning rubber or hot wire smell can come from an overheated alternator. This happens if the belt slips or is too tight.
This smell warns of a possible breakdown. The alternator needs inspection to avoid failure.
Dashboard Warning Lights
The battery or alternator warning light on the dashboard often signals alternator problems. It may glow or flash.
Check the lights quickly. They help you know if the alternator needs testing or repair.
When To Seek Professional Help
Checking your alternator with a multimeter can help spot basic issues. Some problems need expert attention.
Knowing when to see a professional can save you time and money. It keeps your vehicle safe and reliable.
Unusual Noises From The Engine
If you hear grinding or whining noises near the alternator, it may be damaged. This needs a mechanic’s check.
Irregular Voltage Readings
When your multimeter shows very low or very high voltage, the alternator may be failing. A professional can diagnose the cause.
Dashboard Warning Lights Stay On
Battery or alternator warning lights that remain lit mean a problem exists. A trained technician should inspect your vehicle.
Battery Keeps Dying Quickly
If your battery drains fast after charging, the alternator might not be charging it correctly. A mechanic can test and fix this.
Alternator Belt Problems
- Cracked or loose belts
- Squealing noises from the belt area
- Visible wear or damage
Problems with the belt can affect the alternator’s function. A professional should replace or adjust the belt if needed.
Complex Electrical Issues
| Symptom | Possible Cause |
| Flickering lights | Alternator voltage fluctuations |
| Car stalls or won’t start | Alternator or battery failure |
| Burning smell | Overheating alternator or wiring |
If you notice these signs, professional diagnosis is best. They have tools and skills for safe repair.

Credit: carbuzz.com
Frequently Asked Questions
How Do I Test An Alternator With A Multimeter?
Set the multimeter to DC voltage, start the engine, and check voltage across battery terminals. It should read 13. 8 to 14. 8 volts, indicating a healthy alternator.
What Voltage Should An Alternator Output Show?
A healthy alternator should output between 13. 8 and 14. 8 volts when the engine runs. Lower or higher readings suggest alternator issues.
Can A Multimeter Detect Alternator Problems?
Yes, a multimeter can detect alternator issues by measuring voltage output. Abnormal readings indicate potential alternator failure or wiring problems.
When Should I Check My Alternator With A Multimeter?
Check your alternator if the battery warning light is on or electrical systems act erratically. Regular checks prevent unexpected failures.
Conclusion
Checking your alternator with a multimeter is simple and useful. It helps find problems early before they get worse. Just follow the steps carefully and stay safe. Regular checks keep your car’s electrical system healthy. Practice this skill to save time and money on repairs.
A working alternator means a reliable car every day. Try it yourself and see how easy it can be.


