
Is your car running hotter than usual? It might be time to replace your coolant.
Knowing how to do this yourself can save you money and prevent costly engine damage. In this DIY Car Coolant Replacement Guide, you’ll find simple steps that anyone can follow, even if you’ve never worked on a car before. By the end, you’ll feel confident handling your vehicle’s cooling system and keeping your engine in top shape.
Ready to take control of your car’s health? Let’s dive in!

Credit: www.youtube.com
Why Coolant Matters
Car coolant helps keep your engine at the right temperature. It stops the engine from getting too hot or too cold.
Using the right coolant protects your engine and makes your car run smoothly. It also prevents costly damage.
Role In Engine Protection
Coolant moves heat away from the engine to avoid overheating. It keeps engine parts safe from damage.
It also stops rust and corrosion inside the engine’s cooling system. This helps parts last longer and work better.
- Prevents engine overheating
- Protects metal parts from rust
- Keeps the cooling system clean
- Ensures smooth engine operation
Signs Of Low Coolant
Low coolant can cause your engine to overheat quickly. Watch for warning lights on your dashboard.
You might also see steam from under the hood or notice your engine running hotter than usual.
- Dashboard coolant warning light
- Steam or smoke from the engine
- Engine temperature gauge rises
- Coolant puddles under the car
Credit: www.k20a.org
Choosing The Right Coolant
Replacing your car coolant helps keep the engine cool and safe. Picking the right coolant is important for your car’s health.
Coolants come in different types. Each type works best with certain cars. Learn about the options before you buy.
Types Of Coolants
There are three main types of coolant. Each type uses different chemicals to protect the engine.
- Inorganic Acid Technology (IAT): Usually green. Good for older cars.
- Organic Acid Technology (OAT): Usually orange or red. Lasts longer.
- Hybrid Organic Acid Technology (HOAT): Mix of IAT and OAT. Often yellow or turquoise.
Choose the type that fits your car’s age and needs. Using the wrong type can cause damage.
Compatibility With Your Vehicle
Check your car’s manual before buying coolant. It tells you what type works best.
Some cars need special coolant. Mixing different types can cause rust or leaks.
- Read the label to match your car’s coolant type.
- Use the same color coolant as before if unsure.
- Ask a mechanic if you are not sure about compatibility.
Tools And Materials Needed
Replacing your car’s coolant is important for its health. You need the right tools and materials to do it safely.
Gathering everything beforehand will make the process smooth and efficient.
Tools Required
Having the right tools ensures you can replace the coolant without issues.
- Screwdriver set
- Socket wrench
- Funnel
- Drain pan
- Gloves
Materials Needed
These materials are essential for a successful coolant replacement.
| Material | Purpose |
| Coolant | To refill the system |
| Distilled Water | Mixing with coolant |
| Anti-freeze | Prevents freezing |
Safety Equipment
Safety is crucial when working with car fluids. Protect yourself adequately.
- Safety goggles
- Rubber gloves
- Face mask
Credit: www.familyhandyman.com
Preparing Your Vehicle
Replacing your car coolant helps keep your engine running cool. Before you start, prepare your vehicle carefully.
Getting ready includes making sure the engine is cool and finding the coolant reservoir. These steps keep you safe and make the job easier.
Ensuring Engine Is Cool
Never open the coolant system when the engine is hot. Hot coolant can spray and cause burns.
Wait at least one hour after turning off your car. Touch the radiator or engine cover to check if it feels cool.
- Turn off the engine and let it rest
- Check the engine temperature gauge
- Open the hood carefully
- Feel the radiator and engine parts for heat
Locating The Coolant Reservoir
Find the coolant reservoir before starting. It holds the coolant you will replace.
The reservoir is usually a translucent plastic tank near the radiator or engine. Look for a cap labeled “coolant” or with a warning symbol.
- Open the hood and look near the front of the engine bay
- Find a plastic tank with minimum and maximum level marks
- Check for labels or symbols on the cap
- Wear gloves if needed to avoid dirt and heat
Draining Old Coolant
Draining old coolant is an important part of car maintenance. It helps keep the engine cool and prevents damage. Doing this yourself saves money and ensures the job is done right.
Before starting, make sure the engine is cool. Hot coolant can cause burns. Gather all tools and safety gear needed for the process.
Opening The Drain Valve
Locate the drain valve under your car’s radiator. It usually looks like a small valve or petcock. Place a container under it to catch the old coolant.
- Put on gloves and safety glasses to protect yourself.
- Lift the car safely with a jack and support it with stands.
- Find the drain valve at the bottom of the radiator.
- Turn the valve slowly to open it and let the coolant drain out.
- Wait until the coolant stops flowing.
- Close the valve tightly to avoid leaks.
Proper Disposal Methods
Used coolant is toxic and must be disposed of safely. Do not pour it down drains, on the ground, or into water. Follow local rules for disposal.
| Disposal Method | Description |
| Auto Repair Shops | Many accept used coolant for recycling. |
| Hazardous Waste Facilities | Special centers handle toxic liquids safely. |
| Community Collection Events | Some towns hold events for hazardous waste drop-off. |
Flushing The Cooling System
Flushing the cooling system is important for car maintenance. It helps remove dirt and old coolant.
This process ensures your car engine runs smoothly. Regular flushing can prevent overheating issues.
Using Distilled Water
Distilled water is best for flushing your car’s cooling system. It does not contain minerals that can cause buildup.
Using tap water may introduce harmful substances. This can damage the system over time.
- Distilled water prevents scale buildup
- Keeps the cooling system clean
- Improves engine efficiency
When To Perform A Flush
A flush should be done every two years. Some cars may need it sooner based on usage.
Check your car’s manual for specific recommendations. Flushing more often is better for older cars.
- Every 30,000 miles for most cars
- After any repairs to the cooling system
- When the coolant appears dirty
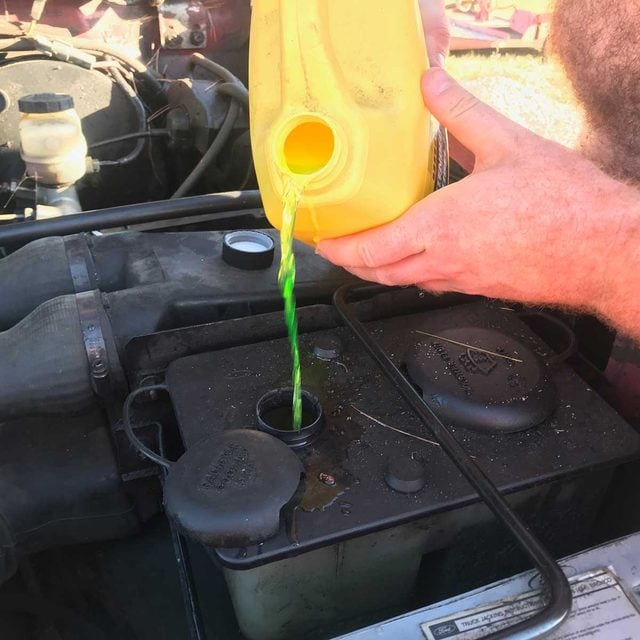
Refilling With New Coolant
Refilling your car’s coolant is important to keep the engine cool. Fresh coolant helps prevent overheating and corrosion.
Use the right mixture and fill the reservoir carefully. This guide shows how to mix coolant and water and how to fill the reservoir properly.
Mixing Coolant And Water
Coolant usually needs to be mixed with water before use. The correct mix protects your engine in hot and cold weather.
- Check your car’s manual for the recommended ratio.
- Use distilled water to avoid minerals that can harm the system.
- Mix coolant and water in a clean container.
- Usually, a 50/50 mix works for most cars.
- Stir the mixture well before pouring.
Filling The Reservoir Correctly
Filling the reservoir the right way keeps the cooling system safe. Overfilling or underfilling can cause problems.
| Action | What to Do | Why |
| Check Coolant Level | Look at the marks on the reservoir | To know how much coolant to add |
| Fill Slowly | Pour the coolant mix carefully | To avoid spills and bubbles |
| Do Not Overfill | Fill to the “Full” line only | Overfilling can cause pressure issues |
| Close Cap Tight | Secure the reservoir cap after filling | Prevents leaks and contamination |
Bleeding Air From The System
Replacing car coolant is a common maintenance task. After refilling, air can get trapped inside the cooling system. This air can cause problems if not removed properly.
Bleeding air from the system helps the coolant flow smoothly. It keeps your engine running at the right temperature and prevents damage.
Why Air Removal Is Important
Air pockets in the cooling system stop coolant flow. This leads to overheating and engine damage. Air also causes noise and reduces heater performance.
- Prevents engine overheating
- Ensures efficient coolant circulation
- Eliminates noise from air bubbles
- Improves heater operation inside the car
- Protects engine parts from corrosion
Steps To Bleed Air
Follow these steps carefully to remove air from your car’s cooling system. Use protective gloves and work on a cool engine.
- Park the car on a level surface and open the radiator cap.
- Locate the bleed valve or screw on the radiator or thermostat housing.
- Start the engine and let it reach normal operating temperature.
- Turn the heater inside the car to the highest setting.
- Slowly open the bleed valve to let trapped air escape.
- Watch for coolant flowing steadily without bubbles.
- Close the bleed valve tightly once air is fully released.
- Top off coolant if the level drops and replace the radiator cap.
- Turn off the engine and check for leaks around the valve.
- Repeat the process if you still hear air or see bubbles.
Checking For Leaks And Final Steps
After replacing your car coolant, it is important to check for leaks. This helps keep your engine safe and working well.
Following the refill, you should inspect hoses, connections, and monitor coolant levels. These steps ensure your coolant system works correctly.
Inspecting Hoses And Connections
Look closely at all hoses connected to the radiator and engine. Check if any hose feels soft, cracked, or swollen.
Check the clamps and connections. Make sure they are tight and secure to stop any coolant from leaking out.
- Feel hoses for any soft or weak spots
- Look for cracks, holes, or leaks
- Check clamps and tighten if loose
- Replace damaged hoses to prevent leaks
Monitoring Coolant Levels Post-refill
After you refill the coolant, check the level regularly. Coolant can settle or leak if there is a problem.
Keep an eye on the coolant reservoir for a few days. Fill it up if the level drops below the recommended mark.
- Check coolant level daily for the first week
- Look for any puddles under the car
- Refill coolant if the level is low
- Visit a mechanic if levels drop often
Maintenance Tips For Longevity
Car coolant helps keep your engine cool and working well. Taking care of your coolant can stop engine problems.
Regular checks and timely replacement keep your car running smoothly for a long time.
Regular Coolant Checks
Check your coolant level at least once a month. Low coolant can cause your engine to overheat.
Look for leaks or discoloration in the coolant. Clear coolant works best, while rusty or dirty coolant needs attention.
- Open the hood and find the coolant reservoir.
- Check the level against the marks on the tank.
- Look for any cracks or leaks in hoses.
- Observe the coolant color for any changes.
When To Replace Coolant Again
Replace coolant every 2 to 5 years or as your car manual says. Old coolant loses its ability to protect your engine.
Signs you need new coolant include overheating, strange smells, or visible rust inside the reservoir.
- Check the car manual for the replacement schedule.
- Flush and refill coolant if it looks dirty or rusty.
- Replace coolant after fixing any leaks.
- Use the right type of coolant for your car model.
Frequently Asked Questions
How Often Should I Replace Car Coolant?
Replace car coolant every 2 to 5 years or 30,000 to 50,000 miles. Check your owner’s manual for exact intervals. Regular replacement prevents engine overheating and corrosion.
What Tools Do I Need For Diy Coolant Replacement?
You need gloves, a drain pan, a funnel, a wrench, and new coolant. Also, have a hose to flush the radiator if necessary. Safety goggles are recommended.
Can I Mix Different Types Of Coolant?
No, mixing different coolant types can damage your engine. Always use the coolant type specified in your vehicle’s manual. Mixing may cause chemical reactions and reduce cooling efficiency.
How Do I Safely Dispose Of Old Coolant?
Take old coolant to a recycling center or auto shop. Never pour it down drains or on the ground. It is toxic and harmful to the environment.
Conclusion
Replacing your car coolant is simple and saves money. Follow the steps carefully and take safety first. Use the right coolant for your car model. Regular checks keep your engine cool and avoid damage. Stay patient and work slowly to avoid mistakes.
Your car will run smoother and last longer. Keep your tools ready for the next time. Small efforts now prevent big problems later. Stay safe and enjoy a cooler ride.


