
Are your car’s leather seats looking dull or feeling sticky? Keeping leather seats clean isn’t just about appearance—it protects your investment and keeps your ride comfortable.
You might think cleaning leather is tricky or risky, but with the right steps, it’s easier than you expect. You’ll discover simple, effective methods to make your leather seats look fresh and last longer. Ready to give your car’s interior the care it deserves?
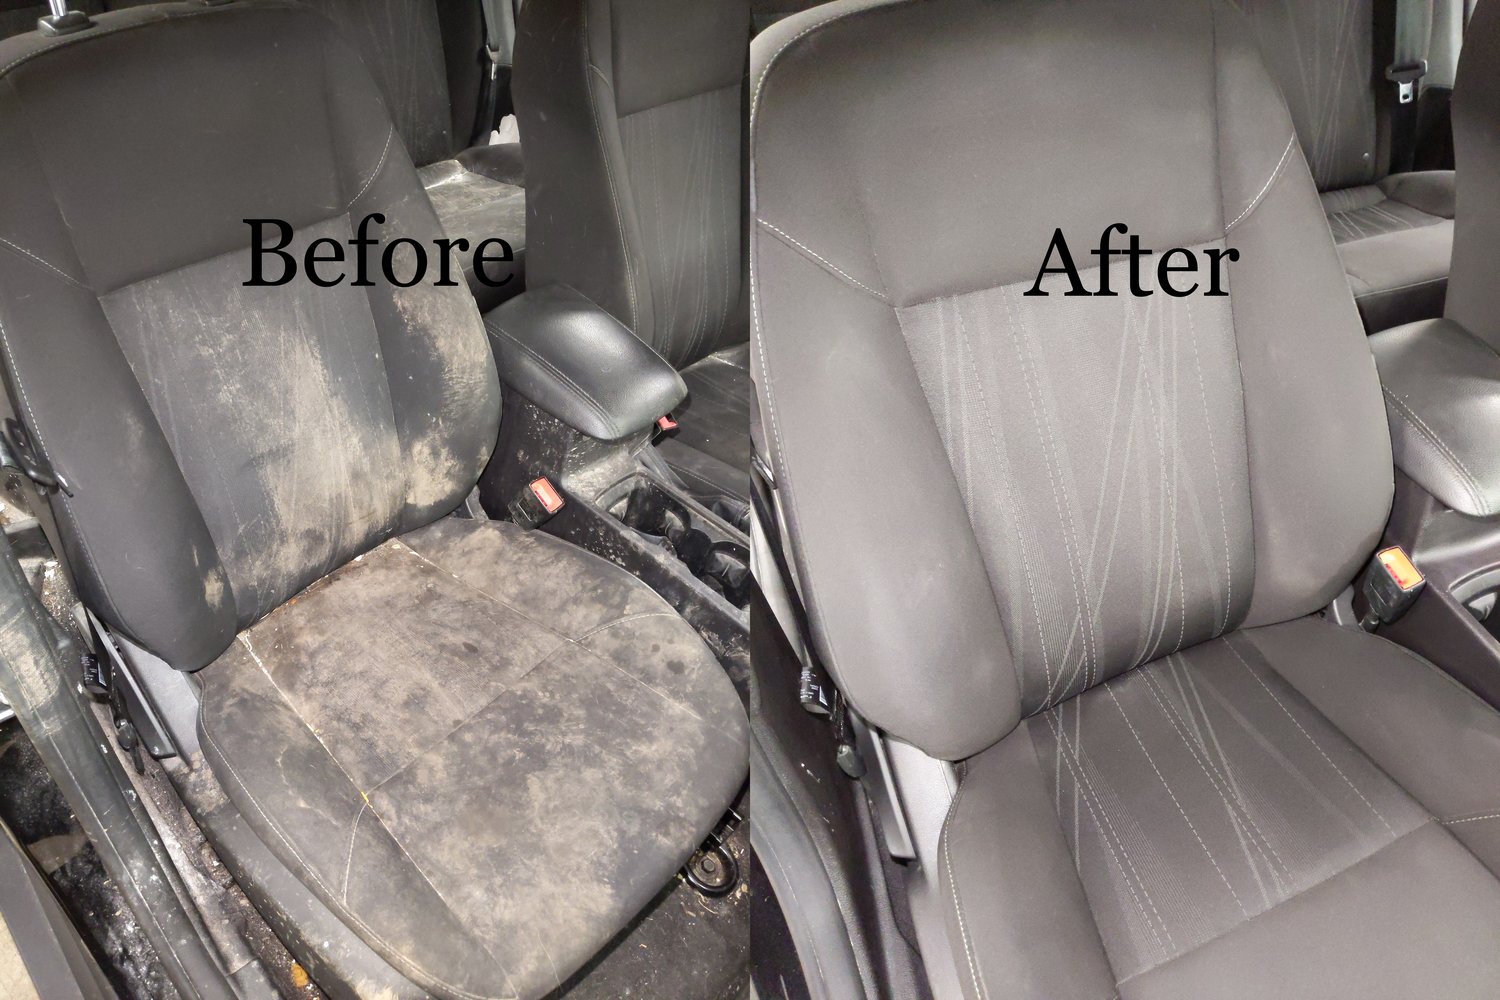
Let’s get started.

Credit: www.fibrenew.com
Choosing The Right Cleaning Products
Cleaning leather seats in your car needs the right products. Using the wrong cleaner can damage the leather. It is important to pick safe and effective options.
In this guide, we look at different types of cleaners. Learn which ones work best and which to avoid for your car’s leather seats.
Leather Cleaners Vs. Household Cleaners
Leather cleaners are made for soft and sensitive leather. Household cleaners often contain harsh chemicals. These can dry out or crack leather.
- Leather cleaners keep leather soft and clean.
- Household cleaners can strip oils from leather.
- Using the wrong cleaner may cause discoloration.
- Leather-specific products often have conditioners included.
Natural Cleaning Alternatives
Natural cleaners are gentle on leather and eco-friendly. Many use simple ingredients found at home. Always test on a small area first.
| Natural Cleaner | How to Use | Benefits |
| White Vinegar and Water | Mix equal parts, apply with soft cloth | Removes dirt, mild disinfectant |
| Coconut Oil | Rub small amount, buff with cloth | Moisturizes and shines leather |
| Baking Soda | Sprinkle on stains, brush off after 30 mins | Absorbs oils and odors |
Avoiding Harmful Ingredients
Check product labels for harmful ingredients. Some chemicals damage leather over time. Avoid these to keep seats in good shape.
- Ammonia
- Bleach
- Alcohol
- Strong acids or alkalis
- Abrasive powders
Preparing Your Car For Cleaning
Cleaning leather seats in your car starts with good preparation. This helps protect the leather and makes cleaning easier.
Before applying any cleaner, you need to remove dirt and test products safely. Also, gather all needed tools.
Removing Loose Dirt And Debris
First, clear loose dirt and dust from the leather seats. Use a soft brush or vacuum cleaner with a soft brush attachment.
Do this gently to avoid scratching the leather surface. Removing debris prevents rubbing dirt deeper into the leather when cleaning.
Testing Products On A Small Area
Always test cleaning products on a hidden spot of the leather seat. This check helps avoid damage or discoloration.
- Choose a small, hidden area like under the seat or near a seam.
- Apply a small amount of the cleaner and wait 5 to 10 minutes.
- Look for any color change, fading, or texture damage.
- If the leather looks fine, you can use the product on the entire seat.
Gathering Cleaning Tools
Collect all tools needed before you start cleaning. Having everything ready makes the process smooth and safe.
| Tool | Purpose |
|---|---|
| Soft brush | Remove dirt without scratching leather |
| Vacuum cleaner | Pick up loose dust and crumbs |
| Microfiber cloths | Apply cleaner and wipe seats |
| Leather cleaner | Gently clean and condition leather |
| Bucket of warm water | Rinse cloths and dilute cleaner if needed |
Step-by-step Cleaning Process
Cleaning leather seats keeps your car looking fresh. Dirt and stains can damage the leather.
Follow these simple steps to clean your leather seats safely and effectively.
Vacuuming The Seats
Start by vacuuming the seats to remove loose dirt and dust. Use a soft brush attachment to avoid scratching the leather.
Pay close attention to seams and crevices where dirt collects.
Applying Cleaner With Soft Cloth
Choose a cleaner made for leather seats. Apply a small amount to a soft cloth.
Gently rub the cleaner onto the leather in a circular motion. Avoid soaking the leather.
- Use a microfiber or cotton cloth
- Test cleaner on a hidden spot first
- Work in small sections
- Do not scrub hard
Using A Soft Brush For Stubborn Stains
For tough stains, use a soft-bristled brush to gently lift dirt. Brush lightly to protect the leather.
| Type of Stain | Brush Used | Cleaning Tip |
| Ink | Soft Nylon | Apply cleaner first |
| Food | Soft Horsehair | Brush after cleaner dries |
| Oil | Soft Nylon | Blot before brushing |
Wiping Off Residue
Use a clean, damp cloth to wipe off any cleaner residue from the seats. Make sure no cleaner remains.
Finally, dry the seats with a dry cloth to prevent water spots and keep leather smooth.
Credit: www.drivebydetail.net
Conditioning Leather Seats
Leather seats in cars need care to stay soft and strong. Conditioning helps keep leather from drying out or cracking.
Using the right conditioner keeps the seats looking new and adds a layer of protection.
Importance Of Conditioning
Leather can dry and crack without proper care. Conditioning adds moisture to the leather.
This process helps the leather last longer and look better over time.
- Prevents drying and cracking
- Keeps leather soft and smooth
- Protects against stains and spills
- Maintains the seat’s original look
Choosing The Right Conditioner
Pick a conditioner made for car leather seats. Not all leather products work well on car seats.
Look for a product that cleans and conditions without leaving a sticky feel.
- Use conditioners designed for automotive leather
- Avoid products with harsh chemicals or wax
- Check if the product is safe for your leather type
- Test on a small seat area first
Application Tips
Clean the seats before applying conditioner. Dirt can cause damage if left on the leather.
Apply conditioner evenly and gently with a soft cloth. Let it absorb before using the car.
- Use a microfiber cloth to apply conditioner
- Work in small sections for even coverage
- Allow the conditioner to soak in for 10-15 minutes
- Buff off any extra with a clean cloth
- Condition seats every 3-6 months for best care
Dealing With Tough Stains
Leather seats in cars can get dirty fast. Some stains are hard to clean. This guide helps you remove tough marks safely.
Use gentle methods and the right products. Avoid harsh chemicals that can damage leather.
Ink And Dye Removal
Ink and dye stains need quick attention. Dab the stain gently with a clean cloth. Do not rub hard to avoid spreading.
- Use a cotton swab dipped in rubbing alcohol.
- Lightly blot the stain until it fades.
- Apply leather conditioner after cleaning.
- Test on a hidden area first.
Grease And Oil Stains
Grease and oil can leave dark spots. Sprinkle baking soda or cornstarch on the stain. Let it sit for 15 minutes.
Gently brush off the powder. If the stain stays, use mild soap and warm water to clean it.
Water Spots And Mildew
Water spots and mildew damage leather over time. Clean with a soft cloth dampened with equal parts water and white vinegar.
| Problem | Cause | Cleaning Method |
| Water Spots | Hard water drops | Wipe with damp cloth, dry quickly |
| Mildew | Moisture and poor ventilation | Use vinegar solution, then dry well |

Credit: apexautopros.com
Maintaining Leather Seats For Longevity
Leather seats add a touch of luxury and comfort to your car. Proper care ensures they last for years.
Learn how to maintain them with regular cleaning, sun protection, and by avoiding common mistakes.
Regular Cleaning Schedule
Cleaning leather seats regularly prevents dirt build-up and maintains their look.
- Vacuum the seats to remove dust.
- Apply leather cleaner with a soft cloth.
- Use a conditioner to keep leather soft.
Protecting From Sun Damage
The sun can cause leather to fade and crack. Protect seats from UV damage.
- Park in shaded areas or use a car cover.
- Apply UV protectant on leather surfaces.
- Use sunshades on windows to block direct sunlight.
Avoiding Common Mistakes
Some common actions can harm your leather seats. Be aware and avoid them.
| Mistake | Why to Avoid |
| Using harsh chemicals | They can strip the leather’s natural oils. |
| Skipping regular cleaning | Dirt can cause abrasions over time. |
| Excessive water usage | Water can cause stains and damage. |
Frequently Asked Questions
How Often Should I Clean Leather Car Seats?
Clean leather seats every 3 to 6 months to maintain their look. Regular cleaning prevents dirt buildup and cracks, extending seat life. Use gentle leather cleaners and conditioners for best results.
What Is The Best Cleaner For Leather Car Seats?
Use a pH-balanced, leather-specific cleaner to protect the material. Avoid harsh chemicals or ammonia-based products that can damage leather. Test any cleaner on a hidden area first for safety.
Can I Use Household Products On Leather Seats?
Household products can harm leather by drying or discoloring it. Stick to products designed for leather to ensure safe cleaning. Using the wrong cleaner may cause permanent damage or stains.
How Do I Remove Stains From Leather Car Seats?
Blot stains gently with a soft cloth and leather cleaner. Avoid rubbing harshly to prevent damage. For tough stains, use a specialized leather stain remover following instructions carefully.
Conclusion
Clean leather seats keep your car looking fresh and new. Regular cleaning stops dirt and stains from building up. Use gentle cleaners and soft cloths to protect the leather. Avoid harsh chemicals that can damage the surface. Dry seats carefully after cleaning to prevent cracks.
Small, simple steps make a big difference. Your car feels more comfortable and inviting. Take care of your leather seats often for the best results. Clean seats also help keep your car’s value high. A little effort goes a long way.


