
Your tire valve might seem like a small part, but it plays a big role in keeping your tires properly inflated and your ride safe. If you’ve noticed your tire losing air or a hissing sound near the valve, it’s time to take action.
Replacing a tire valve might sound tricky, but with the right steps, you can do it yourself and save time and money. In this guide, you’ll find clear, simple instructions that anyone can follow. Keep reading, and by the end, you’ll have the confidence to fix your tire valve like a pro.
Tools And Materials Needed
Replacing a tire valve is a simple task if you have the right tools and materials. This guide will help you prepare everything before starting.
Gathering proper equipment ensures the job goes smoothly and safely. Let’s look at what you need.
Essential Tools
You need some basic tools to replace a tire valve. These tools help remove and install the valve without damaging the tire or rim.
- Valve core remover tool
- Tire pressure gauge
- Jack and lug wrench
- Tire iron or tire lever
- Air compressor or pump
- Soap and water spray bottle
Choosing The Right Valve
Choose a valve that fits your tire type. Valves come in different sizes and materials to match various wheels.
Most passenger cars use Schrader valves. Some bikes and performance cars use Presta valves. Check your tire or wheel manual to be sure.
- Schrader valves: common in cars and trucks
- Presta valves: used in bicycles and some sports cars
- Metal or rubber valve stems based on durability needs
Safety Gear
Wear safety gear to protect yourself during the valve replacement. Safety reduces the risk of injury.
Use gloves to protect your hands and safety glasses to shield your eyes from dirt or debris.
- Protective gloves
- Safety glasses
- Closed-toe shoes

Credit: www.youtube.com
Preparing Your Vehicle
Replacing a tire valve starts with getting your vehicle ready. Proper preparation makes the task safer and easier.
Follow the right steps to park and secure your vehicle, remove the wheel, and deflate the tire.
Parking And Securing
Park your vehicle on a flat, firm surface away from traffic. Turn off the engine and apply the parking brake to stop any movement.
- Find a level area free of obstacles.
- Engage the parking brake firmly.
- Place wheel chocks behind the wheels still on the ground.
- Turn on your hazard lights for safety.
Removing The Wheel
Remove the wheel carefully to access the tire valve. Use the right tools and keep safety in mind.
- Loosen the lug nuts slightly before lifting the vehicle.
- Use a jack to raise the vehicle off the ground.
- Remove the lug nuts completely and take off the wheel.
- Place the wheel flat on the ground to avoid damage.
Deflating The Tire
Deflate the tire fully before removing the valve. This step ensures safety and easier valve removal.
| Action | Details |
| Locate valve stem | Find the tire valve on the wheel rim. |
| Remove valve cap | Unscrew and keep it safe. |
| Press valve core | Use a valve core tool or small object to release air. |
| Wait until tire is empty | Listen for air escaping until no sound remains. |
Removing The Old Valve
Replacing a tire valve starts with removing the old one carefully. This part guides you through the process step by step.
Follow these instructions to remove the valve without damaging the tire or rim.
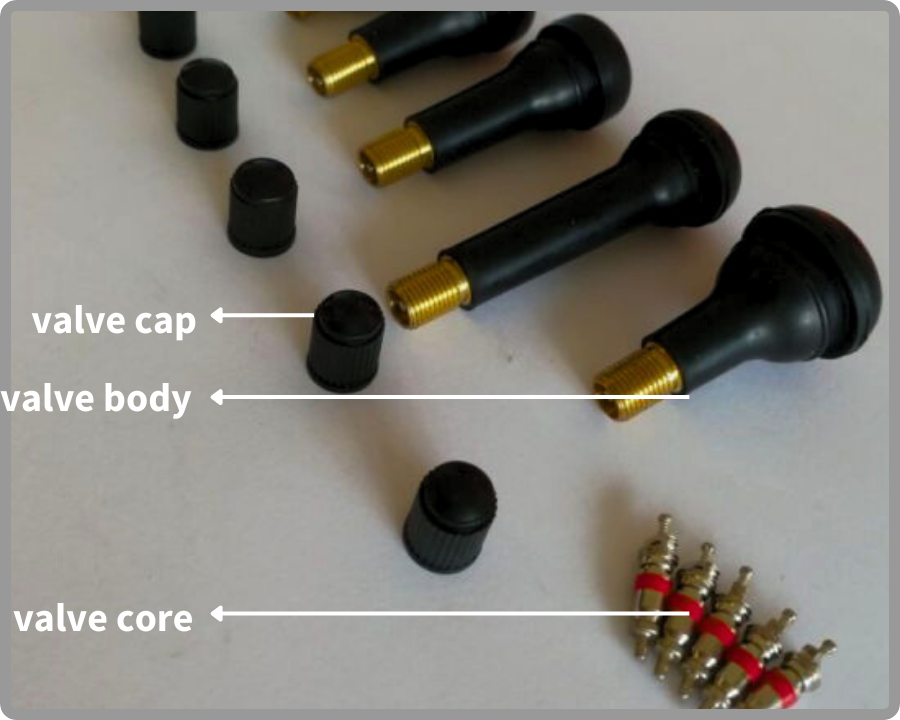
Locating The Valve Stem
The valve stem is a small tube sticking out from the wheel rim. It holds the valve core and lets air in and out of the tire.
- Look around the edge of the wheel for the valve stem.
- It usually has a small cap on top to protect it from dirt.
- Clean around the valve stem before starting to remove it.
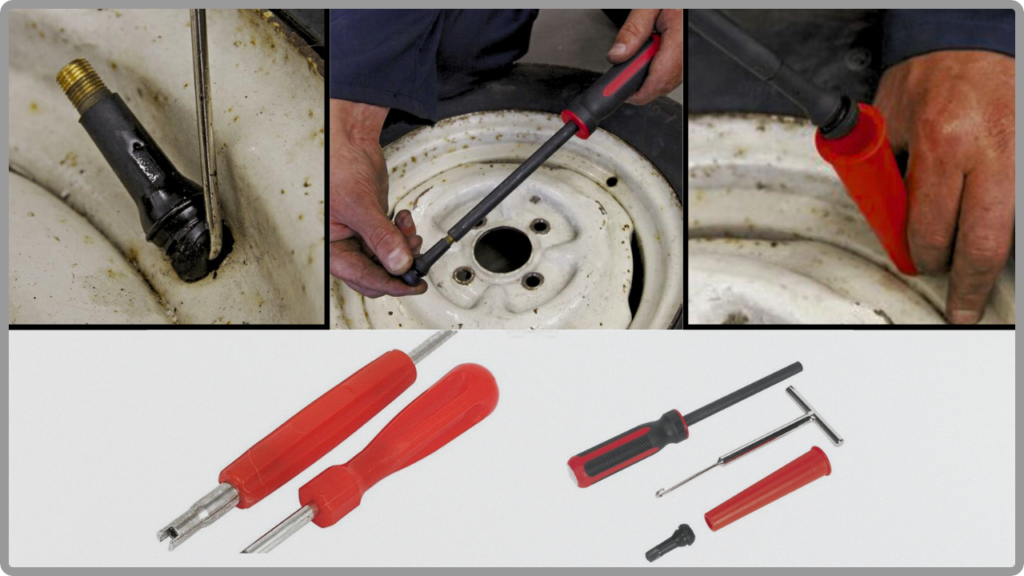
Detaching The Valve Core
The valve core is the inner part that controls air flow. You need a valve core remover tool to detach it safely.
- Remove the valve cap by twisting it off.
- Insert the valve core remover into the valve stem.
- Turn the tool counterclockwise to unscrew the valve core.
- Pull out the valve core carefully and set it aside.
Extracting The Valve Stem
After removing the valve core, the valve stem must be pulled out from the rim. Use pliers or your hands to do this step.
| Tool | Use |
|---|---|
| Pliers | Grip and pull the valve stem out carefully |
| Hands | Pull if the valve stem is loose and easy to remove |
Credit: tireonway.com
Installing The New Valve
Replacing a tire valve requires careful steps to ensure a secure fit. Installing the new valve correctly helps prevent air leaks.
This guide covers inserting the valve stem, securing it, and reinstalling the valve core. Follow each part closely for best results.
Inserting The New Valve Stem
Start by pushing the new valve stem through the hole in the rim. Make sure the rubber base sits flush against the inside of the rim.
Use steady pressure to avoid bending or damaging the valve stem during insertion.
Securing The Valve
Once the valve stem is inserted, tighten the valve nut on the outside of the rim. This holds the valve firmly in place.
- Hand-tighten the valve nut onto the stem.
- Use a wrench to snug the nut gently.
- Do not over-tighten to avoid damaging the valve or rim.
- Check that the valve stem does not move or wiggle.
Reinstalling The Valve Core
After securing the valve stem, screw the valve core back into place using a valve core tool.
| Step | Action |
|---|---|
| 1 | Insert the valve core into the valve stem. |
| 2 | Use the valve core tool to turn clockwise. |
| 3 | Stop turning once the core is tight. |
| 4 | Check for leaks after installation. |
Reassembling And Testing
After replacing the tire valve, it is important to reassemble the parts correctly. Testing the valve and tire ensures safety and proper function.
This section explains how to inflate the tire, check for leaks, and mount the wheel back on the vehicle.
Inflating The Tire
Use an air compressor or a hand pump to inflate the tire. Add air slowly and watch the pressure gauge.
Fill the tire to the pressure recommended by the vehicle manufacturer. Do not overinflate the tire.
Checking For Leaks
After inflating, check the valve and tire for air leaks. Use soapy water and apply it around the valve area.
Bubbles will form if there is a leak. Tighten the valve or replace it again if you find leaks.
- Mix water with a small amount of soap
- Apply the mixture around the valve stem
- Look for bubbles indicating air escape
- Fix any leaks before mounting the wheel
Mounting The Wheel Back
Place the wheel back on the hub carefully. Align the wheel holes with the studs on the vehicle.
Hand-tighten the lug nuts first. Then, use a wrench to tighten them in a star pattern to secure the wheel evenly.
- Lift the wheel and align it with hub studs
- Put on the lug nuts by hand
- Tighten nuts in a crisscross pattern
- Lower the vehicle and fully tighten the nuts
Tips For Maintenance
Regular maintenance of tire valves keeps your vehicle safe. Valves control air pressure, preventing blowouts.
Learn how to check, replace, and protect your tire valves. These tips will help extend their lifespan.
Regular Valve Checks
Checking your tire valves should be a routine part of car maintenance. Look for signs of wear or damage.
- Inspect for cracks or leaks
- Ensure valve caps are tight
- Check air pressure regularly
When To Replace Valves
Valves need replacement if they are damaged or old. Replace them to ensure safe driving conditions.
| Condition | Action |
| Cracks | Replace immediately |
| Leaking air | Inspect and replace |
| Missing cap | Replace cap |
Preventing Valve Damage
Protect your valves to avoid unnecessary replacements. Simple precautions can save you time and money.
Credit: tireonway.com
Frequently Asked Questions
How Do I Know When To Replace A Tire Valve?
You should replace a tire valve if you notice air leaks, cracks, or damage. Regular checks during tire maintenance help spot issues early. If the valve core is faulty or the valve stem is corroded, replacement is necessary to maintain proper tire pressure.
What Tools Are Needed To Replace A Tire Valve?
To replace a tire valve, you need a valve core remover, tire iron, air compressor, and a new valve stem. These tools ensure safe and effective valve removal and installation. Having a tire pressure gauge is also helpful for checking pressure after replacement.
Can I Replace A Tire Valve Without Removing The Tire?
Replacing a valve stem generally requires removing the tire from the rim. This allows proper access to the valve for safe replacement. Some valve cores can be replaced without tire removal, but full valve stem replacement needs tire removal for best results.
How Long Does It Take To Replace A Tire Valve?
Replacing a tire valve usually takes about 15 to 30 minutes. The process depends on your experience and the tools available. Professional mechanics can complete the job quickly while DIY replacements may take a bit longer.
Conclusion
Replacing a tire valve can be simple and safe. Follow each step carefully to avoid mistakes. Use the right tools and take your time. Check the valve for leaks after replacement. Regular tire care helps your vehicle run smoothly. Keep this guide handy for future tire needs.
Taking small actions protects your safety on the road. Stay confident in handling basic car repairs yourself.


