
Changing your oil at home can save you money and give you a sense of accomplishment. But if you’re not careful, it can also get messy and even dangerous.
That’s where an oil drain pan comes in—it’s your best friend for catching used oil without spills or stains. Want to know how to use your oil drain pan safely and effectively? Keep reading, because mastering this simple tool will protect your workspace, keep you clean, and make your oil change hassle-free.
Let’s dive into the essential tips you need to get it right every time.
Choosing The Right Oil Drain Pan
Using an oil drain pan helps keep your workspace clean. It catches old oil when you change it. Choosing the right pan makes the job easier and safer.
This guide covers important points to consider. Look at the material, size, and useful features before buying a pan.
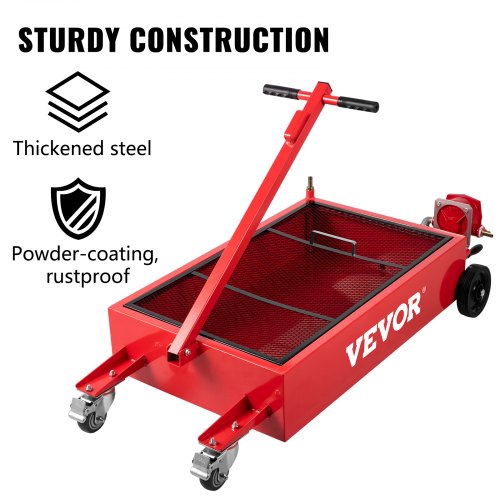
Material Types And Durability
Oil drain pans come in different materials. Plastic pans are lightweight and affordable. Metal pans last longer and resist damage. Choose a material that suits your needs and use.
- Plastic: Easy to carry, may crack over time
- Steel: Strong and durable, heavier to handle
- Aluminum: Lightweight and rust-resistant
- Rubber-coated pans: Prevent slipping and add durability
Size And Capacity Considerations
Select a pan size that fits your vehicle’s oil volume. Too small pans can overflow. Too large pans may be hard to store or clean.
| Vehicle Type | Oil Capacity (quarts) | Recommended Pan Size (quarts) |
|---|---|---|
| Small Cars | 4-5 | 6-8 |
| SUVs and Trucks | 6-8 | 9-12 |
| Large Vehicles | 9+ | 13+ |
Features To Look For
Some features make oil draining easier and safer. Look for pans with these helpful options.
- Built-in spouts for easy pouring
- Handles for secure grip and carrying
- Wide base to prevent tipping
- Measurement marks to track oil volume
- Sealed lids to store used oil safely
Credit: www.vevor.ca
Preparing For The Oil Change
Changing your vehicle’s oil is important for its health. Preparing properly helps you do the job safely and smoothly.
Using an oil drain pan correctly keeps your work area clean. Follow these steps before you start the oil change.
Gathering Necessary Tools
Before you begin, collect all the tools you need. This saves time and prevents interruptions during the oil change.
- Oil drain pan to catch old oil
- Wrenches or socket set for the drain plug
- New oil and oil filter
- Funnel to pour new oil
- Rags or paper towels for cleaning spills
- Gloves to keep your hands clean
Ensuring Vehicle Stability
Make sure your vehicle is stable before working underneath it. This helps prevent accidents and injuries.
Park your car on a flat surface. Use wheel chocks to stop the vehicle from rolling.
- Engage the parking brake
- Place wheel chocks behind rear tires
- If lifting the car, use jack stands for support
- Never rely on a car jack alone
Wearing Protective Gear
Protect yourself by wearing the right gear. This keeps you safe from hot oil and sharp parts.
Wear gloves to avoid skin contact with oil. Use safety glasses to protect your eyes from splashes.
- Use heat-resistant gloves if oil is hot
- Wear long sleeves to protect your arms
- Safety glasses prevent oil from getting into your eyes
- Consider old clothes that can get dirty
Proper Oil Drain Techniques
Changing your vehicle’s oil safely requires using the right tools and methods. An oil drain pan helps catch used oil without making a mess.
Follow proper steps to avoid spills and protect yourself and the environment.
Locating The Drain Plug
Find the drain plug under your vehicle by checking the owner’s manual. It is usually a large bolt at the bottom of the oil pan.
Make sure the vehicle is on a flat surface and use jack stands if needed to lift the car safely.
Positioning The Drain Pan
Place the drain pan directly under the drain plug to catch all the oil. The pan should be wide and deep enough to hold all drained oil.
- Check that the pan is clean and free of debris
- Wear gloves to avoid contact with used oil
- Keep a rag nearby for any spills
- Make sure the pan is stable and won’t tip over
Controlling Oil Flow
Slowly loosen the drain plug to control the oil flow and prevent splashing. Be careful as hot oil may cause burns.
| Action | Reason |
| Loosen plug slowly | Prevents sudden oil gush |
| Wear gloves | Protects skin from hot oil |
| Keep drain pan steady | Avoids oil spills |
| Dispose oil properly | Protects environment |
Handling Used Oil Safely
Used oil can harm the environment if not handled properly. It is important to use an oil drain pan safely to avoid accidents and spills.
Following safe steps protects you and the area where you work. This guide covers how to avoid spills, store oil, and dispose of it the right way.
Avoiding Spills And Leaks
Spills and leaks cause pollution and create slippery surfaces. Use these tips to keep your workspace clean and safe.
- Place the oil drain pan on a flat surface before draining.
- Do not overfill the pan to prevent overflow.
- Use a funnel to transfer oil to containers without spilling.
- Clean any small spills immediately with absorbent material.
Storing Used Oil
Store used oil in a safe container to avoid leaks and contamination. Label containers clearly to prevent mix-ups.
| Storage Tip | Reason |
| Use a sealed, leak-proof container | Prevents spills and keeps oil clean |
| Keep containers away from heat and flames | Avoids fire hazards |
| Store containers in a cool, dry place | Prevents container damage and oil degradation |
| Label containers with “Used Oil” | Makes identification easy and safe |
Disposing Of Oil Responsibly
Do not pour used oil down drains or on the ground. Dispose of it at approved recycling centers or collection points.
- Find local recycling centers that accept used oil.
- Transport oil in sealed containers to avoid leaks.
- Never mix used oil with other liquids.
- Follow local laws and guidelines for disposal.
Cleaning And Maintaining The Drain Pan
Keeping your oil drain pan clean helps it last longer. Proper care also keeps your workspace safe and tidy.
Regular cleaning and checking for damage are important. Store the pan carefully to use it again.
Removing Residual Oil
After draining oil, pour out leftover oil from the pan. Use a paper towel to wipe the inside.
Dispose of oil-soaked towels safely. Avoid pouring oil down drains or on the ground.
- Wear gloves to protect your hands
- Use absorbent materials for spills
- Collect oil in a sealed container for recycling
Inspecting For Damage
Look for cracks, holes, or rust in the pan. Damage can cause leaks and spills.
Check the drain plug or valve for tightness and wear. Fix or replace damaged parts before use.
- Examine the pan surface for dents
- Test the drain plug to ensure it seals well
- Replace the pan if damage is severe
Storing For Future Use
Store the drain pan in a clean, dry place. Avoid areas with direct sunlight or extreme heat.
Keep the pan covered to stop dust and dirt buildup. Store it upside down to avoid collecting debris.
- Dry the pan completely before storage
- Keep it away from chemicals that may cause damage
- Label the storage area for easy finding

Credit: kapscomoto.com
Common Mistakes To Avoid
Using an oil drain pan is essential for car maintenance. Many people make mistakes that can lead to spills or accidents. Avoid these common errors to ensure safe and clean oil changes.
Overfilling The Pan
Overfilling the oil drain pan is a common mistake. It can cause oil to spill over, creating a mess. Always check the pan’s capacity before starting.
- Check the pan’s maximum fill line
- Empty the pan if nearing capacity
- Have extra containers ready
Ignoring Safety Precautions
Ignoring safety precautions can lead to accidents. Always wear protective gear when handling oil. Safety should be your top priority.
- Wear gloves to protect your skin
- Use goggles to shield your eyes
- Ensure proper ventilation in the area
Mixing Different Fluids
Mixing different fluids in the drain pan is risky. It can cause chemical reactions or make recycling difficult. Keep each fluid separate to avoid problems.
- Use separate pans for different fluids
- Label containers clearly
- Dispose of fluids according to local regulations

Credit: www.reddit.com
Frequently Asked Questions
What Is The Purpose Of An Oil Drain Pan?
An oil drain pan collects used engine oil during oil changes. It prevents spills and keeps the workspace clean. Using it correctly helps protect the environment and makes disposal easier.
How Do I Safely Position An Oil Drain Pan?
Place the pan directly under the oil drain plug. Ensure it covers the entire opening to catch all oil. Use a flat surface to avoid spills and maintain stability.
Can I Reuse An Oil Drain Pan Multiple Times?
Yes, you can reuse an oil drain pan if cleaned properly. Wash it with soap and water after each use. Avoid mixing different fluids to prevent contamination.
How Do I Dispose Of Used Oil From The Pan?
Transfer used oil into a sealed container for recycling. Take it to a certified recycling center or auto shop. Never pour oil down drains or on the ground.
Conclusion
Using an oil drain pan safely helps protect your workspace and environment. Always place it on a flat surface to avoid spills. Wear gloves to keep your hands clean and safe. Dispose of used oil properly to prevent pollution. Clean the pan after each use to keep it ready.
Following these simple steps makes oil changes easier and safer. Stay cautious and protect yourself while working on your vehicle. Safety first, every time.


