
Is your car’s leather interior looking worn, cracked, or faded? You don’t have to live with those imperfections or spend a fortune on replacements.
Repairing your leather interior can bring back that fresh, luxurious feel and save you money. You’ll discover simple, effective ways to fix your leather seats and restore your car’s style. Keep reading to learn how you can protect your investment and enjoy a smooth, comfortable ride every time you get behind the wheel.
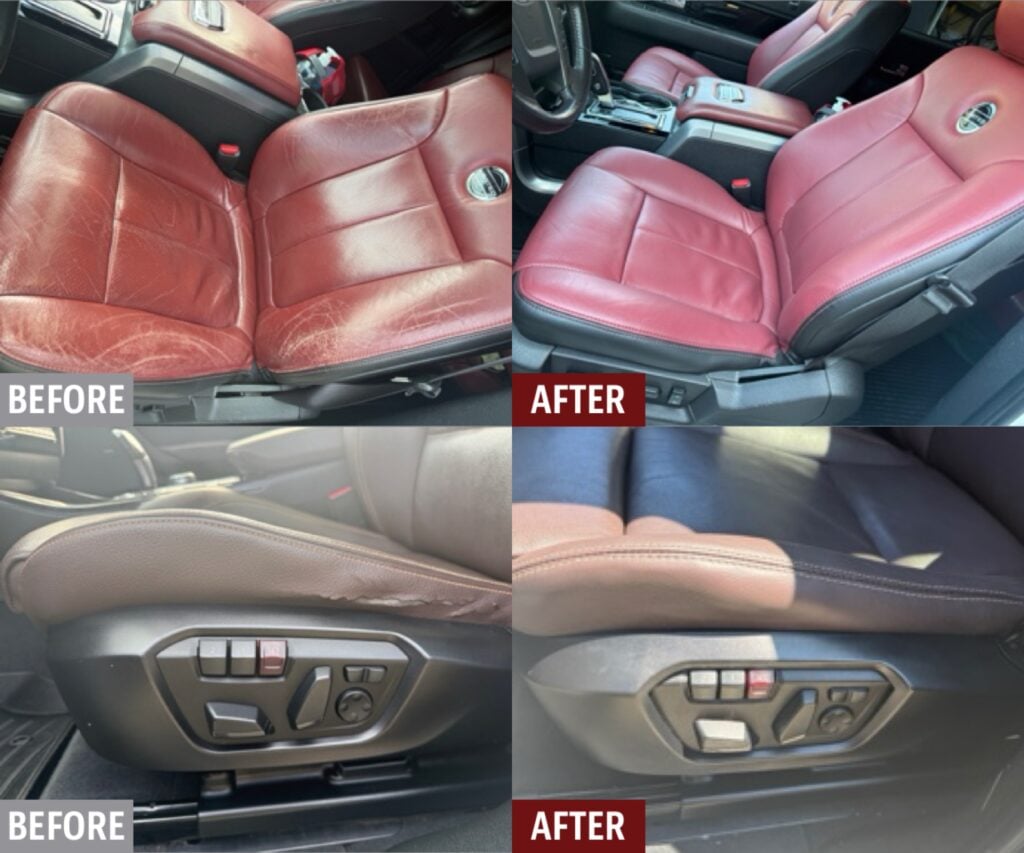
Credit: www.fibrenew.com
Assessing Leather Damage
Leather car interiors can suffer damage over time. Checking the condition helps decide repair needs.
Look closely at the leather to find signs of wear and damage. Early detection saves time and money.
Common Types Of Leather Wear
Leather shows wear in many ways. Some types are easy to spot, others need careful inspection.
- Fading or discoloration from sunlight
- Dryness and stiffness due to lack of care
- Small cracks forming on the surface
- Scratches from sharp objects or pets
- Stretch marks from frequent use
Identifying Scratches And Cracks
Scratches often appear as thin lines on the leather. Cracks may look like splits or deep lines.
| Damage Type | Appearance | Cause |
| Scratch | Thin, light lines on surface | Sharp objects or pets |
| Crack | Deep lines or splits | Dryness or aging |
Spotting Stains And Discoloration
Stains can come from food, drinks, or dirt. Discoloration may happen from sun or chemical exposure.
- Look for dark or light spots that do not match the rest of the leather
- Check seams and crevices where dirt can collect
- Notice any areas with uneven color or faded patches
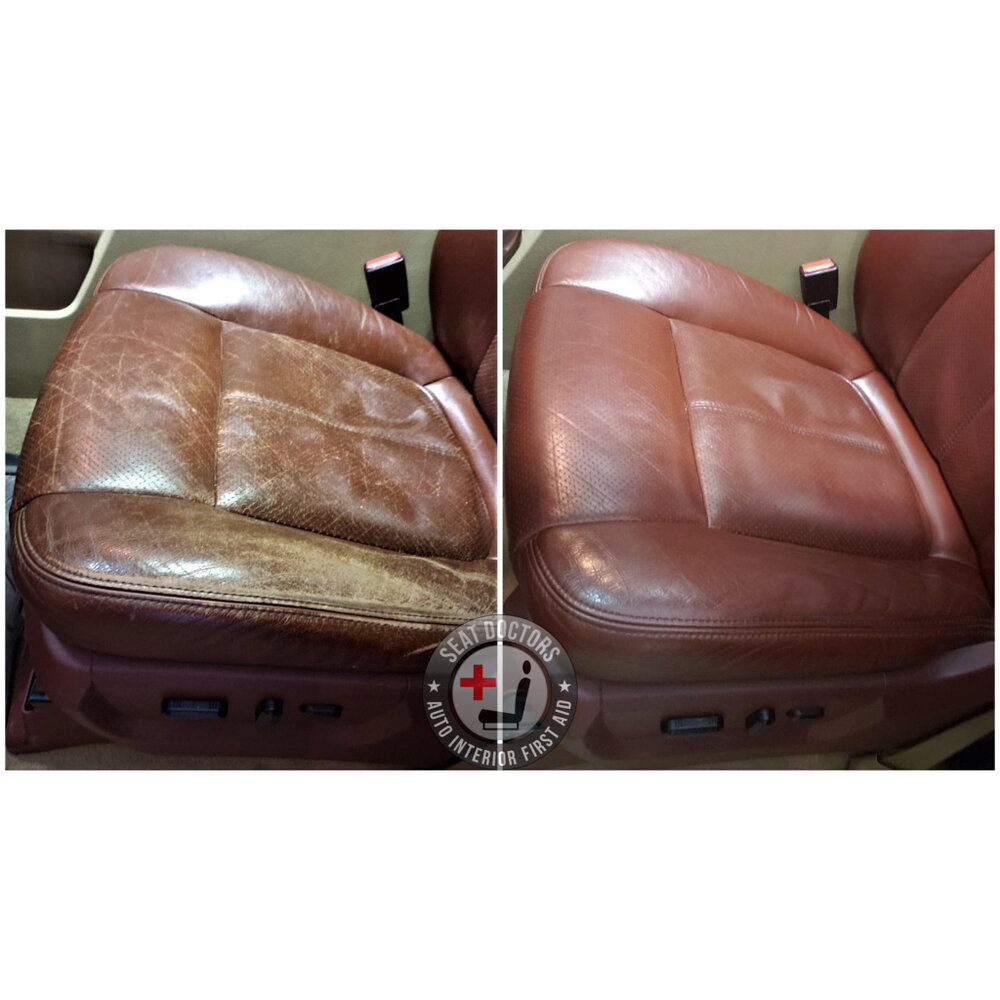
Credit: www.seatdoctors.com
Gathering Essential Tools
Repairing leather car interiors needs the right tools. These tools help clean, fix, and restore the leather surface.
Getting all necessary items before starting saves time and ensures good results.
Leather Cleaner And Conditioner
Leather cleaner removes dirt and oils without harming the material. Conditioner keeps leather soft and prevents cracks.
- Use a gentle leather cleaner made for car interiors.
- Apply conditioner after cleaning to keep leather moist.
- Choose products that match your leather type and color.
Repair Kits And Fillers
Repair kits include fillers and colorants to fix scratches, holes, and cracks.
| Tool | Purpose | Tip |
| Leather filler | Fills cracks and holes | Apply in thin layers |
| Colorant | Matches repaired area to leather color | Test on small spot first |
| Adhesive | Bonds torn leather edges | Use sparingly to avoid stiffness |
Application Tools And Brushes
Proper tools help apply cleaners, conditioners, and fillers evenly and smoothly.
- Soft cloths for cleaning and conditioning
- Sponges for even filler application
- Small brushes for detailed colorant work
- Sandpaper or smoothing pads for surface prep
Cleaning Leather Surfaces
Cleaning leather in your car keeps it looking fresh and lasts longer. Dirt and spills can damage the leather if not cleaned properly.
Use gentle methods to protect the leather’s natural oils and texture. This guide helps you clean your car’s leather step-by-step.
Choosing The Right Cleaner
Pick a cleaner made for leather to avoid damage. Avoid harsh chemicals or anything with bleach or alcohol.
- Use pH-balanced leather cleaners
- Test the cleaner on a small hidden spot first
- Avoid cleaners with dyes or perfumes
- Choose products labeled safe for automotive leather
Step-by-step Cleaning Process
Follow these steps to clean your leather surfaces carefully and effectively.
- Vacuum the leather to remove loose dirt and dust.
- Apply the cleaner to a soft cloth, not directly on leather.
- Gently wipe the leather in small sections using circular motions.
- Use a clean, damp cloth to remove excess cleaner.
- Dry the area with a soft towel before moving on.
Drying And Preparing Leather
Drying leather properly helps keep it soft and prevents cracks. Prepare it for conditioning or use.
| Task | Tip |
| Air Dry | Let leather dry naturally, avoid direct sunlight |
| Use Towels | Pat dry with a clean, soft towel gently |
| Check for Residue | Make sure no cleaner remains on the surface |
| Prepare for Conditioner | Apply conditioner only when leather is fully dry |

Credit: www.seatdoctors.com
Fixing Scratches And Tears
Leather car interiors can get damaged from daily use. Scratches and tears reduce the look and comfort. Fixing these issues keeps the car interior neat and durable.
This guide explains simple ways to repair minor scratches, patch small tears, and handle deep cracks in leather.
Repairing Minor Scratches
Minor scratches on leather can be fixed without special tools. Clean the area first to remove dirt. Use a soft cloth to gently rub the scratch. Leather conditioner helps soften the surface.
- Clean the scratched area with mild soap and water.
- Dry it completely with a soft cloth.
- Apply leather conditioner to soften the scratch.
- Buff gently with a microfiber cloth.
- Repeat if the scratch is still visible.
Patching Small Tears
Small tears need a patch to stop them from getting bigger. Use a leather repair kit for best results. The kit usually includes adhesive and a patch that matches your leather color.
| Material | Purpose |
| Leather patch | Covers the tear from underneath |
| Leather adhesive | Glues the patch to the leather |
| Sandpaper | Smooths rough edges around the tear |
| Colorant | Matches patch color to original leather |
Clean the area, sand the edges, apply the patch under the tear, and glue it in place. Let it dry before using the car seat or panel.
Handling Deep Cracks
Deep cracks need careful repair to restore strength. Use a filler designed for leather repair. It fills the crack and creates a smooth surface.
Follow these steps for deep crack repair:
- Clean the cracked area well.
- Apply the filler in thin layers.
- Let each layer dry before adding the next.
- Once filled, sand gently to smooth.
- Apply leather colorant to match the repaired area.
Restoring Leather Color
Restoring the color of your car’s leather interior can make it look new again. It’s important to match the dye and apply it correctly for a seamless finish.
Here are steps to ensure your leather interior regains its original charm.
Selecting Matching Dyes
Choosing the right dye is crucial for a natural look. It should match the original leather color as closely as possible.
Test a small area first. This ensures the dye looks right when dry.
- Use a color chart to find the best match
- Consider the leather type and age
- Buy quality dyes for lasting results
Applying Leather Dye Evenly
Applying the dye evenly is key to avoid patchy spots. Use a soft sponge or cloth for smooth application.
Work in small sections to ensure even coverage. This helps in achieving a consistent color.
- Start from one corner and move systematically
- Apply in circular motions for better blending
- Let each layer dry before adding more
Sealing And Protecting Color
After dyeing, seal the color to protect it from wear. This also helps in maintaining the leather’s texture.
Use a leather sealer. It prevents the color from fading and adds a layer of protection.
- Apply sealer with a clean cloth
- Allow it to dry completely
- Buff the leather gently for a polished look
Conditioning And Protecting Leather
Leather car interiors need care to stay soft and last longer. Conditioning helps keep the leather from drying out or cracking.
Protecting leather also stops stains and damage from sun or spills. Regular care makes your car look good inside.
Benefits Of Conditioning
Conditioning leather restores natural oils. It makes leather soft and flexible again. This prevents cracks and wear over time.
- Keeps leather soft and smooth
- Prevents drying and cracking
- Extends the life of leather seats
- Improves appearance and feel
- Protects from stains and spills
Choosing The Right Conditioner
Pick a conditioner made for car leather. Avoid products with harsh chemicals or dyes. Some conditioners add UV protection to guard from sunlight.
| Type | Best For | Notes |
| Oil-Based | Dry, cracked leather | Deeply nourishes, use sparingly |
| Water-Based | Regular maintenance | Lightweight, non-greasy |
| Silicone-Based | Shiny finish | Good for appearance, less conditioning |
| UV Protection | Sun-exposed leather | Prevents fading and cracking |
Regular Maintenance Tips
Clean leather before conditioning. Use a soft cloth and gentle cleaner. Do not use harsh soaps or brushes.
- Vacuum seats to remove dust and dirt
- Wipe with a damp cloth and mild cleaner
- Apply conditioner evenly with a soft cloth
- Let leather dry naturally, avoid direct sun
- Condition every 3 to 6 months for best results
Preventing Future Damage
Leather car interiors can last longer with proper care. Preventing damage helps keep your car looking new.
Simple steps protect leather from cracks, fading, and wear. These steps save money on repairs.
Avoiding Sun And Heat Exposure
Sunlight and heat dry out leather. This causes cracks and color fading. Park in the shade or use a sunshade to protect your car’s interior.
Keep windows slightly open if safe. This lets heat escape and lowers temperature inside the car.
Using Seat Covers And Protectors
Seat covers shield leather from spills, stains, and scratches. Choose covers that fit well and allow air flow.
- Use waterproof covers to stop liquid damage
- Pick breathable materials to reduce sweat build-up
- Remove covers regularly to clean underneath
Routine Cleaning Schedule
Cleaning leather stops dirt from wearing down the surface. Use gentle cleaners designed for leather.
| Cleaning Task | Frequency |
| Dust with soft cloth | Weekly |
| Wipe with leather cleaner | Monthly |
| Apply leather conditioner | Every 3 months |
When To Seek Professional Help
Repairing leather car interiors can be tricky. Sometimes, calling a professional is the best option. Knowing when to seek help can save time and money.
Look for signs that a repair is too complex. If unsure, a professional can provide expert advice and solutions.
Complex Repairs And Restoration
Some repairs need special tools and skills. Deep cracks, severe discoloration, or large tears may require a professional touch.
- Deep scratches that expose the underlying material
- Severe fading or discoloration
- Large rips or tears in the leather
Evaluating Repair Costs
Understanding the cost of repairs is important. Comparing prices helps in choosing the right service. Some repairs might be expensive, but worth it for long-term use.
| Repair Type | Approximate Cost |
| Minor Scratch Repair | $50 – $100 |
| Full Seat Restoration | $200 – $500 |
| Custom Color Matching | $100 – $250 |
Choosing A Reliable Service
Finding a trustworthy service is key. Look for experienced professionals with good reviews. Ask questions to make sure your car is in good hands.
Frequently Asked Questions
How Do I Repair Scratches On Leather Car Seats?
To repair scratches, clean the area first. Apply a leather conditioner or repair kit. Gently rub the product until the scratch fades. For deep scratches, use a leather filler and colorant.
Can I Fix Leather Tears Without Professional Help?
Yes, small tears can be fixed at home. Use a leather repair kit with adhesive and patches. Clean the area and follow the kit instructions carefully for best results.
What Products Are Best For Leather Car Interior Repair?
Use specialized leather repair kits, conditioners, and cleaners. Avoid harsh chemicals as they damage leather. Choose products suitable for your leather type for effective repair and maintenance.
How Often Should I Maintain Leather Car Interiors?
Maintain leather interiors every 3-6 months. Regular cleaning and conditioning prevent cracks and fading. Frequent care extends the leather’s life and keeps it looking new.
Conclusion
Repairing your car’s leather interior saves money and keeps your car looking great. Small tears and cracks don’t have to grow bigger problems. Regular care helps leather last longer and feel comfortable. You can fix minor damage with simple tools and products.
Clean leather gently to avoid damage. Taking action early protects your car’s value. A well-kept interior makes every drive more pleasant. Start small, stay consistent, and enjoy the results. Your car deserves this kind of care.


