
Looking to add a cool, modern touch to your car’s interior? Installing LED light strips inside your car is one of the easiest and most affordable ways to transform your driving experience.
Imagine cruising at night with vibrant colors glowing under your dashboard or along your doors, making every ride feel special. But how do you get started? In this guide, you’ll discover simple, step-by-step instructions to install LED light strips yourself—no expert skills needed.
By the end, you’ll know exactly how to brighten up your car and impress everyone who steps inside. Ready to light up your ride? Let’s dive in!
Credit: www.amazon.ca
Choosing The Right Led Strips
Installing LED light strips inside your car can improve its look and feel. Picking the right LED strips is important for the best results.
This guide will help you understand the key features to consider before buying LED strips for your vehicle.
Types Of Led Strips
There are different types of LED strips for cars. Some have small lights close together, while others have bigger lights spaced apart.
Choose between single-color strips or multicolor strips depending on your style and needs.
- Single-color LED strips: One color light, simple and bright
- RGB LED strips: Can change colors using a remote
- Addressable LED strips: Control each light separately
Brightness And Color Options
Brightness matters for visibility and mood. Look at the light’s brightness level before buying.
Color options let you pick the right tone for your car’s interior. Choose warm or cool colors based on your preference.
- Brightness is measured in lumens; higher means brighter
- Warm white creates a cozy feeling
- Cool white looks modern and clean
- RGB strips allow many color choices
Waterproof And Durability Features
Your car’s LED strips must handle moisture and heat. Waterproof strips last longer inside cars.
Check the strip’s durability to avoid damage from car vibrations and heat from the engine.
- IP65 rating means water-resistant
- IP67 or IP68 ratings mean fully waterproof
- Look for flexible materials that resist cracking
- Choose strips with strong adhesive for firm attachment
Tools And Materials Needed
Installing LED light strips inside your car is a simple way to add custom lighting. You need the right tools and materials to make the process smooth and safe.
Gather everything before you start. This helps avoid interruptions and ensures a clean installation.
Essential Tools
These tools help you install the LED strips correctly and safely.
- LED light strips with adhesive backing
- Wire cutters or scissors
- Electrical tape
- Plastic trim removal tools
- Multimeter for testing electrical connections
- Power source adapter (usually 12V car adapter)
Additional Accessories
These accessories improve the installation and help keep everything neat and secure.
| Accessory | Purpose |
| Heat shrink tubing | Protects and insulates wire connections |
| Zip ties | Keeps wires organized and fastened |
| Fuse holder | Protects electrical circuits from overload |
| Switch or remote control | Turns LED strips on and off easily |
| Alcohol wipes | Cleans surfaces before sticking LED strips |
Preparing Your Car Interior
Installing LED light strips inside your car starts with good preparation. You need clean, dry surfaces and a clear plan for where to place the strips. This helps the strips stick well and look great.
Take your time to prepare the interior. This step will make sure your LED lights last longer and work better inside your car.
Cleaning And Drying Surfaces
Clean the areas where you want to install the LED strips. Dirt, dust, and grease can stop the strips from sticking well. Use a soft cloth and a mild cleaner to wipe these spots.
- Remove any dust with a dry cloth.
- Use rubbing alcohol on a cloth to clean sticky or oily areas.
- Let the surface dry completely before placing the strips.
- Avoid touching the cleaned surface afterward to keep it free of oils.
Planning Strip Placement
Decide where you want to place your LED light strips. Think about which areas will look best and provide the right lighting. Consider power source access and wire routing.
| Car Area | Lighting Effect | Installation Tips |
| Under Dashboard | Soft glow for footwell | Check for vents or controls to avoid |
| Under Seats | Subtle floor lighting | Secure wires to avoid interference |
| Door Panels | Accent lighting | Clean well and avoid moving parts |
| Roof Edges | Ambient overhead light | Test strip length before fixing |
Wiring And Power Source
Installing LED light strips inside your car needs proper wiring and power. Choosing the right power source is key for safety and performance.
Wiring must be neat and secure to avoid shorts or damage. This guide explains how to wire and power LED strips.
Choosing The Power Source
Select a power source that matches your LED strip’s voltage and current needs. Most car LED strips use 12 volts.
You can connect LED strips to the car battery or the fuse box. Each has pros and cons based on ease and safety.
- Car battery gives direct power but needs a fuse
- Fuse box connections are safer and cleaner
- Consider power draw to avoid draining the battery
Connecting To Car Battery Or Fuse Box
Connecting to the car battery requires a fuse near the battery. This protects the wiring and LED strips from short circuits.
Connecting to the fuse box lets you tap into circuits that turn off with the ignition. This avoids battery drain when the car is off.
- Use a fuse tap to connect safely to the fuse box
- Connect the positive wire to the fuse or battery positive terminal
- Attach the negative wire to a metal ground point on the car frame
- Ensure all connections are tight and insulated
Using A Switch Or Remote Control
Add a switch to control the LED strips manually. A switch lets you turn lights on or off anytime you want.
Some LED strips come with a remote control. This allows easy changes in light modes or brightness without reaching the switch.
- Install the switch in a reachable place on the dashboard
- Wire the switch on the positive line of the LED strip
- Remote controls use wireless receivers connected to the power line
- Test the switch or remote before finalizing the setup
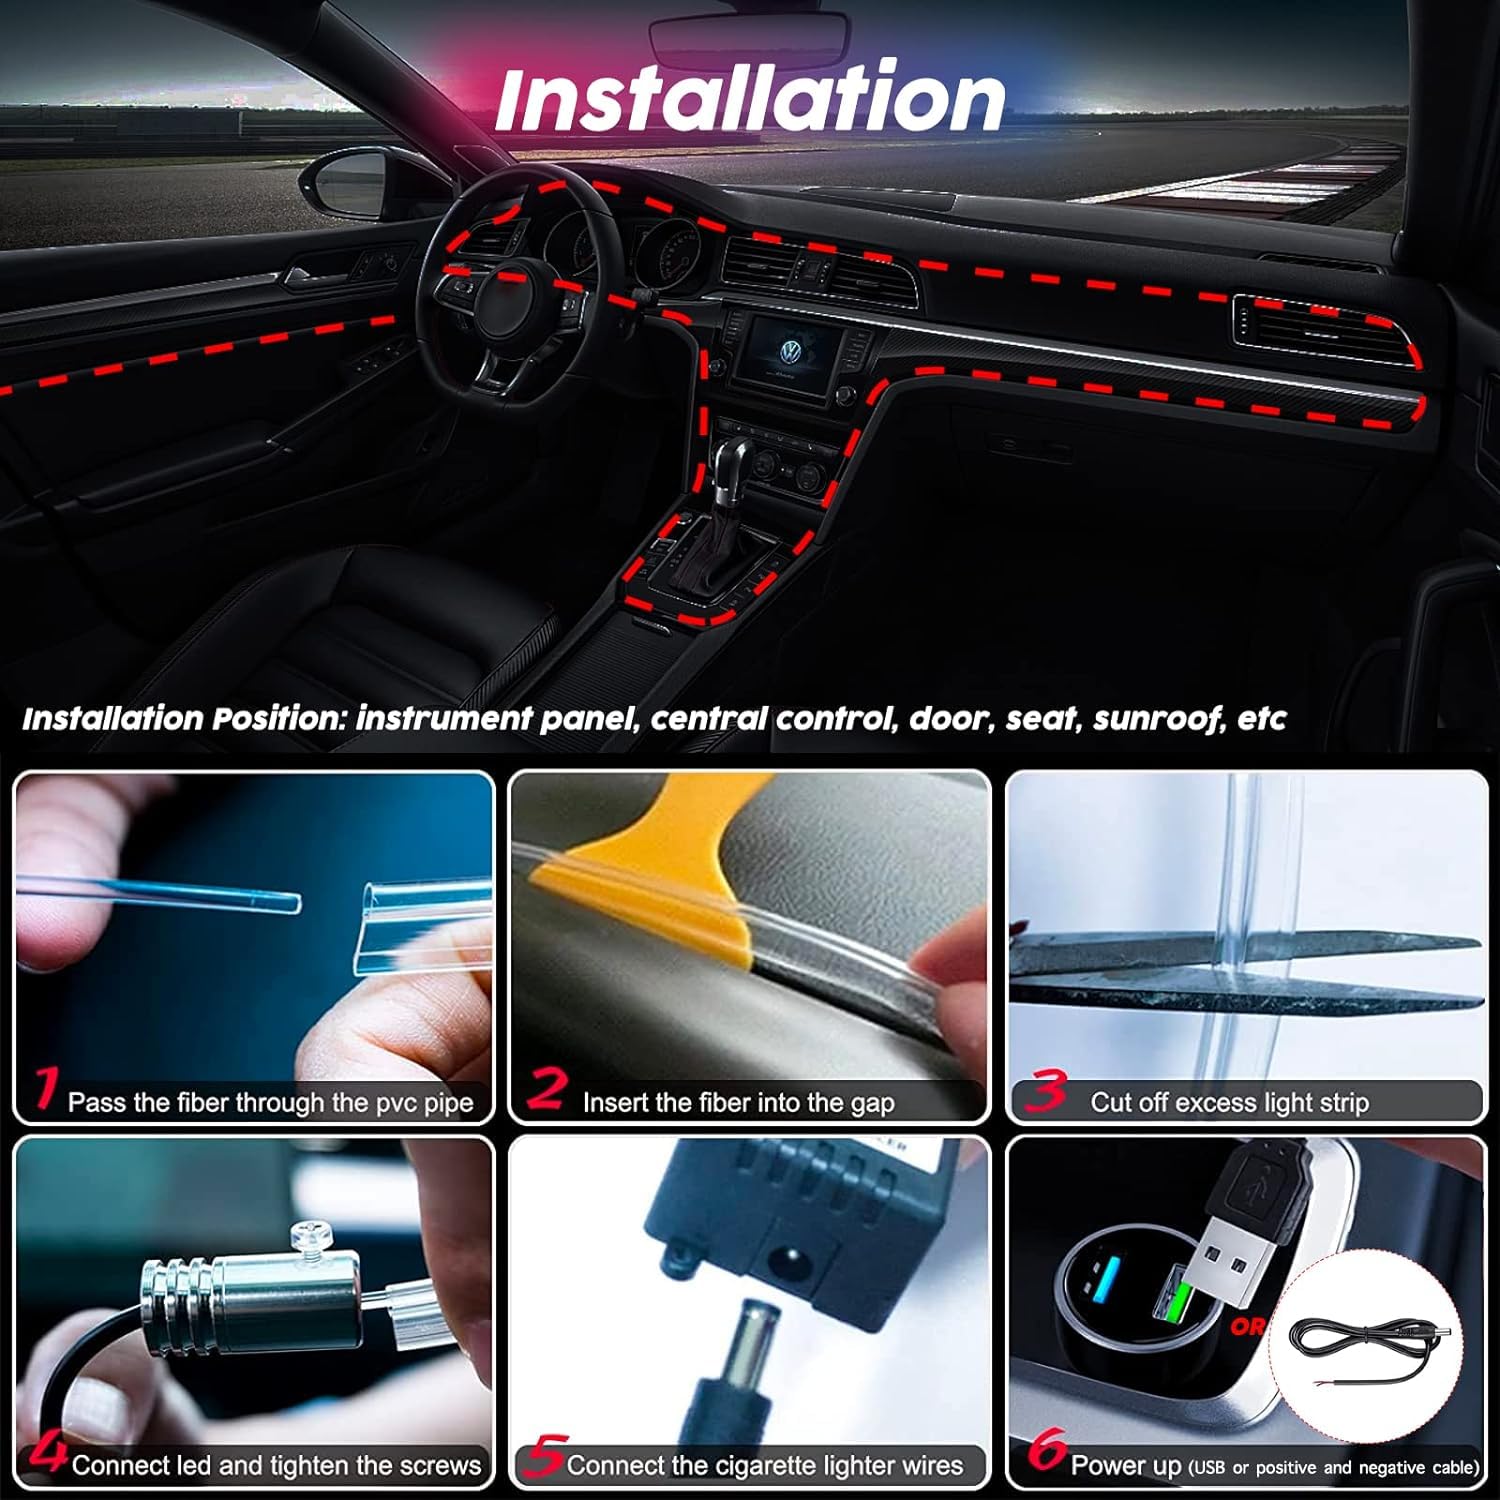
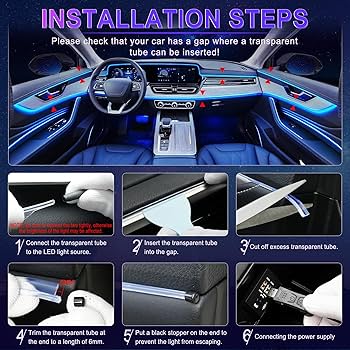
Installing The Led Strips
Installing LED light strips inside your car can improve its look and ambiance. This guide helps you install strips safely and neatly.
Follow these steps carefully to cut, secure, and manage the wiring of your LED strips inside the car.
Cutting And Adjusting Strip Length
Measure the area where you want to place the LED strips. Cut the strip only at marked points to avoid damage.
Use sharp scissors or a cutter to make clean cuts. Avoid cutting too short to keep the strip working properly.
- Locate the cut marks on the strip (usually a line with a scissor icon)
- Cut only on these marks to avoid breaking circuits
- Measure twice before cutting
Securing Strips Inside The Car
Clean the surface where you want to stick the LED strips. Use alcohol wipes to remove dust and grease.
Peel off the adhesive backing and press the strip firmly. Hold it for a few seconds to ensure it sticks well.
- Choose flat surfaces like door panels or under the dashboard
- Avoid areas with direct heat or sharp edges
- Use extra clips or tape if adhesive is weak
Managing Excess Wiring
Keep extra wires neat to avoid tangles and damage. Use zip ties or cable clips to bundle loose wires.
Hide wires under panels or carpets to keep them out of sight. Make sure wires do not block pedals or controls.
- Bundle excess wire length with zip ties
- Secure wires along existing wiring paths
- Check that wires are not pinched or stretched
Testing And Troubleshooting
Installing LED light strips inside your car can be exciting. But it’s important to ensure they work correctly. Testing and troubleshooting help avoid future problems.
This guide will help you test and fix common issues. Follow these steps to keep your lights functioning well.
Powering On And Checking Lights
First, connect the LED lights to a power source. Make sure the car battery or adapter is suitable.
Once connected, switch on the lights. Check if all sections light up evenly. Look for any flickering or dim areas.
- Ensure all connections are tight and secure.
- Verify the power source is active and compatible.
- Check if the remote control works, if applicable.
Fixing Common Installation Issues
If some lights do not work, inspect the installation. Loose wires or incorrect connections are common problems.
Double-check the wiring. Make sure each wire is in the right place. Replace any damaged wires.
- Reattach any loose connectors.
- Test each section individually for faults.
- Use a multimeter to check for electrical issues.
Safety Tips And Maintenance
Installing LED light strips inside your car can be fun and stylish. Follow these safety tips and maintenance guidelines to ensure a smooth installation and longer lifespan.
Avoiding Electrical Hazards
Electrical safety is important when installing LED lights. Avoiding mistakes can prevent damage and ensure safety.
- Turn off your car before installation.
- Use the correct voltage to match your LED strips.
- Secure all wires to avoid exposure and short circuits.
- Connect the LED strips to a proper fuse for protection.
Cleaning And Longevity Tips
Regular cleaning helps maintain your LED lights. It also ensures they last longer, providing better performance.
- Use a soft cloth to wipe the LED strips clean.
- Avoid using water directly on the lights.
- Check and tighten connections regularly.
- Replace any damaged strips immediately.

Credit: www.amazon.com.au
Credit: www.amazon.ca
Frequently Asked Questions
How Do I Prepare My Car For Led Strip Installation?
Clean the surface where you’ll attach the LED strips. Remove dust and grease for better adhesion. Ensure the area is dry before installation.
What Tools Are Needed To Install Led Light Strips?
You need LED strips, a power source, adhesive tape, wire connectors, and a fuse tap. A screwdriver and wire stripper help with connections.
Can Led Light Strips Be Connected To Car’s Battery?
Yes, connect LED strips to the car battery using a fuse tap for safety. This ensures a stable power supply and protects your vehicle’s electrical system.
How To Hide Led Strip Wires Inside A Car?
Tuck wires under trim panels or carpet edges. Use zip ties to keep wires neat and avoid interference with pedals or controls.
Conclusion
Installing LED light strips inside your car is simple and fun. Choose the right strip and find a good spot. Connect the wires carefully to avoid problems. Test the lights before fixing them in place. Brighten your car’s interior and enjoy the new look.
This small change makes your car feel fresh and cool. Take your time, follow the steps, and drive with style.


