
Your car’s headlights are more than just lights—they’re your safety on the road. When your headlight lenses get cloudy or yellowed, your visibility drops, making night driving risky.
But don’t worry, cleaning them is easier than you think. You’ll discover simple, effective ways to restore your headlights so you can see clearly and drive confidently. Keep reading to learn how to make your headlights shine like new again.
Causes Of Headlight Lens Cloudiness
Car headlight lenses can become cloudy over time. This makes headlights less bright and reduces driving safety.
Several factors cause this cloudiness. Understanding these helps keep headlights clear and working well.
Effects Of Uv Exposure
Sunlight contains ultraviolet (UV) rays that harm headlight lenses. UV rays break down the plastic surface, making it dull.
This damage causes the lens to look yellow or cloudy. It reduces how much light comes through the lens.
Impact Of Dirt And Grime
Dirt, dust, and grime build up on headlight lenses over time. This layer blocks light and makes the lens look foggy.
Driving on muddy or dusty roads adds more grime. Rain can mix with dirt and create stubborn stains on the lens.
- Dust from roads
- Mud splashes
- Insect residue
- Rain mixed with dirt
Role Of Oxidation
Oxidation happens when oxygen reacts with the plastic lens. This causes the lens surface to break down and turn cloudy.
Oxidation makes the plastic weak and rough. It also reduces how clear the lens is and lowers light output.
Credit: www.youtube.com
Tools And Materials Needed
Cleaning car headlight lenses is easy with the right tools. Using proper materials helps remove dirt and fog.
Gathering the right supplies before starting saves time and improves results.
Cleaning Solutions
Cleaning solutions help break down grime and dirt on headlight lenses. Use gentle products to avoid damage.
- Mild soap mixed with water
- Commercial headlight cleaner
- White vinegar diluted with water
- Baking soda paste (baking soda and water)
Polishing Compounds
Polishing compounds remove scratches and restore clarity. Choose one made for plastic surfaces.
| Compound Type | Purpose | Notes |
| Plastic polish | Removes fine scratches | Use with soft cloth |
| Rubbing compound | Removes heavy oxidation | Use carefully |
| Car wax | Protects after polishing | Apply thin layer |
Protective Gear
Wear protective gear to keep yourself safe while cleaning and polishing.
- Rubber gloves to protect skin from chemicals
- Safety glasses to shield eyes from splashes
- Mask to avoid inhaling dust or fumes
- Old clothes to avoid stains
Preparation Before Cleaning
Cleaning car headlight lenses needs some preparation. Getting ready helps the cleaning go smooth and safe.
Taking time before you start also protects your car and yourself from damage.
Gathering Supplies
Collect all the materials you need before cleaning. This keeps you from stopping in the middle.
- Soft cloths or microfiber towels
- Mild soap or car cleaner
- Water spray bottle
- Masking tape to protect edges
- Sandpaper or polishing kit (if needed)
- Gloves to protect your hands
Protecting Car Surfaces
Cover areas near the headlights to avoid scratches. Paint and trim can get damaged by cleaning tools or chemicals.
Use tape or cloth to shield these parts before you start cleaning.
- Apply masking tape around the headlights
- Cover the bumper and hood edges if needed
- Remove any loose dirt from nearby surfaces
Ensuring Safety
Safety is important before cleaning your headlights. Work in a well-lit, ventilated place.
Wear gloves to protect your skin from chemicals and dirt. Avoid cleaning when the car is hot or in direct sun.
- Choose a shaded area to clean
- Wear protective gloves
- Keep water and cleaning liquids away from electrical parts
- Turn off the car and lights before cleaning
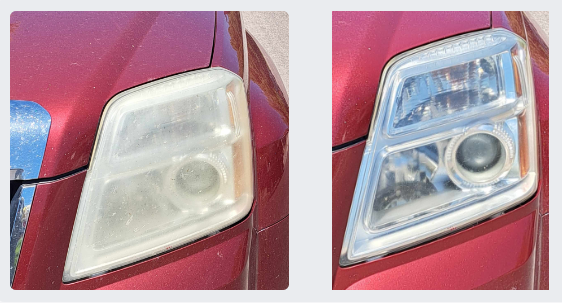
Step-by-step Cleaning Process
Cleaning car headlight lenses can make your car look newer. Clear headlights help you see better at night.
Follow these simple steps to clean your car’s headlight lenses. You’ll need some basic materials and a little time.
Initial Washing
Start by washing the headlights with soap and water. This removes dirt and grime.
Use a soft cloth or sponge to avoid scratching the lens. Rinse with clean water and dry completely.
Sanding Techniques
Use sandpaper to remove the cloudy layer from the lens. Start with a coarse grit and move to finer grits.
Sand in circular motions, keeping the surface wet. This helps to prevent scratches.
- Start with 400 grit sandpaper
- Move to 600 grit sandpaper
- Finish with 2000 grit sandpaper
Applying Polishing Compound
Apply a small amount of polishing compound to the lens. Use a clean cloth to spread it evenly.
Rub the compound in circles to polish the surface. This will make the lens clearer.
Buffing For Shine
Buff the headlight lens with a soft cloth or a buffer. This removes any leftover compound and adds shine.
Work in small sections to get an even finish. Your headlights should now look clean and bright.
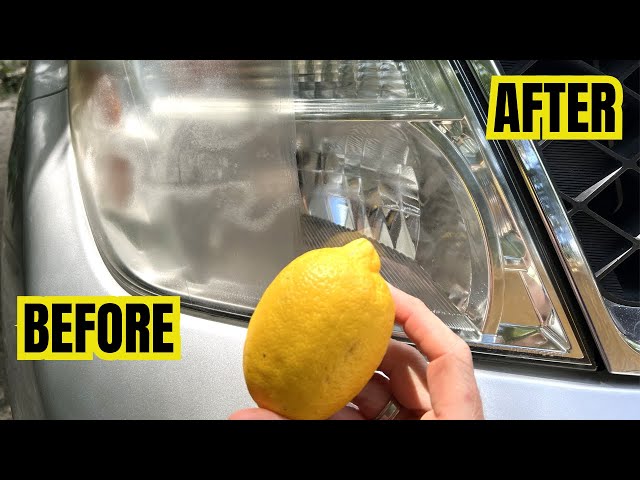
Using Household Items For Cleaning
Car headlights can get cloudy and dirty over time. Cleaning them at home saves money. You can use common household items for this task.
These methods are simple and use things you already have. They help clear the lens and improve light brightness.
Toothpaste Method
Toothpaste works as a mild abrasive to clean headlights. Use regular white toothpaste, not gel types. It removes dirt and minor scratches.
- Apply a small amount of toothpaste to a soft cloth.
- Rub the toothpaste on the headlight in circular motions for 5 minutes.
- Rinse the headlight with clean water.
- Dry with a soft towel.
Baking Soda Paste
Baking soda is another gentle cleaner. Mix it with water to make a paste. This paste helps scrub away grime and buildup.
| Ingredient | Amount | Purpose |
|---|---|---|
| Baking Soda | 2 tablespoons | Cleaning agent |
| Water | 1 tablespoon | Mixing paste |
Apply the paste with a cloth and rub in circles. Rinse and dry the headlight afterward.
Vinegar And Baking Soda Mix
This mix creates a fizzy cleaner that breaks down dirt. Use white vinegar and baking soda for best results.
- Sprinkle baking soda on the headlight surface.
- Spray or pour vinegar slowly over the baking soda.
- Let the fizzing action work for a few minutes.
- Scrub gently with a soft brush or cloth.
- Rinse with water and dry.

Credit: www.chemicalguys.com
Preventing Future Cloudiness
Cleaning your car’s headlight lenses is just the start. Protecting them helps keep them clear longer.
Cloudiness comes from sunlight, dirt, and moisture. Using simple methods can stop it from coming back.
Applying Uv Sealant
After cleaning, a UV sealant covers the headlight lenses. This layer blocks harmful sun rays.
The sealant also forms a shield against dust and water. It helps keep the plastic smooth and clear.
- Choose a sealant made for headlights
- Apply evenly on dry lenses
- Let it dry completely before driving
- Reapply every few months for best protection
Regular Maintenance Tips
Cleaning your headlights often stops dirt buildup. It also prevents damage from small scratches.
| Maintenance Task | Frequency | Reason |
| Wash headlights with soap and water | Weekly | Removes dirt and grime |
| Inspect lenses for cracks | Monthly | Find damage early |
| Apply wax or sealant | Every 3-4 months | Protects surface from UV rays |
| Park in shade when possible | Daily | Reduces sun exposure |
Garage Storage Benefits
Storing your car in a garage protects headlights from sun and weather. It slows down clouding.
Benefits of garage storage:
- Blocks UV rays that cause yellowing
- Prevents dirt and debris buildup
- Protects from rain and snow damage
- Reduces temperature changes that stress plastics
When To Replace Headlight Lenses
Car headlight lenses can become cloudy over time. This affects visibility and safety. Knowing when to replace them is important.
Regular checks on your headlight lenses can help you decide. Cloudy or damaged lenses should be replaced to ensure clear driving visibility.
Signs Of Irreparable Damage
Some damage cannot be fixed by cleaning. Look for these signs to know if replacement is necessary.
- Deep scratches or cracks
- Permanent yellowing that won’t clear up
- Water inside the headlight
- Broken or missing pieces of the lens
Cost Considerations
Replacing headlight lenses can vary in cost. It’s important to understand what you might need to spend.
- New headlight lenses can cost between $100 and $300 per pair
- DIY kits are cheaper but may not last as long
- Professional installation adds to total cost
Professional Replacement Options
Sometimes a professional is the best choice for replacing lenses. They have the right tools and experience.
Look for local auto shops or dealerships that offer this service. Ensure they use high-quality parts for the best results.
Credit: www.wd40.com
Frequently Asked Questions
How Often Should I Clean Car Headlight Lenses?
Clean your car headlights every 3 to 6 months. Frequent cleaning maintains brightness and improves nighttime visibility. Regular care prevents yellowing and fogging, keeping headlights clear and safe.
What Household Items Clean Headlights Effectively?
Use toothpaste or baking soda mixed with water to clean headlights. These mild abrasives remove dirt and haze safely. Avoid harsh chemicals that can damage the lens surface.
Can Diy Cleaning Restore Foggy Headlights?
Yes, DIY cleaning can restore foggy headlights. Use gentle abrasives and polish to remove oxidation. If severe, professional restoration may be needed for best results.
Is It Safe To Use Sandpaper On Headlights?
Yes, but only with fine-grit sandpaper. Sand lightly to avoid scratching lenses. Always wet sand and finish with polish for a smooth, clear surface.
Conclusion
Cleaning car headlight lenses improves your safety on the road. Clear lights help you see better at night and in bad weather. Regular cleaning stops dirt and fog from building up. Use simple household items for a quick, easy fix.
Keep your headlights bright to avoid accidents and fines. Try these steps often to keep your car looking good. A little care goes a long way. Your headlights will shine like new again. Simple, safe, and smart.


