
Are you tired of struggling to park your car safely or worrying about unseen obstacles behind you? Installing a car reverse camera can change all that.
Imagine backing up with confidence, knowing you have a clear view of what’s behind your vehicle. In this guide, you’ll discover simple, step-by-step instructions to install a reverse camera yourself—even if you’re not a tech expert. Keep reading to unlock a smarter, safer way to park every time you get behind the wheel.

Credit: www.youtube.com
Choosing The Right Camera
Selecting the right car reverse camera improves safety and ease of parking.
This guide helps you pick a camera that fits your needs and budget.
Types Of Reverse Cameras
There are different types of reverse cameras to choose from.
- Wired cameras connect directly to the car’s monitor.
- Wireless cameras use radio signals to send video to the screen.
- Flush mount cameras fit inside the bumper for a sleek look.
- Surface mount cameras attach to the outside of the bumper.
- License plate cameras install around the license plate area.
Features To Look For
Choose a camera with features that suit your driving style and environment.
| Feature | Description |
| Resolution | Higher resolution shows clearer images. |
| Night Vision | Helps see clearly in low light or dark conditions. |
| Wide Angle Lens | Gives a broader view behind the car. |
| Waterproof | Protects the camera from rain and splashes. |
| Guidelines | On-screen lines help judge distance while reversing. |
Budget Considerations
Price varies by type and features. Plan your budget before buying.
- Basic wired cameras are usually less expensive.
- Wireless models cost more due to added convenience.
- Cameras with night vision and wide angles often have higher prices.
- Installation costs may add to your budget if you hire a professional.
- Consider long-term value, not just upfront cost.

Credit: www.youtube.com
Tools And Materials Needed
Installing a car reverse camera requires specific tools and materials. Having the right items makes the process easier and safer.
This guide lists the essential tools and extra supplies you may need for a smooth installation.
Essential Tools
You need some basic tools to install the reverse camera properly. These tools help you connect wires and fix the camera in place.
- Screwdrivers (Phillips and flathead) for opening panels
- Wire strippers to prepare electrical wires
- Electrical tape to protect wire connections
- Drill with drill bits for mounting the camera
- Multimeter to check electrical connections
- Panel removal tools to avoid damaging interior parts
- Measuring tape for accurate positioning
Additional Supplies
Besides tools, some supplies help make the installation neat and durable. These items improve safety and camera performance.
- Reverse camera kit including camera and monitor
- Extension wires if the cable is too short
- Zip ties to secure loose wires
- Connectors or wire nuts for joining wires
- Silicone sealant to waterproof the camera mount
- Fuse tap for safe electrical connection
- Cleaning cloth to prepare the mounting surface
Preparing Your Vehicle
Installing a car reverse camera needs careful preparation. You must get your vehicle ready before starting the installation.
Proper preparation helps you avoid damage and makes the process safe and smooth.
Selecting The Mounting Location
Choose a spot on the rear of your car for the camera. The best place usually is near the license plate.
The location must give a clear view behind the car without blocking lights or plates.
- Pick a flat surface to attach the camera
- Avoid places with too much dirt or water exposure
- Check that the camera lens faces straight backward
- Make sure the camera does not block tail lights or sensors
Disconnecting The Battery
Before working on your car’s electrical system, disconnect the battery. This prevents short circuits and shocks.
Remove the negative cable first, then the positive cable. Keep tools and metal away from the battery terminals.
- Use a wrench to loosen the battery cable clamps
- Remove the negative (-) cable first
- Then remove the positive (+) cable
- Keep the cables away from the battery terminals
Installing The Camera
Installing a car reverse camera improves safety while parking. This guide focuses on how to mount the camera and route the wires properly.
Follow these steps to ensure the camera is secure and the wiring is neat and functional.
Mounting The Camera
Choose a spot at the rear of your car with a clear view. Most cameras fit near the license plate or bumper.
- Clean the mounting area to remove dust and dirt.
- Use the included screws or adhesive to fix the camera.
- Make sure the camera lens points straight back for the best view.
- Test the camera angle before fully tightening the screws.
Routing The Wires
After mounting, route the wires from the camera to the car’s monitor or head unit. Hide wires to avoid damage.
| Wire Section | Routing Tip |
| Camera to trunk | Run wires along the trunk lining |
| Trunk to cabin | Use existing wire holes or grommets |
| Inside cabin | Hide wires under carpet or panels |
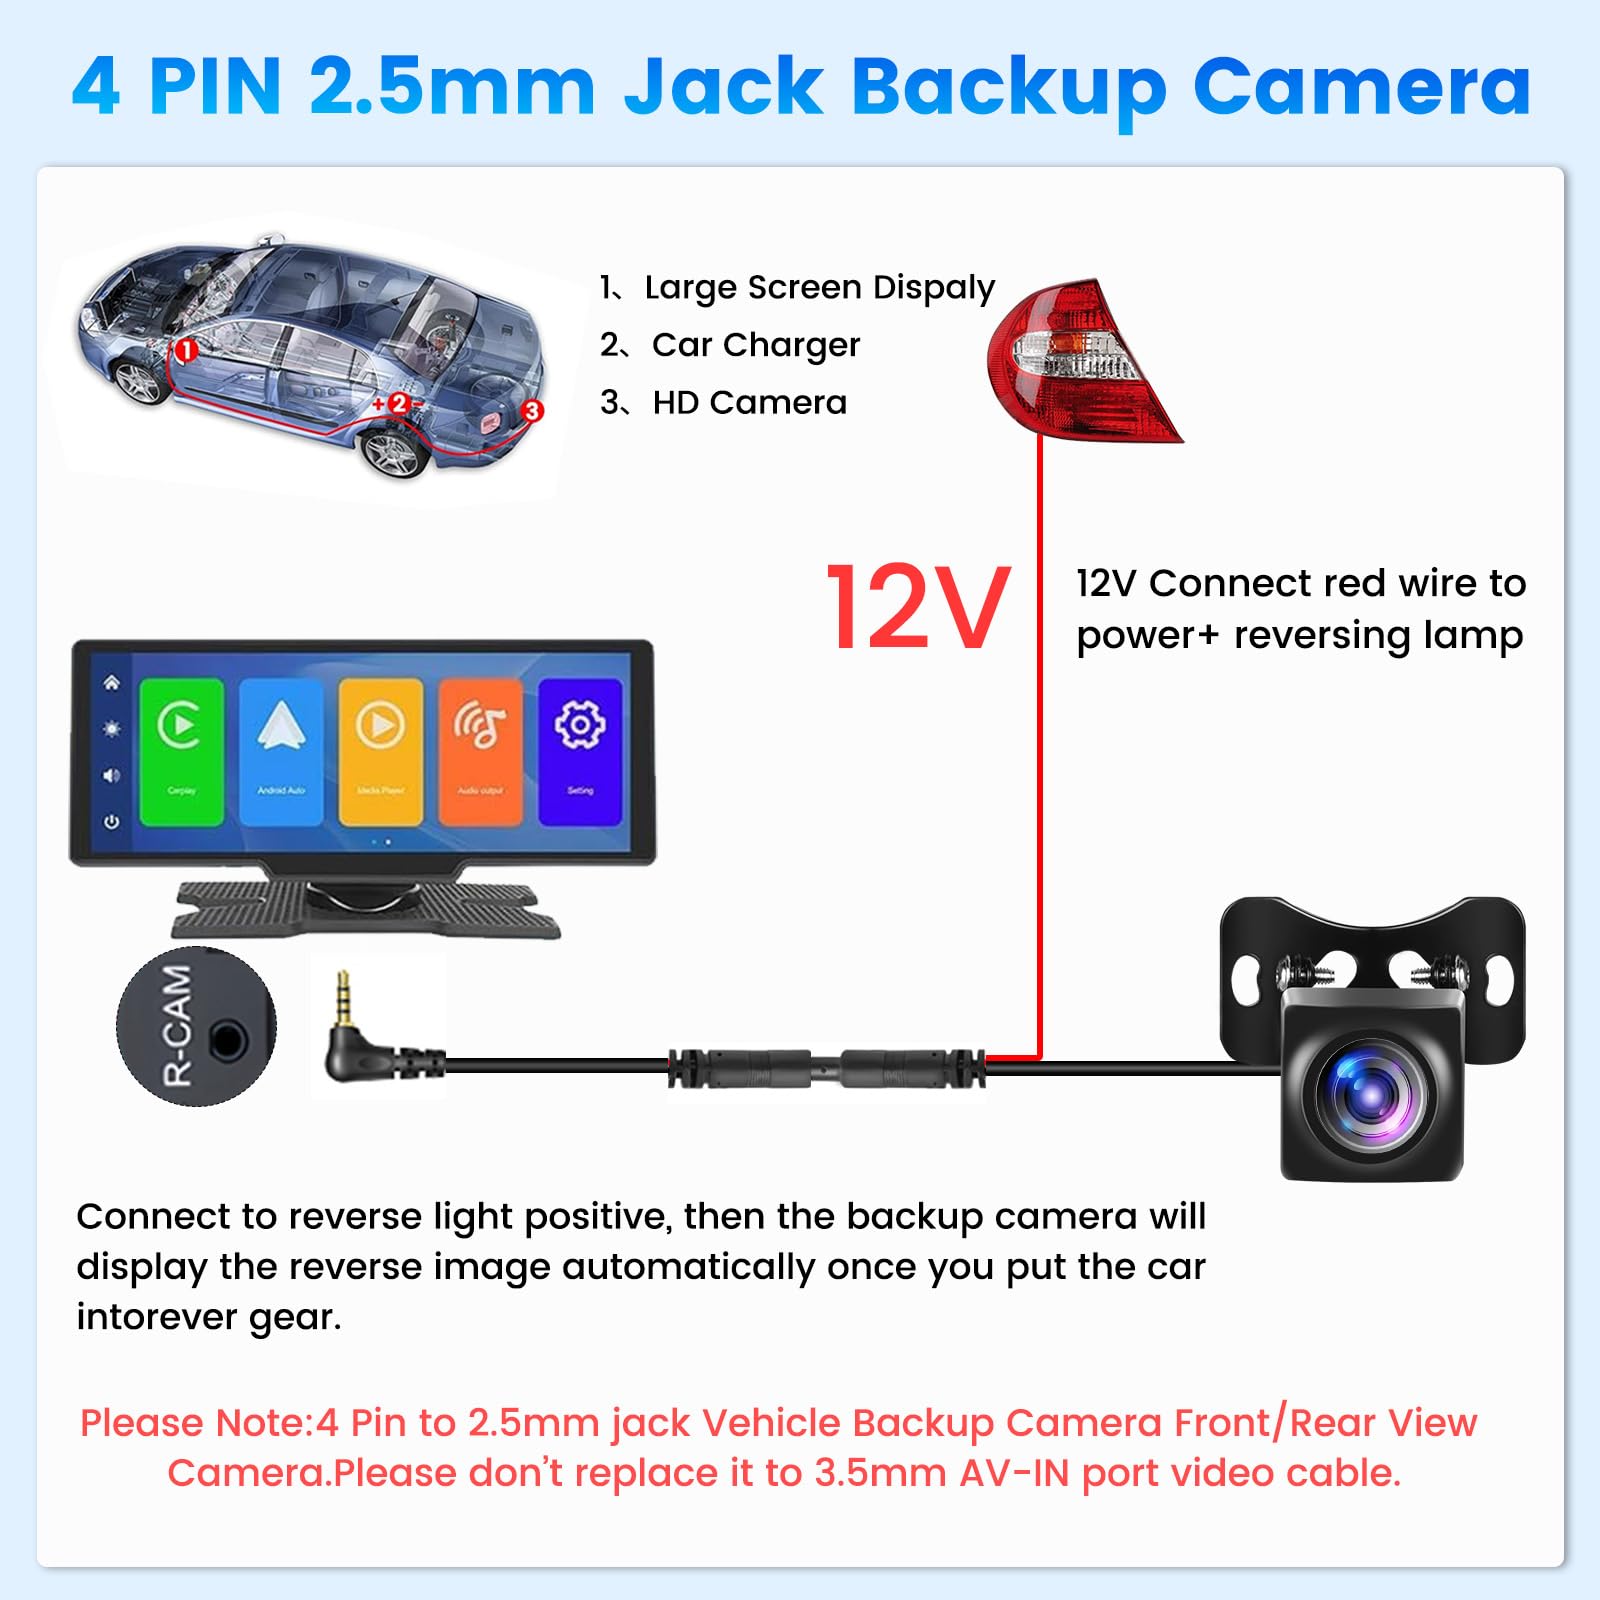
| Power connection | Connect to reverse light for automatic activation |
Connecting To The Display
Connecting the reverse camera to your car display is a key step. The image from the camera shows on the monitor when you reverse.
You need to wire the camera signal and power the display correctly. This ensures a clear picture and proper function.
Wiring To The Monitor
Connect the video cable from the camera to the monitor input. This is usually a yellow RCA connector or a dedicated cable.
- Locate the video input on your car display.
- Plug the camera’s video output into this input.
- Secure the cable to avoid loose connections.
- Test the video signal by turning on the reverse gear.
Power Connections
The camera and monitor both need power to work. Connect them to the car’s electrical system safely.
| Component | Power Source | Wire Color | Notes |
| Reverse Camera | Reverse light positive (+12V) | Red | Activates camera when reversing |
| Camera Ground | Car chassis or battery negative (-) | Black | Ensures proper grounding |
| Monitor Power | Accessory power (switched +12V) | Red or as specified | Turns on with ignition |
| Monitor Ground | Car chassis or battery negative (-) | Black | Complete the circuit |
Testing The System
After installing your car reverse camera, it’s important to test it. Testing ensures everything works properly and helps avoid accidents.
Follow these steps to check the camera angle and display clarity. This will help you use the camera effectively while reversing.
Checking Camera Angle
Make sure the camera angle shows the ground and any obstacles. Adjust it so you can see the area behind your car clearly.
Park your car in an open space to adjust the camera. Use the screen inside your car to view the camera feed.
- Ensure the camera is not tilted too high or too low.
- Check for any blind spots that might be present.
- Adjust until you have a full view behind the car.
Ensuring Clear Display
Check the display inside your car for clarity. A clear display helps you see everything behind your car.
If the display is blurry, check the camera lens. Clean the lens with a soft cloth if needed.
| Problem | Solution |
| Blurry display | Clean the camera lens |
| Dark or dim screen | Adjust the screen brightness |
Troubleshooting Common Issues
Installing a car reverse camera can greatly improve parking safety. But sometimes, problems occur after installation.
Understanding common issues helps you fix them quickly. Here are some typical problems and solutions.
No Power To Camera
If the camera has no power, it will not function. Check the wiring first.
- Ensure the power cable is connected properly.
- Check the fuse associated with the camera’s circuit.
- Inspect for any visible damage to wires.
Distorted Image
A distorted image can make the camera useless. It’s often caused by incorrect settings or wiring issues.
Ensure the camera lens is clean and free of obstructions. Check the video cable for tight connections.
Signal Interference
Signal interference can cause a flickering image or no image at all. This is often due to nearby electronic devices.
| Cause | Solution |
| Wireless device interference | Move the device away from the camera |
| Poor ground connection | Check and secure ground wires |
| Weak signal range | Install a signal booster |
Credit: www.amazon.ca
Safety Tips During Installation
Installing a car reverse camera needs care to keep yourself safe. Follow safety tips to avoid accidents or damage.
Focus on handling electrical parts and working safely near your vehicle. This helps the job go smoothly and safely.
Handling Electrical Components
Turn off the car engine before touching any wires. This stops electric shocks and short circuits.
Use insulated tools to protect your hands. Check wires for damage before connecting them.
- Disconnect the car battery first
- Wear gloves to avoid shocks
- Do not force wires into connectors
- Keep wires away from sharp edges
- Test connections gently before final assembly
Working Safely Around Vehicles
Make sure the car is parked on a flat surface. Use wheel chocks to stop the car from moving.
Keep tools organized to avoid tripping. Work in a well-lit area to see clearly.
- Park the car with the parking brake on
- Use wheel chocks under the tires
- Clear the workspace of hazards
- Wear safety glasses to protect your eyes
- Avoid loose clothing that can get caught
Frequently Asked Questions
How Do I Install A Car Reverse Camera Myself?
To install a car reverse camera, first select a suitable camera model. Mount it near the license plate. Connect the camera to the car’s power and display monitor. Test the camera to ensure it works properly before finalizing the setup.
What Tools Are Needed For Reverse Camera Installation?
Common tools include a drill, screwdrivers, wire strippers, electrical tape, and zip ties. A multimeter helps check electrical connections. Having these tools ready makes the installation process smoother and safer.
Can I Install A Reverse Camera On Any Car Model?
Yes, most reverse cameras are compatible with various car models. Check the camera’s specifications for vehicle compatibility. Some cameras require specific adapters for certain vehicles, so verify before purchasing.
How Do I Connect The Reverse Camera To My Car Display?
Connect the camera’s video cable to the display’s video input. Power the camera using the reverse light circuit. When you shift to reverse, the camera will activate automatically on the display.
Conclusion
Installing a car reverse camera improves safety and parking ease. Follow each step carefully to avoid mistakes. Test the camera after installation to ensure clear view. Use common tools and basic skills for a smooth process. A working camera helps you see blind spots behind your car.
Drive with more confidence and avoid accidents easily. Keep your camera clean for the best image quality. Small effort brings big benefits to your driving experience.


