
Have you ever wished you had eyes all around your car? Installing a 360 camera in your car can give you that superpower.
Imagine parking with ease, avoiding blind spots, and feeling safer on every drive. This simple upgrade can change how you see the road and protect your vehicle from unexpected bumps. You’ll learn exactly how to install a 360 camera in your car, step by step.
Ready to make your driving experience smarter and safer? Keep reading, and let’s get started.
Choosing The Right 360 Camera
Installing a 360 camera in your car can improve safety and convenience. It gives a full view around your vehicle.
Choosing the right camera is important. Consider features, compatibility, and trusted brands before buying.
Key Features To Look For
Look for a camera with good image quality and wide viewing angles. Night vision helps in low light.
- High resolution for clear images
- Wide field of view, at least 180 degrees
- Waterproof and dustproof design
- Easy connection to your car’s display
- Night vision capability
- Durable and weather-resistant materials
Compatibility With Your Car
Check if the 360 camera fits your car model. Some cameras need specific wiring or software.
| Car Feature | Compatibility Tip |
| Display Type | Match camera output to screen (analog or digital) |
| Power Supply | Confirm voltage and connection type |
| Mounting Space | Measure spots for camera installation |
| Software Support | Check if the camera app works with your car system |
Top Brands And Models
Some brands offer reliable 360 cameras with good reviews. Choose models that suit your budget and needs.
- Brand A: Known for clear video and easy setup
- Brand B: Offers waterproof cameras with wide angles
- Brand C: Compatible with many car types and screens
- Brand D: Provides cameras with night vision and durable cases

Credit: www.youtube.com
Preparing For Installation
Installing a 360 camera in your car helps you see all around the vehicle. Proper preparation makes the installation easier and safer.
This guide covers the main steps to get ready before you start. You will learn about tools, camera placement, and wiring basics.
Gathering Necessary Tools
Before installation, collect all the tools you need. Having tools ready saves time and prevents delays.
- Screwdrivers (flat and Phillips)
- Wire strippers and cutters
- Electrical tape
- Multimeter for checking wires
- Drill with bits for mounting holes
- Plastic trim removal tools
- Cable ties to secure wires
- Safety gloves and glasses
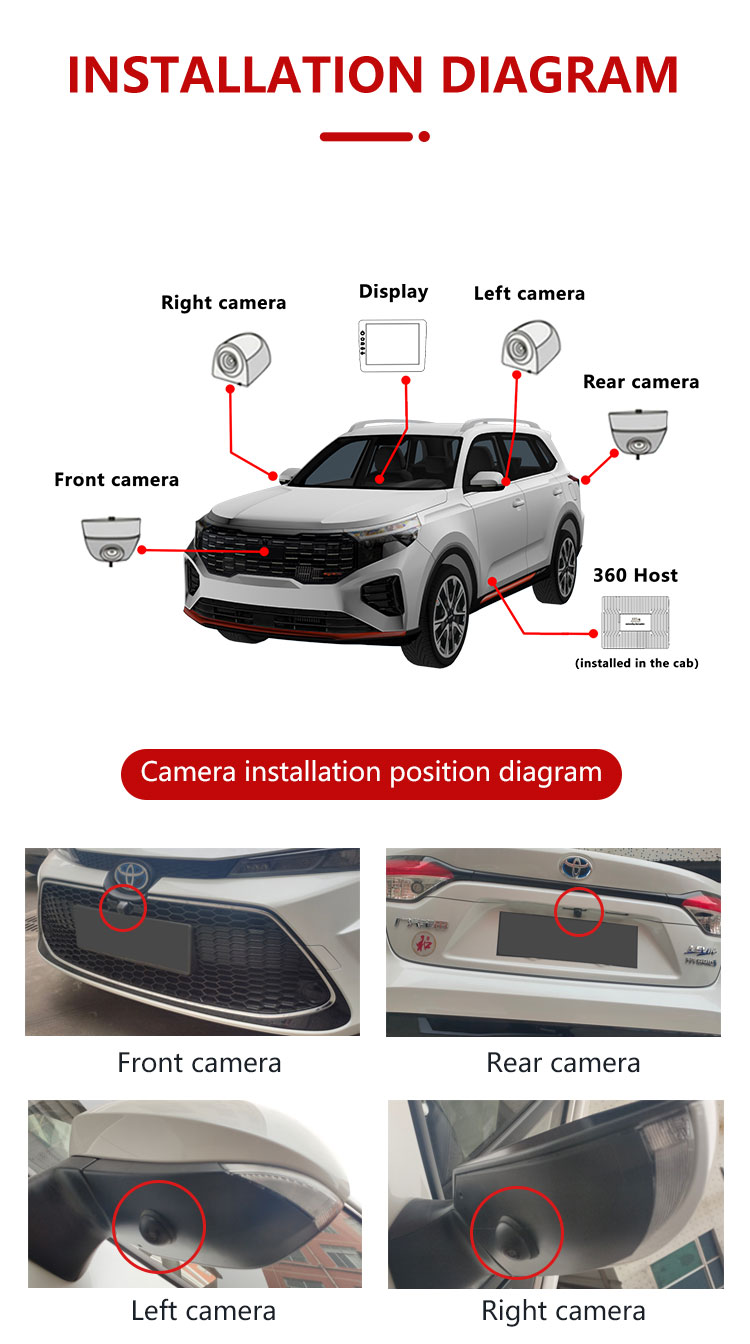
Selecting Camera Mounting Locations
Choose places where cameras can see clearly around the car. The spots must be stable and safe from damage.
Common locations include near the front grille, side mirrors, and rear bumper. Avoid areas that block the driver’s view or sensors.
- Front camera: under or near the front grille
- Side cameras: under side mirrors or door edges
- Rear camera: above or below the rear license plate
- Check for a clear line of sight without dirt or obstructions
- Ensure cameras are mounted firmly and level
Understanding Your Car’s Wiring
Learn about your car’s wiring to connect the camera system properly. This helps avoid damage and electrical problems.
Check the car manual for wire colors and fuse locations. Identify power, ground, and signal wires before starting.
- Locate a 12V power source that turns on with the ignition
- Find a good ground point on the car chassis
- Identify wires for reverse lights if the camera needs this signal
- Use a multimeter to test wire voltage and continuity
- Be careful not to cut or damage existing wires
Step-by-step Installation Process
Installing a 360 camera in your car can improve your driving safety. This guide will help you install it correctly. Follow the steps carefully to get the best results.
Each part of the installation needs attention. You will mount cameras, run wiring, connect power and display, and test the system.
Mounting The Cameras
Place the cameras in the correct spots around your car. Usually, you need one in front, one in the back, and one on each side mirror.
- Clean the mounting areas well
- Use the mounting brackets or adhesive pads provided
- Make sure cameras have a clear view without obstructions
- Secure cameras tightly to avoid movement
Running The Wiring
Route the wires carefully from each camera to the car’s central unit. Avoid sharp edges and moving parts that can damage wires.
- Remove interior panels to hide wires
- Use cable ties to keep wires neat and secure
- Run wires along existing wiring paths if possible
- Leave enough slack to connect without tension
Connecting To Power And Display
Connect the wiring harness to your car’s power source and the display screen. This allows the camera system to turn on and show images.
| Connection | Description |
| Power Wire | Connect to fuse box or battery with correct voltage |
| Ground Wire | Attach to a metal part of the car body |
| Display Cable | Connect to the car’s infotainment screen or a separate monitor |
| Camera Wires | Plug into the main control unit |
Testing The System
After installation, test the 360 camera system to ensure all cameras work and the display shows clear images.
Follow this checklist for testing:
- Turn on the car and power up the camera system
- Check each camera feed on the display
- Look for any wiring issues or loose connections
- Adjust camera angles if needed
- Drive slowly to verify the system works in real conditions
Calibrating The 360 Camera System
Installing a 360 camera in your car is only the first step. Proper calibration is needed for clear, accurate images. Calibration makes sure each camera works with others.
Correct calibration helps drivers see a full view around the car. This improves safety and driving confidence.
Aligning Camera Angles
Each camera must point in the right direction. Aligning the angles ensures the cameras cover all sides without gaps.
Use the car’s calibration tool or app to adjust angles. Check the car’s surroundings from inside to confirm coverage.
- Adjust front camera to cover the road ahead clearly
- Set side cameras to capture the car’s edges
- Position rear camera for a full view behind the car
Adjusting Image Settings
Image quality depends on brightness, contrast, and sharpness. Adjust these settings to get clear pictures day and night.
Use the camera system menu to change image settings. Test the view in different light conditions to find the best balance.
- Increase brightness for dark areas
- Adjust contrast to separate objects clearly
- Sharpen images to reduce blur
Verifying Seamless View
Check how the images from all cameras join together. The view should look smooth without breaks or overlaps.
Drive slowly in a safe area and watch the 360 view screen. Make small angle or setting adjustments if the images do not line up.
- Look for gaps between camera views
- Fix any image overlaps or distortions
- Test different parking and driving angles
Troubleshooting Common Issues
Installing a 360 camera in your car can improve safety and visibility. Sometimes, the camera may face issues that need fixing. This guide helps you solve common problems quickly.
Read through each issue and try the tips. Fixing the problem yourself can save time and money.
Camera Not Powering On
If the camera does not turn on, check the power connection first. The camera needs a steady power supply to work properly.
Make sure all wires are connected firmly. Sometimes, a loose wire or blown fuse stops the camera from powering up.
- Check the fuse box and replace any blown fuses.
- Inspect wiring for damage or loose connectors.
- Test the power source with a multimeter.
- Ensure the camera’s power switch is turned on.
Image Distortion Problems
Blurry or warped images can happen if the lens is dirty or damaged. Dirt and water drops reduce camera clarity.
Check the lens for scratches or moisture. Clean the lens with a soft cloth and lens cleaner to improve the picture.
- Wipe the lens gently with a microfiber cloth.
- Use lens cleaning solution if needed.
- Check if the camera angle is set correctly.
- Replace the lens if it has deep scratches.
Connection And Signal Issues
Weak or lost signal can cause the camera feed to freeze or cut out. This often happens with wireless connections.
Check the signal strength and device pairing. Make sure the camera and display are within range and connected properly.
- Move the camera and receiver closer to each other.
- Remove any metal objects blocking the signal.
- Restart both the camera and the display unit.
- Update the firmware if updates are available.
Credit: www.wemaer.com
Maintaining Your 360 Camera
Keeping your 360 camera in top shape ensures great performance. Regular maintenance helps it last longer and work better.
Follow these easy tips to maintain your 360 camera, so it is always ready to capture every moment.
Regular Cleaning Tips
Clean your 360 camera regularly to remove dust and fingerprints. This keeps your images clear and sharp.
- Use a microfiber cloth to wipe the lens gently.
- Avoid using harsh chemicals that might damage the lens.
- Check and clean the camera mount to ensure stability.
Software Updates
Update your camera’s software to improve features and fix bugs. This keeps your device running smoothly.
Protecting Against Weather Damage
Weather can affect your 360 camera. Protect it from rain, snow, and extreme temperatures to avoid damage.
| Weather Condition | Protection Tip |
| Rain | Use a waterproof cover |
| Snow | Keep the camera warm |
| Heat | Store in a cool place |

Credit: www.youtube.com
Frequently Asked Questions
What Tools Are Needed To Install A 360 Camera In Car?
You need screwdrivers, wire strippers, electrical tape, and mounting brackets. A multimeter helps check connections. Some kits include all necessary tools for easy installation.
How Long Does It Take To Install A 360 Camera?
Installation usually takes 1 to 3 hours. Time depends on car model and your experience. Professional installation may be quicker and ensures proper setup.
Can I Install A 360 Camera Myself?
Yes, if you have basic car wiring knowledge. Follow the manual carefully and use proper tools. Otherwise, seek professional help to avoid damage or errors.
Will A 360 Camera Affect My Car Warranty?
Installing aftermarket cameras may void warranty if damage occurs. Check your warranty terms before installation. Professional installation can reduce risks of warranty issues.
Conclusion
Installing a 360 camera in your car improves safety and parking ease. You get a clear view of all sides around your vehicle. This reduces blind spots and helps avoid accidents. The process is straightforward and suits most car models.
Choose a camera that fits your needs and budget. Regular use can boost your confidence while driving. Take time to install it carefully for best results. Enjoy safer and smarter driving every day with this simple upgrade.


